Posted on

D Rings: My (new) Album of Choice

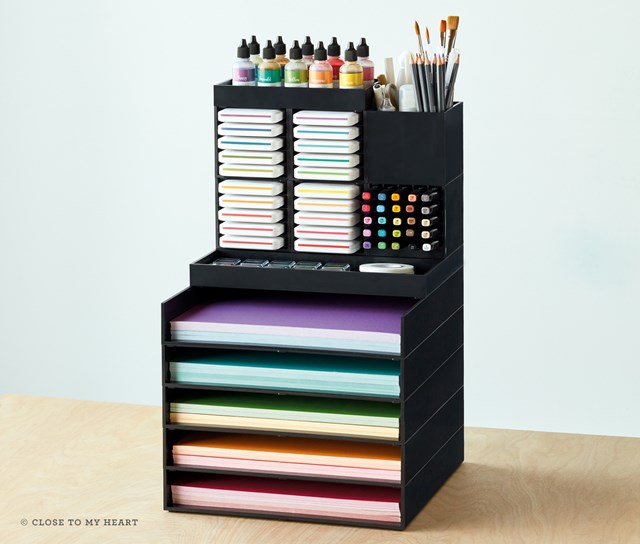
Friday, I posted information about the new #scrap20 Challenge. In the background section, I talked about how I am making a concerted effort to set aside more time for my personal projects. To make this happen, I have been working hard the last couple months on my craft room organization. 

One challenge I’ve had in trying to get organized is what to do with completed — or nearly completed (see previous post) — layouts until the whole album is done. This was an issue because I was using post-bound albums require assembly to add pages. One solution is to guess at how many pages and go ahead and assemble the album with memory protectors. This allowed me to drop the layouts in as I finished them. But if I guessed the number of pages wrong or want to rearrange the pages, I’d have to unscrew the hinges to make the changes.

My work around was to have boxes in my craft closet labeled with each year. As I completed pages, I just added them to the appropriate box. But this never was really a solution because  almost every year is incomplete and these beautiful pages were hidden away out of site. I decided it was time to come out of the closet!

The Real Solution: Change Albums

The surprising answer to my problem came by changing the type of album. By switching to using post albums, I don’t have to wait for all the pages to be complete to put together my book.  Because of this, many of my pages were not in albums. Instead I can go ahead and put them in the album as I go. Since these books have the same high quality faux leather look, they serve as both work-in-progress and display albums!

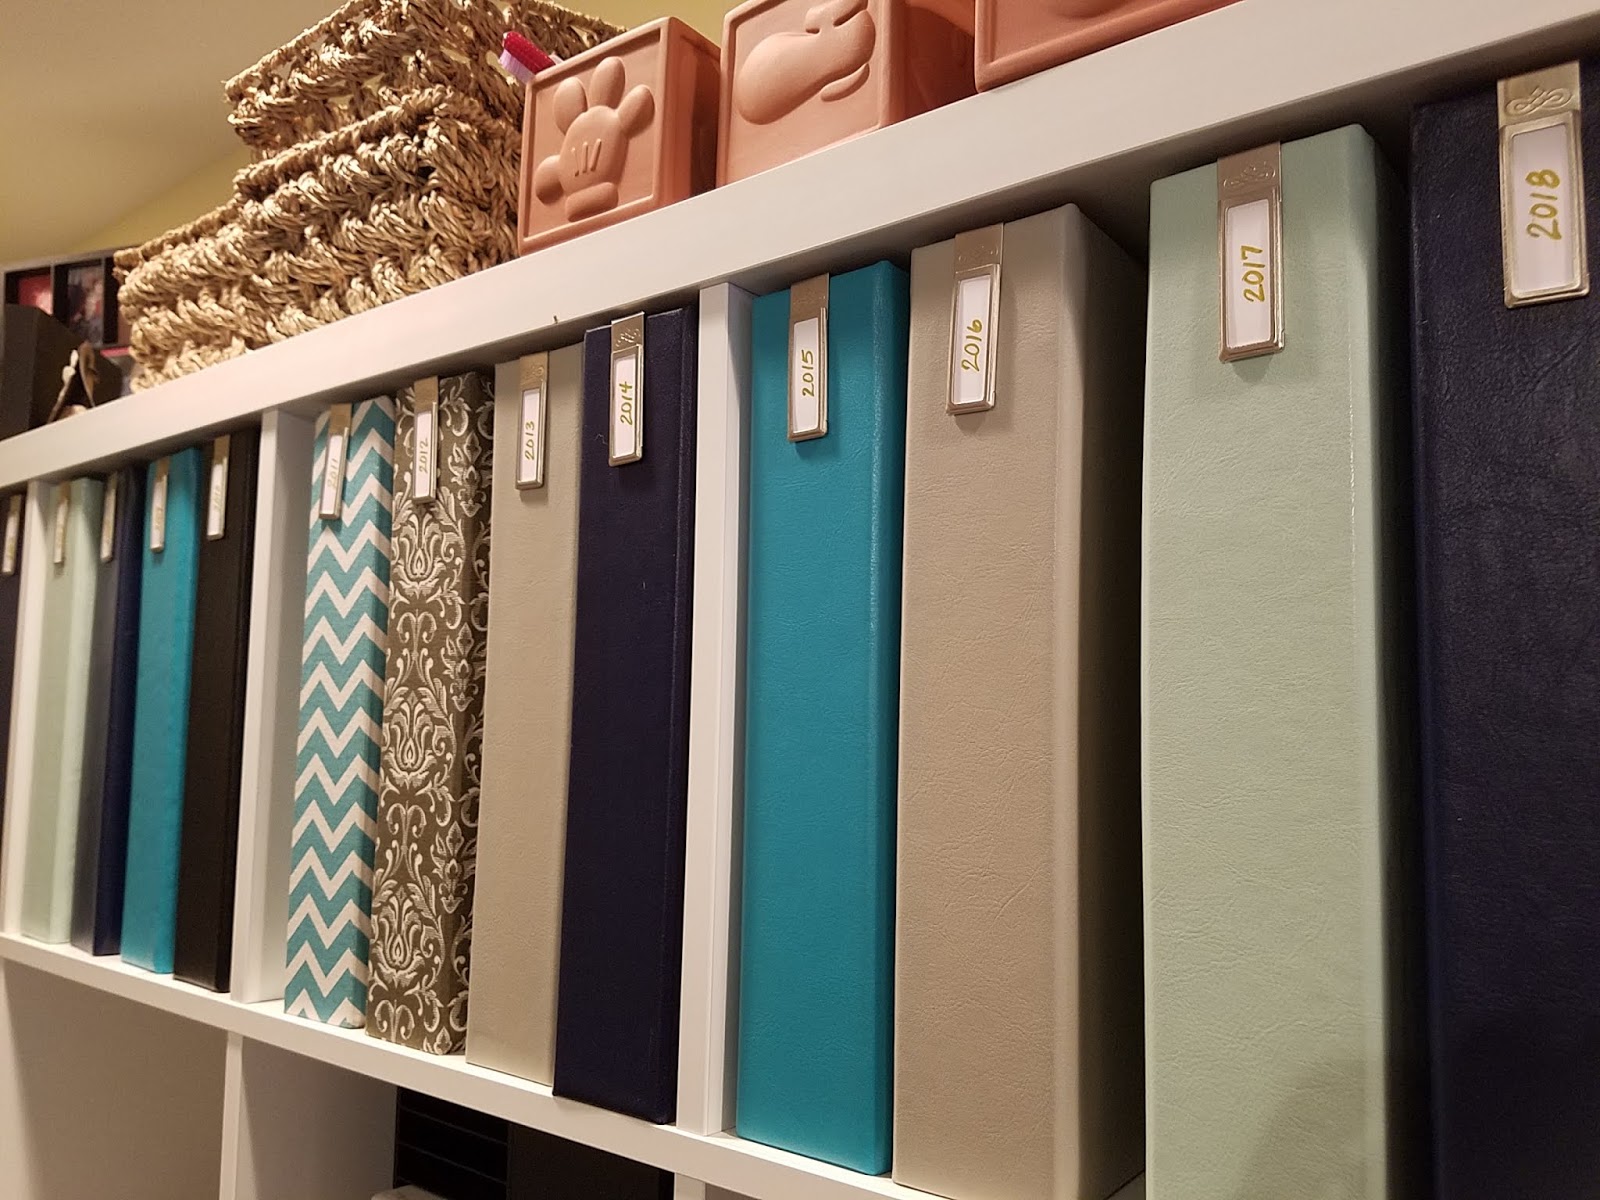
For a couple years, I’ve been thinking about making switching to D-ring albums, but resisted because of the investment I had made in the current albums. A few months ago, I finally did it and I am so happy with the result! I labeled one D-ring album for each year starting in 2000, the year my daughter was born. Then I removed pages from my current completed post albums and slipped the pages from the boxes in the closet into memory protectors and added them to the corresponding year’s album. Then I opened each annual box in the closet and added those pages to additional books.

These albums now reside on the top shelf of my Ikea Kallax shelves in my office. Some of the books are nearly full and others don’t have a single page, but they are uniform and beautiful. Looking at them makes me so happy!

Five Reasons I love this System

  1. As soon as I finish a layout, it immediately goes in an album and is ready for viewing!
  2. I can rearrange or insert pages anytime I want. Finding new pictures is no longer an issue. I just scrap them and insert them into the book.
  3. Each year’s album is the same size and shape, so it gets the same shelf space regardless of how many pages I’ve finished.
  4. Anytime I want to revisit the memories in the books, I simply pull it off the shelf. None of the pages are hiding in boxes! Everyone in the family has enjoyed browsing them a few times already.
  5. They look so pretty on my craft room shelf!

Survey Time

The decision of what type of album to use is certainly a matter of opinion. I was definitely in camp post bound until recently, but I’m happy with my switch. What is your preference: post bound or ring albums? I’d love to hear your reasons so please share in the comments to this post.

Posted on

Free Stampaganza Evernote Download

This weekend, I created an Evernote notebook with the stamp sets that are exclusively available this weekend through the Stampaganza special (buy 2 get 1free). Similar to my previous stamp notebooks, there is a “note” for each of the Solos alphabet and number stamps.

<<Download Stampaganza Notebook>>

What’s in a note?

When you open a stamp’s note, you’ll find several pieces of information including:

A – Item number and name

B – Tags of keywords (shapes, design elements, themes, holidays, Cricut or Thin Cut images, …)

C – Link to the stamp image

D – Text that appears on the stamp set

The data listed above and circled in red help you explore a stamp set without having to locate the physical stamp set. You can look at the tags to get an idea of the theme and features of the stamp set, read the text to know what sentiments are expressed and click on the link to see the actual set. This is all on your screen without having to actually locate the physical stamp set.

However, when you are ready to use the stamp set, the item number is the key. Since I started using Evernote to organize my stamps, all of my actual physical stamp sets are stored alpha-numerically by Item number. So once I choose a stamp set, for example the Solos “b” set above, I simply go to my boxes which are indexed by item number to B1226, conveniently between B1225 and B1227.

Organizing physical stamp sets

The magic of this organization system is that you can now store your stamps simply in alpha-numeric order by item number. One common method to organize stamps is to sorted by “theme”. You could have sections in your stamp boxes for Christmas, Easter, Birthday and other special days. Then there could be separate files for animals, outdoor, floral, etc.

But what happened when a Christmas stamp has cute animals dressed for winter like this retired favorite?

One option would be to put it in the Christmas box. Even though those animals may have been really cute on a birthday card or a spring layout, we’d not see them outside of the holiday season. Instead, we could have stored it with the animals, but then we’d miss it when planning our Christmas projects. See the problem?

When you use Evernote, all of your stamp sets are in the same organizational system. So the stamp set above will not be lost when you are looking for a Christmas stamp set, or an animal set, or a Cricut set, or a gift stamp. Basically, you can sort a stamp set in “all of the above”!

Two ways to locate the perfect stamp

Whether you have already picked out a stamp to use and just need to locate it in your boxes or you want to choose a stamp for a specific project, it’s easy to locate the perfect stamp using the stamp Evernote notebook.

Tags

When creating the notebook, I’ve “tagged” a number of things about the stamp set. First, there are tags for the images in the stamps: flower, dog, circle, tree, girl,… Any themes or holidays represented by the set, these are tagged. Coordination with a Cricut cartridge or thin cut is tagged. There are also tags for the Idea Book or Special (“2018 Stampaganza”) that introduced the stamp set.

To see all of the stamp sets with a specific tag, click on the tag symbol (circled in yellow) to pull up a list of all the tags. You can scroll down to select the one you want or type it in the search box.

Search

You can also do a thorough search of the stamps in the notebook by typing anything you are looking for in the search box (green oval). Evernote will search the tags and text of all of the notes.

For example, a search for “friend” found two stamp sets in the Stampaganza notebook with friend in the text: Solos “b” and Solos “f”.

Ready to give Evernote a try? Click the link below to open this free notebook.

<<Download Stampaganza Notebook>>

Helpful notes to get started with Evernote:

  1. To use the notebook you’ll need to create a Evernote account if you don’t already have one. You can get one free at evernote.com
  2. You may find it helpful to add your own tags. For example, I tag the stamps that I “own” in my personal notebook so I can always narrow my search down. I have another tag for “wishlist” of those I’m thinking of ordering. I’m sure you can think of other tags that will be helpful. In order to add tags, you’ll need to make a personal copy of the notebook. You can learn to do this on my Evernote resources page.
  3. Want to have more of your stamps into Evernote? I can help you with that. I create a new notebook for each of our Idea Books and also have a stamp archive going back to 2015. Information about ordering these is also on my resources page.
Posted on

Be a Hostess in April and get a free workshop!

Do you like bonuses? Then you should host a party in April!!! We’ve got bonuses galore this month.  Don’t have time? Neither do I — let’s do something virtual! We can do an online party or a catalog party or a combination of the two. 

Let’s make it happen! Email me to choose your date>>

APRIL IS HOSTESS BONUS MONTH!!!

In addition to the regular hostess rewards (***see below***), you also have the opportunity to earn the following:

1) Only in April, when your party hits $350 in sales, you get to choose a bonus Cut Above Kit! You can choose a 6 page scrapbooking kit or a card and tag bundle!

2) Use your Hostess Rewards to purchase one or more of our hostess-only stamp sets! See them all on pages 6 – 8 of the Seasonal Expressions Idea Book.

3) In addition, you can maximize your half off items by choosing a special hostess bundle. Learn more>>

4) Qualifying parties unlock additional offers like this Cricut bundle. Learn more>>

***Remember all of the above bonuses are in addition to our already generous Hostess Rewards program which includes both free and discounted products.

Are you ready? Email me to choose your date>>

Posted on

Cyber Monday is Here: Organizers up to 40% off.

Today, there is a one-day flash sale on my Close To My Heart websiteto celebrate Cyber Monday! This sale gives you an opportunity to get a 30% discount on individual Workspace Wonder items and 40% discount on select bundles of Workspace Wonder items!

Workspace Wonder is our unique storage solution for crafting supplies and tools. Choose components made to store ink pads, markers, paintbrushes, paper and more. Order just the pieces you need then stack them to create a custom system that works just for you!

As your needs change, you can rearrange or add more parts. Watch this video to show you how you can transform your crafting space and organize your supplies.

The sale started at 1 am and run through 1 am Tuesday morning (CST). Some of the items are only available in low quantities, so be sure to place your order early!

Start shopping now>>>

As your needs change, you can rearrange or add more parts. Watch this introductory video to show you how you can transform your crafting space and organize your supplies.

This second video shows the new carousel base & top which give you even more options for storing your markers and ink pads.

To see which items will be discounted during this sale, visit the Promotions Page of my website.

Start shopping now>>>

Before you submit your order, be sure to check out the other specials including the Fundamental products and bundles that are 30 – 40% off regular price and the current Stamp of the Month.

Start shopping now>>>

Posted on 4 Comments

Create your own Everyday Life binder tabs using Artbooking

I love our Everyday Life albums! These not-so-mini Mini Albums would make Goldilocks happy: not to small and not too big.

Currently, you have two choices: Black & White Stripes or Sea Glass. (In August, a new color Bashful will be introduced!)

These versatile two-ring albums can become whatever you want them to be. Want to make a pint size photo album? Fill your binder with the 4″x6″ Memory Protectors (2 photos per side) and just slide your printed pictures in. Would you rather mix it up by alternating with journaling and titles? Fill some of the photo wells with 4×6 Picture My Life Cards. Add some 3″x4″ Memory Protectors to mix it up even more. 

Another option is to fill the album with full size 6″x8″ Memory Protectors and fill them with down sized scrapbook layouts. There are Memory Protector designs that you can mix and match throughout your book: 3″x4″, 4″x6″ and 6″x8″.

Of course you can also use the binder as a planner. Either purchase the calendar pages from us (currently deeply discounted!) or create your own. There are so many great printables available on the internet.

Members of my Close To My Heart team are using the Everyday Life album as “business binders”. We are setting up sections to hold information about contacts, events, goals and more.

In fact, you can embrace your creativity and combine all of these ideas to create exactly what you want. Regardless of what you create with your Everyday Life Album, adding a few tabs can help you keep your pages organized. 

Click on the link below to open a file which includes these three tabs that when cut will fit your Everyday Life album perfectly.  (Note that this file will not cut if you do not have the Artbooking Cricut Cartridge linked to your Design Space account.)

LINK to Everyday Life Tab Design Space File

Posted on 4 Comments

Using Evernote to organize your stamps (and anything else) plus download a FREE Notebook!

Does this sound like you:

  • Hunting through multiple boxes to find a stamp set you want to use?
  • Re-purchase a set because you can’t find yours? 
  • Use the same sentiment over and over because it is available even though you have gobs of stamps that may be better for your project?
  • Have stamp sets that never see the light of day because they are in storage and long forgotten?
  • Find alternatives to stamping because it is just too much trouble to get them out.

My Stamp Organization Story

Once I had more than a couple dozen stamp sets, I really stuggled with how to organize and store them. I tried several methods to get the chaos under control. I created an huge, elaborate binder with paper print outs of each stamp set that I owned. This allowed me to thumb through them and see all the images, but it was heavy and cumbersome.

At that time, my physical stamp setswere organized by categories like animals, outdoor, sentiments, everyday, holiday, etc. Sounds good, right? However, most stamp sets fall into several categories. For example, if the stamp set below was in my “Christmas box”, I would totally miss out on using these cute animals the rest of the year — what a shame! Plus, once I choose a stamp set from my fancy binder, I had to figure out which category it fell under and actually locate it before I could start my project!

Then I started hearing about this application called Evernote. People were using it to keep track of all kinds of things: recipes, DVDs, notes, and even stamps! I decided to give it a try and spent several weeks getting all of my stamp sets into Evernote. It completely changed how I use my stamps! I can now quickly choose a stamp set I am looking for or discover one that I had forgotten. Once I pick out a stamp set, I can easily locate the physical stamp set which are now stored simply in alpha-numeric order….but I’m getting ahead of myself. Let’s look at how it works. 

Try it with this FREE Sample Notebook

To help explain how I use Evernote for my Stamp Sets, I’ve created a sample stamps notebook for the bonus stamps that are avaialble only in July 2017 for the Stampaganza special. To open this free notebook, click on the link below and continue reading to learn how to use this notebook.

Link to Stampaganza Notebook


Click HERE to learn more about the July Stamp Special!


(For purposes of this post, I’m including screen shots from the internet version of Evernote in Chrome. Depending on what devise and browser you are using, your display may be a little different, but I believe the function will be similar.)

This link should open the notebook and give you the option to Join or View the notebook. To get the most out of this experiment, I’d suggest that you go ahead and click “Join Notebook”. 

To do this, you will be asked to either log into your Evernote account or create one. The Basic (free) version of Evernote should be sufficent at this point. 

If you’d like to learn more about Evernote in general, I’d suggest reviewing the information available on the Evernote website.

What does a Stamp “Note” Look Like?

Once you are signed into your account, the Stampaganza notebook should appear in your list of notebooks. If the Stampaganza notebook is not already highlighted, click to select it. This should open a list of the stamp sets (“notes”) in this set. When you click on the name of a stamp set, you will see the details of that stamp set in a window on the right. (Note there are various view options, so if your screen looks different than this play around with the settings. If you do not see the Stampaganza notebook, try clicking on the link above again.)

Let’s take a closer look at an individual note. Here’s a blow up of the panel on the right of the screen showing the details of one stamp set. 

You may notice that I name each note with the item number followed by the stamp name. Why? So once I find a stamp set I want to use, I can find it easily in my stamp boxes which are organized in alpha-numeric order by item number. Simple!!! When I sort the notes alphabetically, they are in the exact order they are in my boxes. 

In the body of the note there is a link to the stamp images so you can click to see exactly what the stamp set looks like. Next, any text that appears on the stamp set is entered into the body of the note. This makes all of the words on the stamp sets searchable which is very helpful when you are searching for the perfect sentiment for your project.

Now the real magic begins…

What really makes this system work is that I add tags for EVERYTHING I can think of related to the stamp set. In this example, you’ll see tags for the actual images that appear on the stamps: heart, holly and snow. You’ll also see that I’ve tagged this as a Christmas stamp set. In addition, if this was a stamp set with coordinating Cricut cuts or Thin Cuts, I would have tagged that as well.

Searching for the Perfect Stamp Set

These tags allow you to search for exactly what you are looking for. Ready to make Christmas cards? You can see all your Christmas stamps at once. Looking for an image of a bird? You can easily find all the stamps that include an image of a bird!

Let’s give it a try…click on one of the tags on the left side of the screen. Here’s the resulting list of notes when I click on the Christmas tag.

You can type directly in the search box to filter the stamps by the text on the stamps!

Your Turn

If you like this system, you can create your own notebooks similar to what I’ve done. Although the internet version of Evernote is handy for viewing, to really create you’ll want to install the application for your device by visiting the download section of theEvernote website. Once you are in an actual app, you will need to create a notebook then start adding notes. You can start by copying the notes in this shared notebook. 

We’ve only touched the surface of how to get started in Evernote, but I hope this gives you a taste of how it can work.  If you’d like to learn more about copying this notebook, adding your own notes, accessing the notebooks on other devices or perhaps purchasing notebooks already populated with CTMH stamp sets, visit my Evernote Stamps page. Still have questions? Feel free to email me

Have you used Evernote to organize other areas of your life? If not, are there some places you’d like to give a try?  Please share your thoughts in the comment section!. At the end of the month, I’ll draw one name to win this stamp set from our brand new Annual Inspirations Idea Book on August 1.


UPDATE: Congratulations to Jane for winning the stamp set! 

Posted on

Workspace Wonder Craft Organizers are here! (limited availability)

A shipment of the new Workspace Wonder craft organizers is now available to order on my shopping website. I’ve been so excited about this new system since it was announced at convention last summer. I can’t wait to get my new ink pads and markers stored in these modular units.

Want to learn more about how the system can be arranged and rearranged to fit your needs? In this video Kristine explains how to create custom storage.

Want some for yourself? Hurry before this shipment is gone! Click here to see the individual pieces>>

Update: While I was writing this, the Ink Pad Stack became out of stock! More inventory is coming and the other pieces are still available.

Ready to shop? Click here to go to my shopping website>>

Happy Organizing,

Rebecca

Posted on

Planners Gonna Plan — Much anticipated bundle available now!

Attention all planner addicts! You can now get your hands on the new, gorgeous Everyday Life line of produts. This video gives you a great overview of the complete system.

As mentioned in the video, you’ll want to get the special 2016 bundle which is specially priced only in December for $29.95.

Product Image

This bundle includes:

– Album (8-3/8 x 6-7/8)

– 2016 Planner Pages: monthly & weekly spreads, pocket folder, 12 monthly divider tabs, designed page finder, 4 sheets of stickers

– Perfect Plan Roller Stamp

Here’s a closer view of the sentiments on that Roller Stamp which were selected just for the planner:

The retail value of this bundle is $35.85, but you can get it HERE for just $29.95! This special ends December 31 or when supplies run out, so be sure to order yours now.

Each item in the bundle plus additional items are available individually, including double-sided decorated pages, washi tape and photo protectors.

Z3192
Z3191

Click here to order the special 2016 Planner bundle>>

Click here to view individual items in the Everyday Life system>>

Posted on 5 Comments

Get organized with my {updated} Evernote stamp notebook!

Do you ever feel like you spend more time organizing your creative space more than actually creating? Do you struggle to find ways to store your stamp sets (and other products) in a way that allows you to locate the right one quickly?

Whether you are a consultant or customer, I’d love to help you get organized so you can focus on more important things — like getting creative! I’ve been using Evernote to keep track of all of my stamp sets for a couple years and am excited to share it with you.

In this post, I address a few questions I get about my Evernote stamp notebook.

Get the notebook now>>

WHAT EXACTLY IS THE STAMP NOTEBOOK?

The current version of my notebook includes all of the stamp sets available as of September 1, 2015 from Close To My Heart. This includes all the sets that were just released in the new Annual Inspirationsand Holiday Expression Idea Books. As of September 1, 2015, there are 374 sets! Many of these stamp sets are not in the current Idea Books, but you can see them all when you use the Evernote notebook.

Within the notebook, there is a note for each of the stamp sets, including consultant-only business builder stamps, hostess-only stamps, workshops on the go stamps and stamps of the month. 

WHAT INFORMATION IS INCLUDED?

The name of the note includes both the item number and the name. This allows you to store you physical stamps alpha-numerically by item number. 

The body of the note includes any sentiments on the stamp set and a link to the image on the Close To My Heart website. Tags include all of the images on the set plus any themes or holidays represented.

WHAT ABOUT PHYSICAL STORAGE?

This database has completely revolutionized how I store my stamp sets and saves me ton of time hunting for stamp sets. I used to try to store my stamp sets by theme or holiday. It was a very cumbersome system for many reasons. For example, there were a lot of sets that didn’t fall clearly into one category and others included stamps from more than one category. 

For example this adorable set, Miracle of Christmas (D1656)has cute woodland animals that could be used year-round. It also has gifts that could be used for birthday or shower projects.

If your stamps are sorted by category, you will need to choose a single category for this set. When you are working on projects not related to that category, it will not be found as an option. Using Evernote to organize your stamps solves that issue since a set can have as many tags as are needed to completely describe what the stamp set is about. This stamp set will be included when you filter by any of these tags.

I now store my physical stamp sets in our large organizers by item number. When i need a stamp set — whether I have a particular one in mind or need to choose one — I always go to Evernote first.  Using the filters, I search the notes to find just the right stamp set.  Since the title of the note includes Item Number, I can quickly locate the chosen stamp set in my storage boxes.

HOW DO I ACCESS EVERNOTE?

According to the Evernote website, this program is “available on everything you use every day.” This means that you can access Evernote from your PC (on web or in a Windows app), iPad, iPhone and Android devices.  This means that the information you load into Evernote is available to view and search anytime, anywhere.

I love being able to pull up the stamp sets on my phone. As a consultant, this is really handy when I am at an event and am helping a customer find the perfect stamp set for their projects. To get started using this program, visit evernote.com and find the apps for your devices.

HOW DO I GET STARTED?

You canrequest access to my stamp notebook is available by making a purchase on my Close To My Heart websiteof $25 or more. Join my team to get access for FREE!

Before you place your order, I’d suggest you check out my other Evernote notebooks. I now have notebooks for the Close To My Heart Cricut cartridges and the papers in Studio J. You can receive access to these in addition to the stamps notebook with a larger purchase.

Click here to learn more about these notebooks>>

I am thrilled when I get comments like this back from happy stampers:

  • Your program CHANGED MY LIFE! …it was total chaos!
  • Now that I see how easy it is to use, I’ll do the same with my SU stamps as well.
  • Thank you for offering this organized data for our stamps! Much appreciated!
  • They are GREAT. Her directions are WONDERFUL!
  • I’m excited to begin using it.
  • Thanks again for the wonderful program. I will have fun getting organized.
  • I just watched your video…You have thought of everything 🙂

If you have any questions about the notebooks, please don’t hesitate to contact me. I’d love to help you get more organized.

Happy Day!

Rebecca

Posted on

Get Organized with Evernote: The Stamp Notebook is Back!!

Do you struggle with organizing your stamp sets? Do you wish there was a way to quickly find the set that you want to use? Do you want to be able to search your stamp sets for a theme, holiday or other information without rummaging through all your boxes?  Do you wish you could access all of this information on your tablet or phone?

A little over a year ago, I started using Evernote to organize my stamp sets. This database tool helped me with all of the issues listed above. It allows me easily find the sets I want while using a very simple physical storage system. 

Watch this video to see how you can use Evernote to organize your stamp sets.

As explained in the video,  with the Evernote notebook, I can quickly and easily determine the stamp set I want to use by searching on the sentiments, themes, and images on the stamps. I can also quickly locate the physical stamp set since the database includes the Item number and the physical stamp set since all of my stamp sets are stored alpha-numerically by Item Number in the Close To My Heart Large Organizers (Z1835)

This simple storage system also makes it super easy to put my stamp sets away as soon as I’m done with them. I no longer have a stack of sets on my counter that need to be sorted and put back into the boxes. 

Once you have your Notebook set up, you can access it from your computer, tablet or phone. This means that your stamp sets are at your finger tips anywhere, anytime!

The wait is over! 

A preloaded Evernote Stamp Notebook is once again available to give you a jump start in your stamp organization. The new version has been updated to include the new Seasonal Expressions 2 stamp sets and has been reformatted to comply with copyrights on the stamp images.

Click here to learn how you can get your copy! >>

If you struggle with stamp organization, I urge you to give Evernote a try.  I love being organized and since I started using this system, my stamps are one area that always stays in order.

Now for the rest of my craft room…

Rebecca