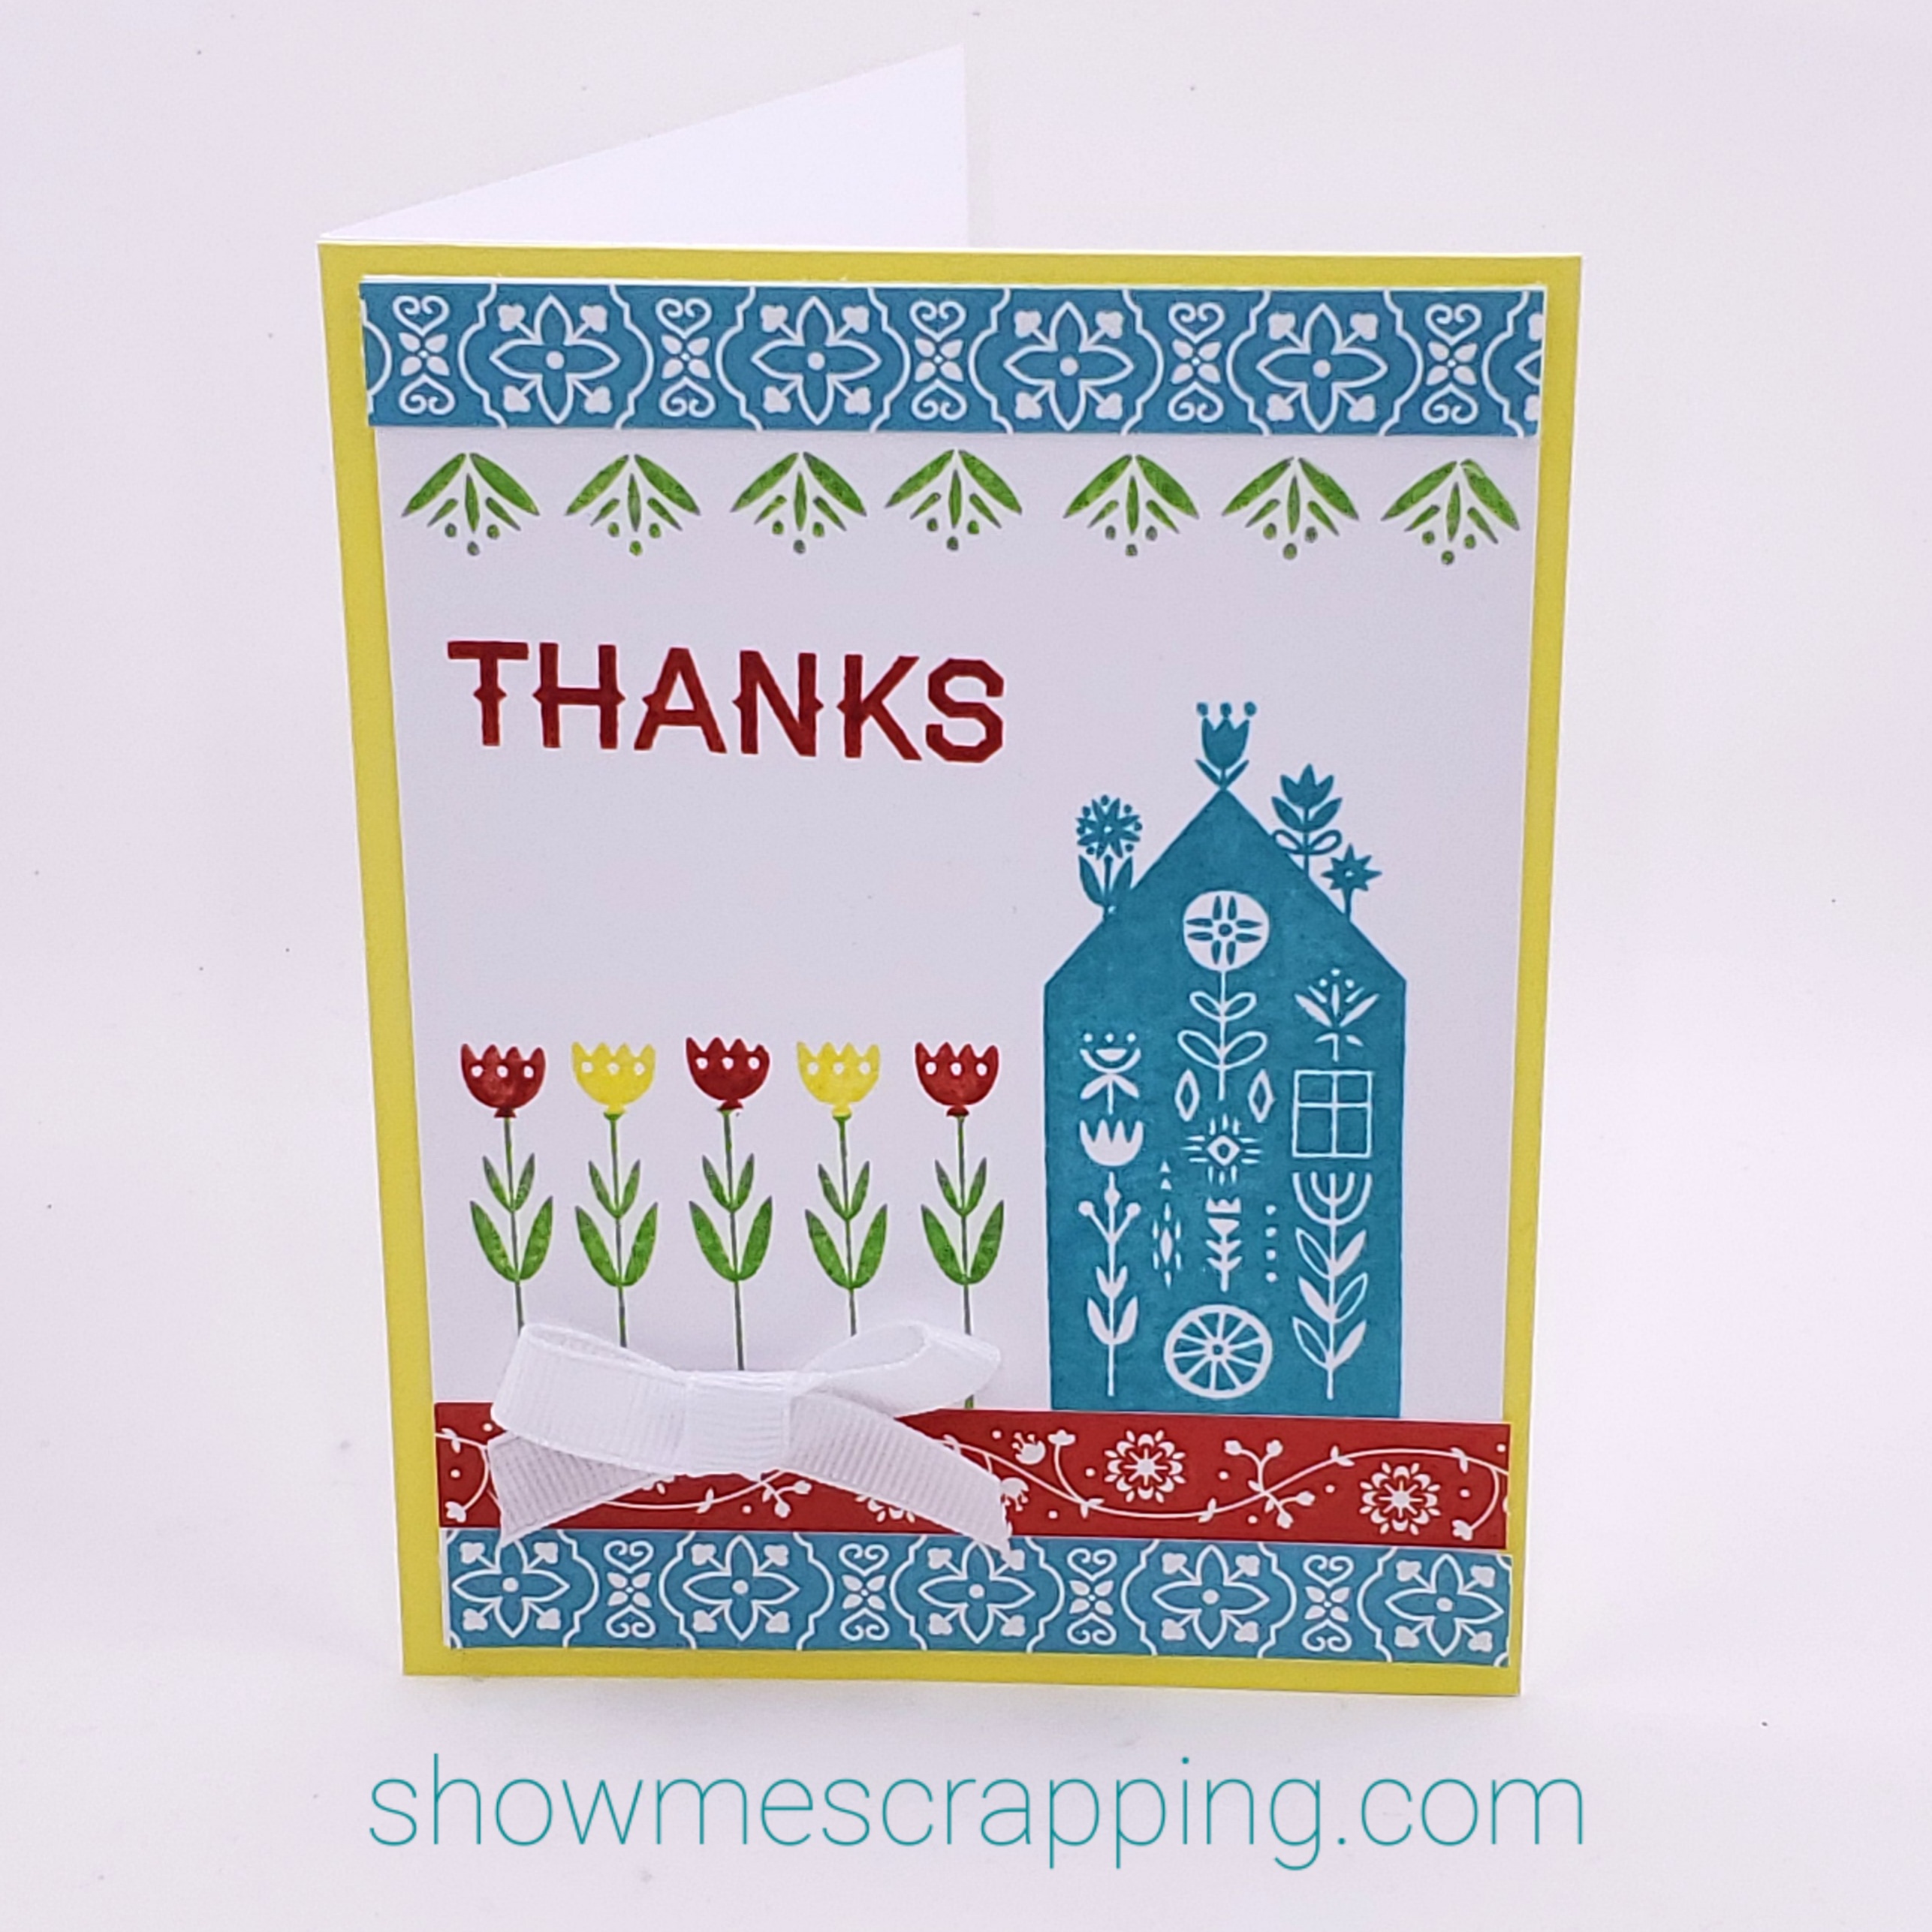
2021 may be the year of Scandinavian artwork! Traditional Scandinavian design is based on symmetry and repetition and often include cheerful detailed images. Our April Stamp of the Month, Scandinavian Folk Art Greetings embraces this trend with images of home, flowers, envelopes, boot, bird and a window. The cool thing about stamping is that the repetition is effortless since you can just reink an image to add it multiple times.
Although Scandinavian art is often monotone, I couldn’t resist adding a lots of color to my card. I really love how cheerful this color combination is and through it would be a great way to let someone know I appreciate them. If you like this design, you are in luck! I will be sending a kit to make it to everyone who orders this stamp set from me. Read on for more details.
This cheerful card is made with papers from the Happiness Lives Here collection. You can get a kit to make one for your self when you order this month’s Stamp of the Month.
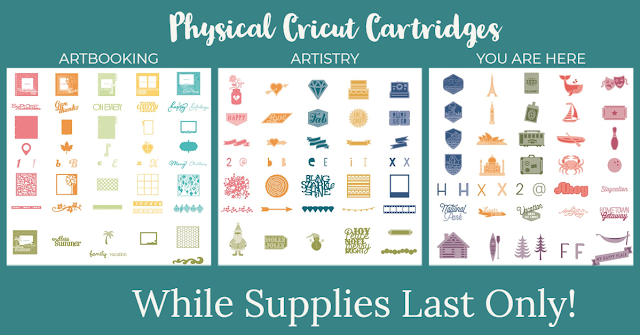
If you have an Expression or other older Cricut machine that does not use Design Space, you probably know that Cricut no longer makes Cricut cartridges. This means that as the inventory in our warehouse is depleted, you will no longer be able to purchase the physical cartridges. It is getting harder and harder to find cartridges to use in these machines. For that reason, you are when you find a cartridge you want to own, you need to buy it while you can!
***If you have a Maker or Explore, you are in luck – all of our collections, even formerly retired sets – are now available using my affiliate link!***
Good news: You can still get your hands on three of they physical cartridges: Artistry, You Are Here and Artbooking!
Even better news: Remaining cartridges are on clearance at 50% off retail price.
Each of these cartridges is fully loaded with 700 images including at least one complete font. When you buy one of these cartridges, you also get a bonus of three coordinating stamp sets. Let’s take a look at each of these cartridges and the coordinating stamp sets.
Artistry
This
collection includes a trendy “filled” font with upper and lower. Plus it has lots of images including basic shapes, overlays, banners,
titles & more. The included stamp sets include lots of great sentiments that work for both cards and scrapbook pages.
You can see all of the images in this amazing collection by opening the handbook using the link below. I have a few of these in my personal inventory, plus you can still purchase it directly from the Close To My Heart website.
This
collection includes two fonts that can be used alone or together for layered letters. The images cover all the places that you may travel — both physical destinations and places in life. It includes iconic buildings and monuments from around the world, badges for several US National Parks and so much more.
You can see all of the images in this amazing collection by opening the handbook using the link below. It is still available for purchase on the Close To My Heart website.
The Artbooking collection is a favorite for Scrapbookers. It includes complete layouts and
mini albums designed to let you select the size once and cut everything proportionally. As you look at the images below, you can see the completed project in the top row with some of the elements shown below. Stamp sets create coordinating embellishments, journaling spots and sentiments.
You can see all of the images in this amazing collection by opening the handbook using the link below. Although this one is sold out on the Close To My Heart website, I have a few of these in my personal inventory.
If you
are interested in the first two, you can order directly from my Close To My Heart website. If you
are interested in Artbooking, let me know. Remember once our inventory is exhausted, they will not longer be available to purchase. You will not regret adding them to your Cricut library!
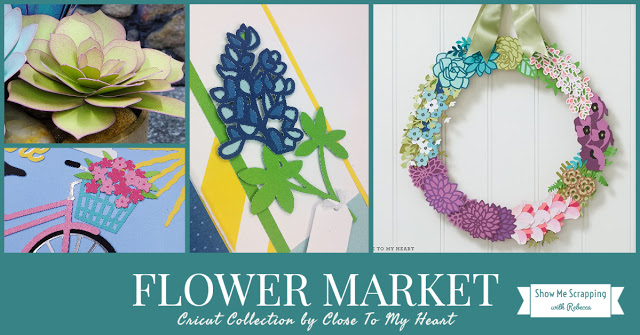
Today, I’d like to share some of the reasons I love the Flower Market Cricut Collection. Although the physical cartridge that contained these images is now retired they are now available using my special Cricut Affiliate link!
This is the second post in a series focusing on the Close To My Heart Cricut image sets.
If you have been keeping up with Cricut developments over the last few years, you have probably heard of Flower Market. It is one of the most popular Cricut collections ever because it has such a wide variety of flowers, including several that are 3D when assembled. But you may may not know that this collection has so much more! In addition to flowers, it has images of things to put flowers in like vases, jars and even off things like boots! It also has things to put flowers on like wreaths, laurels and even horse shoes! There are also titles and other images related to the symbolic nature of flowers.
For example, the Poppy flower is used worldwide as a symbol of remembrance, especially those who have died for their country. Along with both 3-D and flat versions of the flowers, there is also a jar, wreath, ribbon and the words “Always Remember”.
Of course you can mix and match these images with others on the cartridges, but coordinating images are conveniently organized by pagethe handbook. Each page has 14 total images (some are automatically layered in Design Space) including a flower and related images.
Flower Market includes familiar favorites like the Daisy, Sunflower and Rose. But it also includes less well known flowers like Trillium and Delphinium. When this collection was released (with the help of Google), I identified each of the flowers and created a handy index that you can download for free! View Flower Market Index>>
Two Fonts
The Flower Market collection includes two lovely fonts. For each letter, you can choose the decorative or straight versions. The collection also includes numbers and basic symbols.
3-D Flowers
Have you been wanting to join the paper flower craze? This cartridge has several 3D flowers that you can cut and create in minutes. If you need some help with assembly, there are some basic directions in the back of the handbook. These are so much fun to make!
Flowers and much more
As you scroll down and see all of the images on this collection, you’ll see why this is a favorite of mine. There are images and sentiments for all occasions. I frequently use images from this collection in my projects, yet I still see something new every time I look through the handbook.
If you are looking for even more inspiration, you are in luck! When this amazing collection was first released in 2017, Close To My Heart made a series of 34 videos with inspirational art made using the images in the Flower Market set. Click here to see the whole Flower Market video play list>>
Watch the video below to see a beautiful spring layout featuring snowdrop flowers.
How to purchase
The physical cartridge is retired and out of stock, but the good news is that it is back! If you never bought the physical cartridge, you can now create with these images in Design Space. You can access them several different ways. The Flower Markets images are now available with Cricut Access or can be purchased individually in Design Space for $1.99 for each project and $6.99 for the font. However, the best value is to purchase the full collection which includes all 700 individual images (projects plus font) for just $49.95. When you purchase the full collection, the images are yours forever, regardless of your subscription status. You can subscribe to Access or purchase the full collection on Cricut.com. (If you use the Cricut link in this post for your purchases, I’ll earn a commission without you paying extra. Thank You!)
I hope this post has encouraged you to check out or re-familiarize yourself with this great Cricut collection.
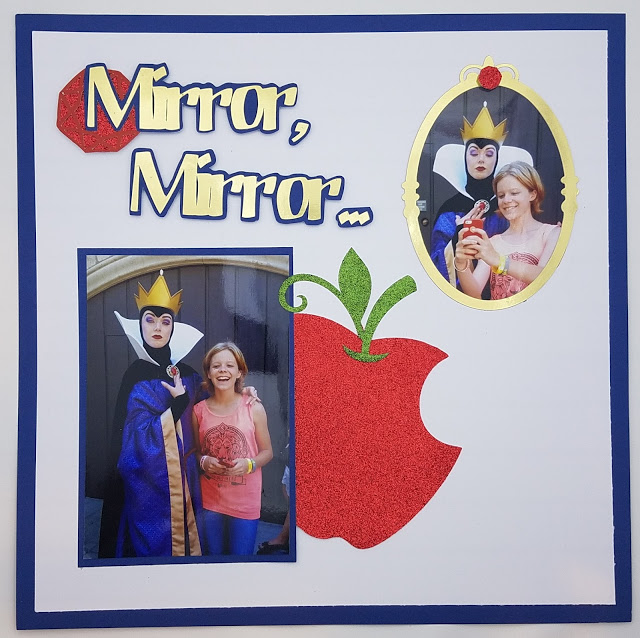
Anyone else missing getting out and going places? Today, I was thinking of one of my favorite places to visit and thought I’d share this layout from our trip to Disneyland a few years ago.
These pictures bring back the memories of this trip. My daughter was totally into taking selfies at the time and collected them with each character she met on the trip. The exchange happening in these pictures was priceless. The Evil Queen, being from Once Upon a Time, had never seen a cell phone of course and was very interested in the miniature “mirror”. It was a moment of Disney magic that still makes me laugh when I see these photos.
To make this layout special enough for these special photos, I used red and green glitter paper (retired) and gold foil paper. I love how well these specialty papers cut on the Cricut. Be sure to use the custom material settings to get the best results.
Want to make this project? Click the link below to open the Design Space file.
Get your Cricut out of the box or dust it off. It’s time to learn some new skills at the Flower Market Cricut Workshop.
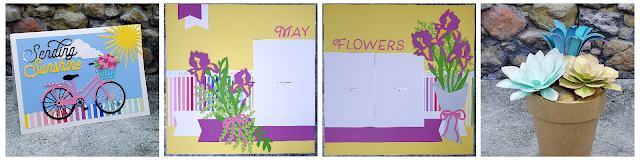
You’re invited to join me for a virtual Cricut class next Sunday (May 17). We’ll make the three projects pictured and described below using the amazing Flower Market Cricut collection. When you make these projects, you’ll learn both basic and advanced Design Space skills. I’m so excited to teach you how to make these beautiful projects.
If you’ve attended one of my workshops before, these are two changes. First, this is now a virtual event which has both limitations but also some advantages over a live event. The most obvious benefit of a virtual class is that you will not need to pack up your machine, laptop, other tools and supplies to travel to where ever I am. You will have the convenience of working in your normal space without the inconvenience of packing and unpacking. We’ll also be able to share community without the pressure to keep up with the person across the table or feeling guilt for working ahead.
Second, for this workshop, you’ll get a guide that includes both step-by-step directions and Design Space links to the completed projects. You choose whether to design the projects from scratch or to jump straight to cutting.
This cheerful card will brighten the day of whoever you send it to. Your kit includes the solid and patterned cardstock, foil paper plus the card base and envelope.
May Flowers (Iris) Layout
Just in time for your late spring pictures, this layout features just one of then many flowers in the Flower Market collection. You’re going to love creating these iris and fern bouquets.
Pot of Succulents
The last project is this gorgeous pot of succulents. Optional sponging technique adds fun detail to these 3-D plants.
Dual Track Printable Guide, with step-by-step directions plus Design Space links to completed projects
Virtual “Live” Workshop Meeting
New Dual Track Classes
The printable workshop guide includes step-by-step directions for each project. For each project, you will be guided through the design, cutting and assembly process. These directions will give you the opportunity to learn how to do intermediate and advanced techniques in Design Space. The format will look very familiar if you have attended one of my Cricut classes before.
New with this workshop, the guide with also include links to completed projects in Design Space. If you are new to Design Space or just want a fast track to finishing the projects, you can use these links and focus on basic skills rather than the advanced techniques used to design the projects. The addition of the Design Space links creates a beginner and advanced track for the projects. You choose which track is best for you!
New Virtual Workshop Format
Each workshop will have a schedule date and time for a virtual workshop using Zoom. The session will begin with a walk through the steps of each project. I’ll point out any challenges that you may have along the way and give you tips to avoid them. Once I have finished this portion, the classroom will remain open while you and others in the workshop work at your own pace. Together, we’ll discuss any questions or issues that come up along the way.
Additional Materials Needed:
Cricut Explore or Maker machine, mat and tools
Paper adhesives
Liquid Glass
Thistle & Pixie ink pads (optional)
Sponge (optional)
Rocks
Images from the Flower Market Cricut Collection*
*You will need to either (a) subscribe to Cricut Access or (b) purchase these images prior to cutting the projects. If you wish to subscribe or purchase the entire Flower Market collection, you can do this using my personal Cricut affiliate link. Alternatively, you can purchase the individual images used in the projects in Design Space just before you cut. I also have two remaining copies of the digital-only collection on discounted to just $40. Let me know if you’d like to purchase one of them.
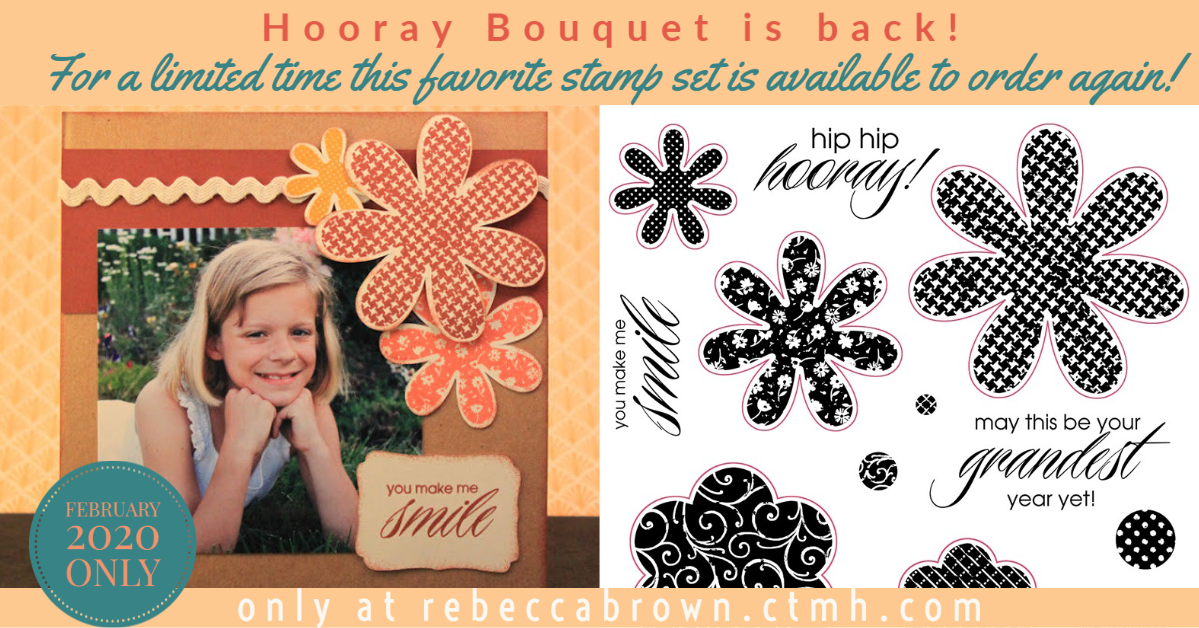
Update 2/13/2020: I updated this post from 2011 because the Hooray Bouquet set used for this mini-layout is back for a limited time! Even better, it is part of our Stamptacular sale and just $12.25! This stamp set coordinates our very first Cricut collection Art Philosophy. This was one of the first Art Philosophy stamp sets and I sure got a lot of mileage out of it!
This mini-layout is still hanging above my mom’s computer and it still makes me smile everytime I see it. My “little” girl in this picture is now in college and all grown up. Time sure flies doesn’t it?
Although this cartridge retired several years ago, it is back through my special Cricut link! In fact all of our Cricut images can now be purchased and used in Design Space with your Explore or Maker machines!!! Hurry, this stamp set will retire again on 2/29/2020!
I’ve decided to have a second create and take at my open house. Come to my house on Sunday, August 14(2011)from 2:30 – 4:00 pm to make this 6″ x 6″ page in addition to the card I showed you earlier. This layout can be added to a small scrapbook, but you do not have to be a scrapbooker to enjoy this cute project. It could be framed, hung on your frig, stuck on your office wall, etc. It even would make a great gift.
Bring a favorite 4″ x 4″ picture if you want to finish it here. (No need for specialty printing, just trim down a 4″ x 6″ print).
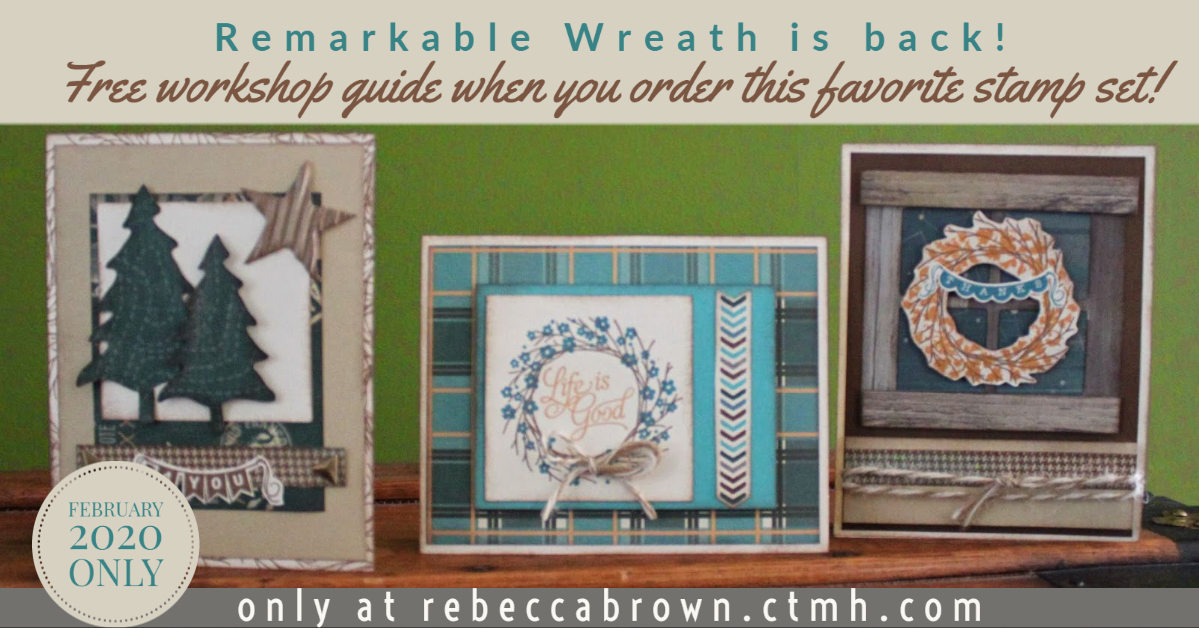
Update 2/13/2020: I updated this post from 2014 because the Remarkable Wreath stamp set used for this card kit is back for a limited time! Even better, it is part of our Stamptacular sale and just $9.50! If you purchase this stamp set from my Close To My Heart website, I’ll send you a pdf cutting and assembly guide for these cards. Although the Timberline paper is retired, other papers and embellishments can be substituted and give these card designs an updated look! Hurry, this stamp set will retire again on 2/29/2020!
I’m so excited to share this new Show Me Scrapping custom card kit with you. Unfortunately, because of retiring products, this kit is only available through July 31, 2014.
This kit includes the cards, envelopes, papers and embellishments to make 12 cards, 4 each of the 3 designs shown. Scroll down for detailed pictures plus a few tips I used when creating these cards.
Timberline Card #1
Timberline Card #2
Timberline Card #3
I love how the3D Foam tape adds dimension to the trees on card #1. The trees are from page 66 of the Artbooking Cricuthandbook.
Another “trick” I used to add detail to card 2 random stamping the wreath with Cocoa ink on the outer edge of the card before layering on the pages. I like how the branch design frames the rest of the card.
The window on card #3 is also from the Artbooking Cricut cartridge. I added a header & footer using the same wood paper from the Timberline paper pack but with the grain going horizontal rather than vertical. To make it really dimensional, I attached these “boards” and the wreath with 3D foam tape.
These cards use one of my favorite stamp sets, C1473 Remarkable Wreath, which sadly will retire at the end of July.
You can order this stamp set and other supplies needed to complete your kit on my Close To My Heart website.
Addtional items needed to complete your cards My Acrylix Remarkable Wreath (C1374)
My Acrylix blocks of various sizes
Goldenrod, Cocoa and Twilight Exclusive Ink Pads
Paper Trimmer & Scissors
Sponge
Adhesives
Artbooking Cricut Cartridge (2020 update – now available through my Cricut link!)
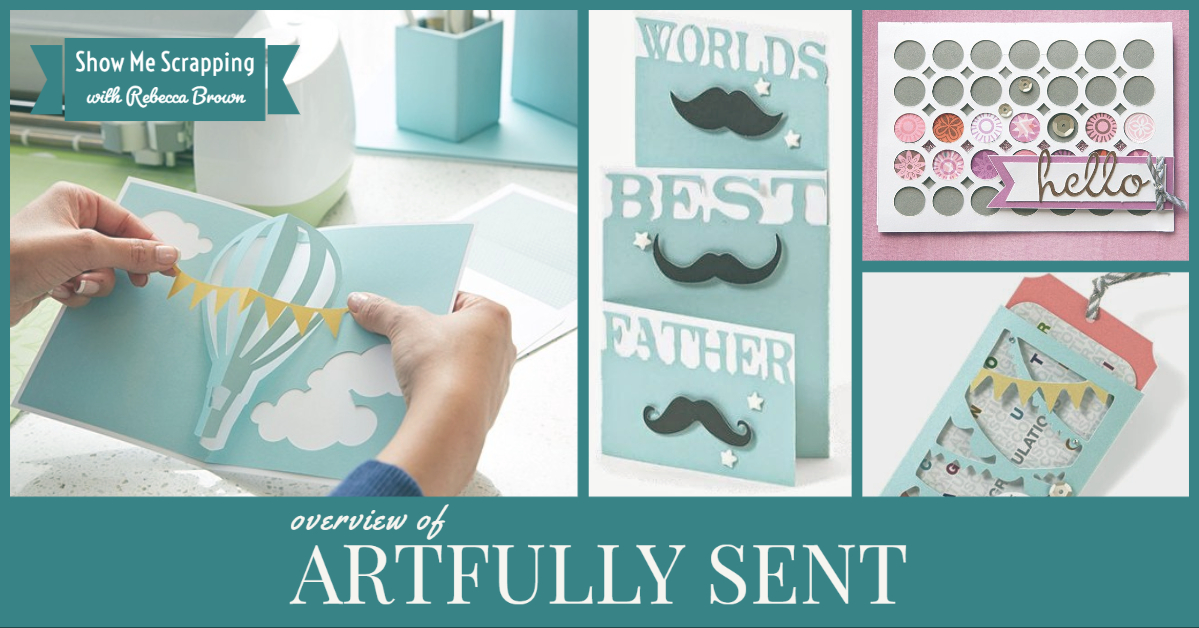
I’m so excited that our retired Cricut image collections are now available to purchase using my special Cricut Affiliate link! In this post, I’m going to knock the dust off the a favorite collection, especially for card-makers, Artfully Sent. Join my as to learn all the features of this amazing set of images.
History and Good News
The Artfully Sent Cricut collection was first released by Close To My Heart in 2014 in a physical cartridge bundle. This is was right after Cricut released the Explore, the first machine to use Design Space, but most Cricut users still used cartridge-driven machines like the Expression. The tiny pictures in the handbook, made this collection difficult to use on these older machines but the projects are perfectly suited for today’s Design Space machines. The collection retired a few years ago without being offered as a digital-only collection. When it retired, these images became unavailable to anyone who was unfortunate enough to miss out on getting this cartridge while it was available.
Last year, Close To My Heart began a new partnership with Cricut which allows all of our image collections, including retired collections like Artfully Sent, to be purchased using special links only available from Close To My Heart consultants! This is an exciting development because many of you missed these collection the first time around. This collection has so many fun projects and with the editing options now available in Design Space, the possibilities are endless!
This is the first post in a series focusing on the Close To My Heart Cricut image sets.
To get started, let’s watch the introductory video from 2014. Note that the stamp sets and cardstock are no longer included when you purchase the collection.
The cartridge was originally packaged with an Assembly booklet which is really helpful to know how to put together the cards. Click here to view the Assembly Booklet>>
Thumbnails of Images
Below is a preview of the font and envelopes, plus each of the the five types of cards. I’ve also included a thumbnail of each project, however as I mentioned before, these images are really small and it’s hard to see the details until you open the projects in Design Space. I’ve also includes links to a series of posts that I wrote when the Artfully Sent cartridge was originally released in 2014.
Font
The Artfully Sent font has fun decorative loops which adds a unique whimsical twist to your projects. The collection includes a full font with upper-case and lower-case letters, numbers and basic symbols. Click here for a more detailed look at the font>>
The 50 pop-up card projects have several layers including a card base, liner and icons. These complete projects are grouped which means in Design Space they are added to your canvas as a single layered image. Click here for more information about these cards >>
There are a whopping 100 in this set of cards. Each card has icons and/or sentiments cut into the card. For all of these, you can leave the cut outs as windows on the card, or cover the back with paper to add color to the design. You can also use the cut outs to make creative shaker window cards. Click here for more information about these cards >>
Sleeve and Overlay Cards
This next group of cards have tabs that when folded and attached create a sleeve or pocket. These can be used in a wide variety of ways including gift card holders, invitations or photos. Click here for more information about these cards >>
The overlay cards have a solid back and cut outs on the front of the card. Most of these do not have any theme, so you can dress them up to use at any occasion.
Pocket Cards
The last collection of projects are flat cards that can be put into the pockets of a divided scrapbooking memory protector. These are also great titles for your full size pages or even for the front of a greeting card. I also like that you can punch a hole in the top (or add in design space) and have an instant tag for any occasion. Click here for more information about these cards >>
This cartridge was retired several years ago, but the good news is that it is back! If you never bought the physical cartridge, you can now create with these images in Design Space. You can access them several different ways. The Artfully Sent images are now available with Cricut Access or can be purchased individually in Design Space for $1.99 for each project and $6.99 for the font. However, the best value is to purchase the full collection which includes all 700 individual images (projects plus font) for just $49.95. When you purchase the full collection, the images are yours forever, regardless of your subscription status. You can subscribe to Access or purchase the full collection on Cricut.com. (If you use the Cricut link in this post for your purchases, I’ll earn a small commission. Thank You!)
Here’s one more video you can watch to see even more inspiring projects made with Artfully Sent.
I hope this post has encouraged you to check out or re-familiarize yourself with this great classic collection of card-making projects.
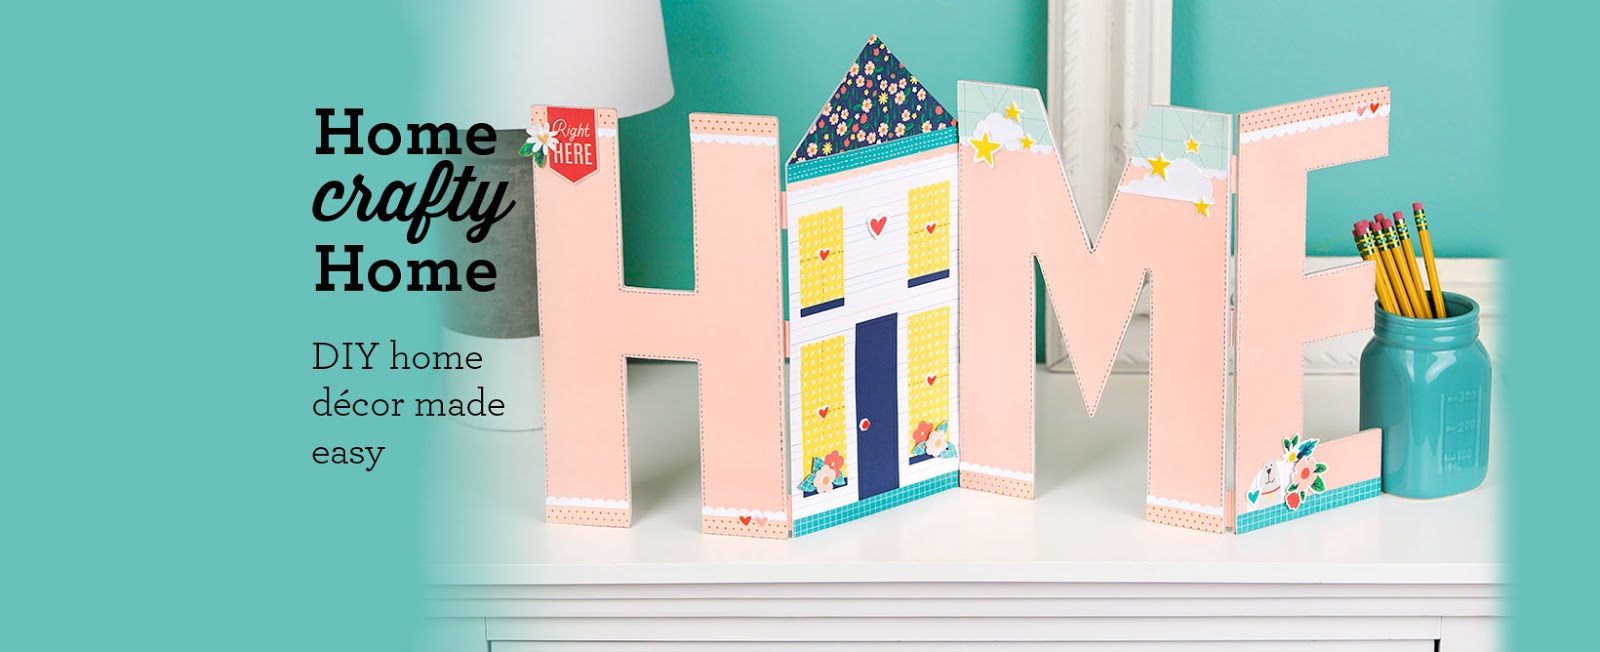
Our new Home DIY Decor workshop gives you the materials and instructions to make this cheery piece for your mantel, shelf or cabinet top! The kit uses our chipboard monogram letters, So Much Happy paper and puffy stickers and shapes cut using the Artistry Cricut collection.
First you’ll get 11.5″ tall chipboard letters H, M and E. You’ll also get a special pack of paper which includes 6 sheets of the So Much Happy patterned paper plus 5 sheets of cardstock (3 peach, 1 sapphire & 1 white) and finally, you’ll get a pack of So Much Happy Puffy Stickers.
The downloadable workshop instructions include detailed directions from start to finish. Note that to complete the house-shaped “O” as shown, you’ll need to an Explore or Maker Cricut machine and the Artistry Collection. To make it super easy, you can click the link below to open a Design Space file with all the images sized correctly!
If you like knowing exactly how to recreate a project step-by-step, you will love how thorough our directions are. However, if you have a more creative bend and enjoy making projects truly your own, use the directions for inspiration and let your imagination go wild.
A few things you may want to consider:
Think of a word that would be more meaningful to you or your family. Buy the letters you need but use this guide for inspiration for decorating and connecting them.
Choose a different paper pack to better fit your decor. Order the letters, paper pack and coordinating embellishments separately and use this printable guide for inspiration.
Add photos on the blank letter to make a more personal decor piece.
What would you change to make this project your own? Post your ideas in the comments.