Posted on

Capture Senior Year Memories with this new Workshop

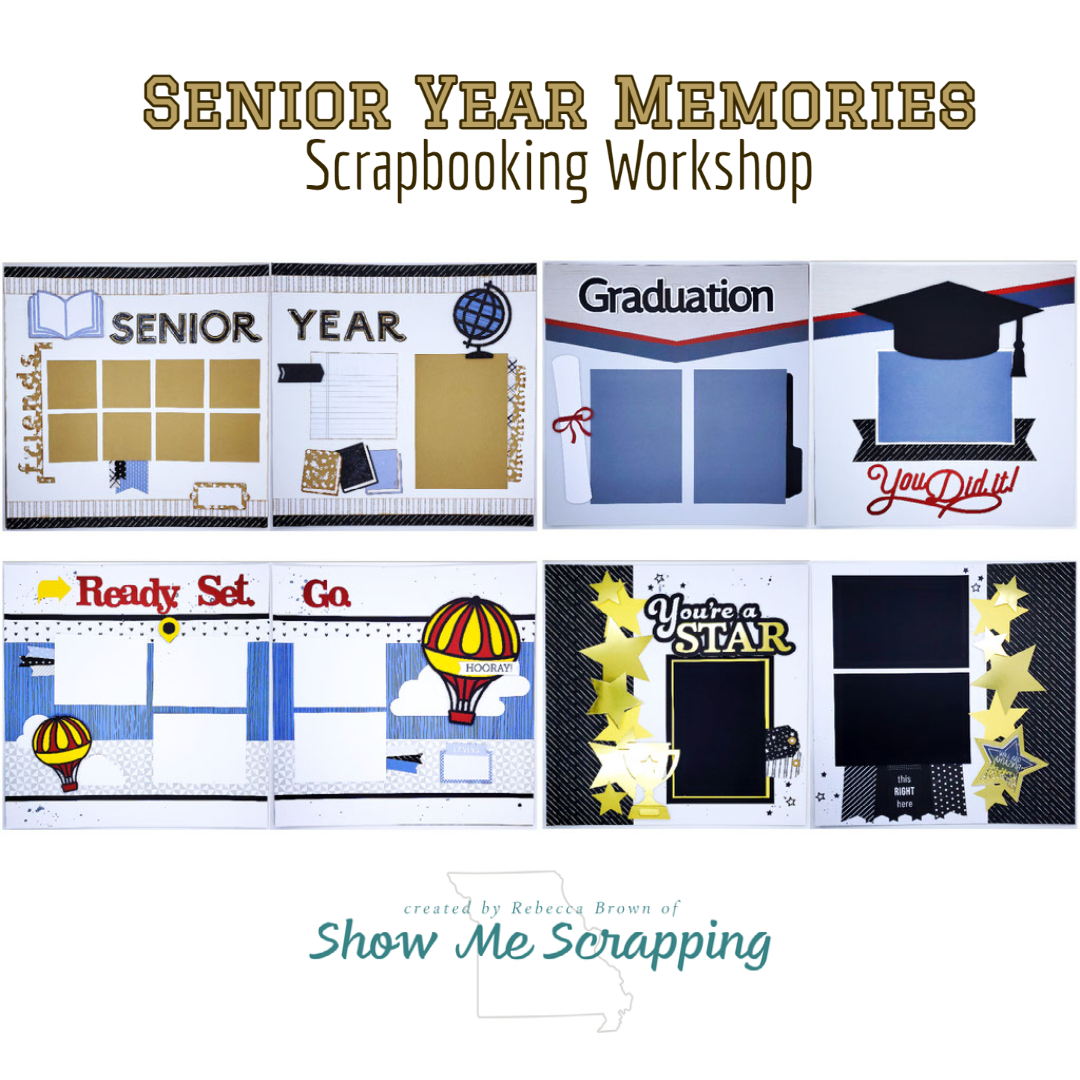
I’m so excited to announce my new graduation-themed scrapbooking workshop. These fun pages have big bold die cut images, a shaker element and lots of room for photos and mementos.

The workshop makes four Senior Year themed two-page 12″ x 12″ layouts with custom Cricut shapes created from CTMH images, a star shaker element and optional shimmer brush and stamping techniques. Let’s take a closer look at these layouts:

This workshop is available to order now! You can choose to get a complete kit, Cricut and die cut pieces only or just the instruction guide. You can also get a free instruction guide by placing an order of $40 or more on my Close To My Heart website. After placing your order, click here to request the guide.

Be sure to review the list of included and additional materials to decide which option to choose. If you are doing your own cutting, you will need the Star Shaker Window Thin Cuts (Z3871) and have access to the following Cricut collections in Design Space: Artbooking, Flower Market, You Are Here, Artiste, Art Philosophy. These collections are available through my Cricut affiliate link.

The sample layouts include optional stamping, distressing and shimmer brush techniques.

  • Stamping: The image inside of the star shaker window and other places in the workshop are stamped with the All-Star Birthday Stamp Set (C1888) and Intense Black ink.
  • Distressing: Papers in layout 1 are sponge distressed using a Toffee ink pad and sponge (or sponge dauber).
  • Shimmer: Splatters were added to the base pages for layout 2 and 4 using a Black Shimmer Brush. The brush can also used to add extra sparkle to several black cardstock pieces.

Step-by-step directions for cutting, prepping and completing the layouts, plus lots of helpful tips, are in the instruction guide.

Order now>>

Posted on

D Rings: My (new) Album of Choice

Friday, I posted information about the new #scrap20 Challenge. In the background section, I talked about how I am making a concerted effort to set aside more time for my personal projects. To make this happen, I have been working hard the last couple months on my craft room organization. 

One challenge I’ve had in trying to get organized is what to do with completed — or nearly completed (see previous post) — layouts until the whole album is done. This was an issue because I was using post-bound albums require assembly to add pages. One solution is to guess at how many pages and go ahead and assemble the album with memory protectors. This allowed me to drop the layouts in as I finished them. But if I guessed the number of pages wrong or want to rearrange the pages, I’d have to unscrew the hinges to make the changes.

My work around was to have boxes in my craft closet labeled with each year. As I completed pages, I just added them to the appropriate box. But this never was really a solution because  almost every year is incomplete and these beautiful pages were hidden away out of site. I decided it was time to come out of the closet!

The Real Solution: Change Albums

The surprising answer to my problem came by changing the type of album. By switching to using post albums, I don’t have to wait for all the pages to be complete to put together my book.  Because of this, many of my pages were not in albums. Instead I can go ahead and put them in the album as I go. Since these books have the same high quality faux leather look, they serve as both work-in-progress and display albums!

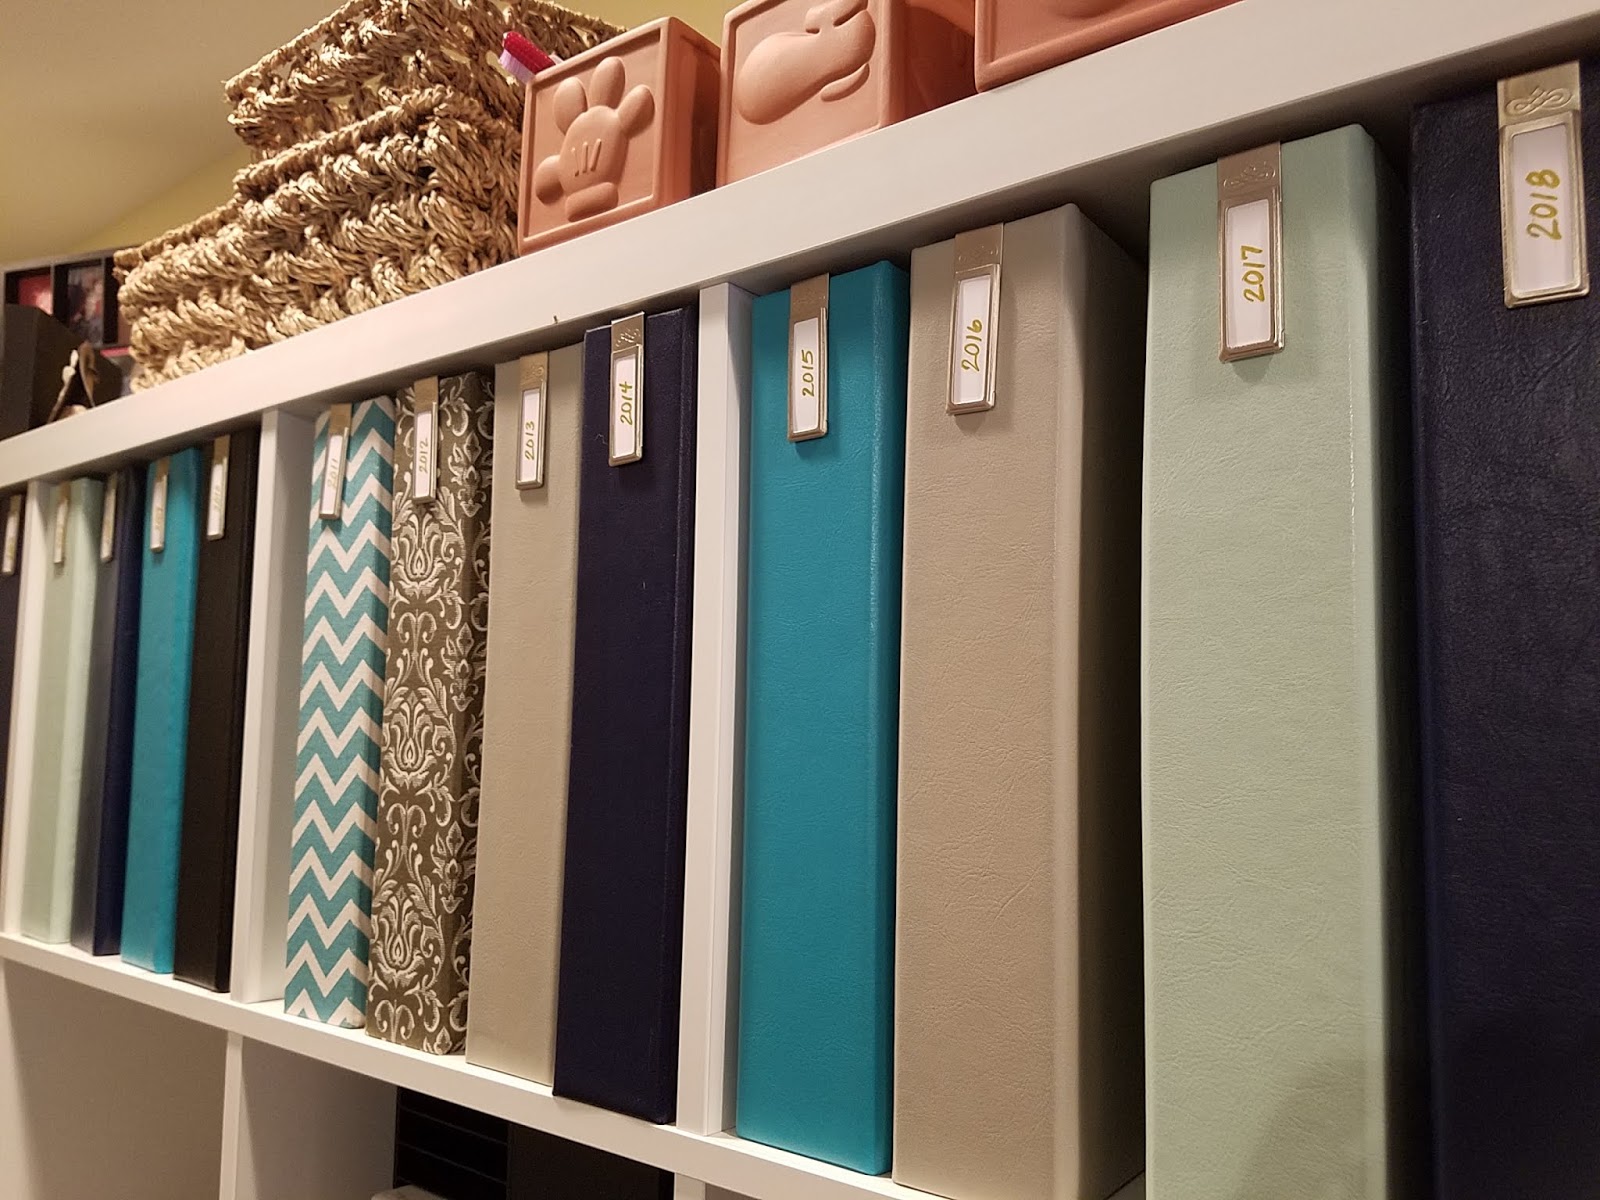
For a couple years, I’ve been thinking about making switching to D-ring albums, but resisted because of the investment I had made in the current albums. A few months ago, I finally did it and I am so happy with the result! I labeled one D-ring album for each year starting in 2000, the year my daughter was born. Then I removed pages from my current completed post albums and slipped the pages from the boxes in the closet into memory protectors and added them to the corresponding year’s album. Then I opened each annual box in the closet and added those pages to additional books.

These albums now reside on the top shelf of my Ikea Kallax shelves in my office. Some of the books are nearly full and others don’t have a single page, but they are uniform and beautiful. Looking at them makes me so happy!

Five Reasons I love this System

  1. As soon as I finish a layout, it immediately goes in an album and is ready for viewing!
  2. I can rearrange or insert pages anytime I want. Finding new pictures is no longer an issue. I just scrap them and insert them into the book.
  3. Each year’s album is the same size and shape, so it gets the same shelf space regardless of how many pages I’ve finished.
  4. Anytime I want to revisit the memories in the books, I simply pull it off the shelf. None of the pages are hiding in boxes! Everyone in the family has enjoyed browsing them a few times already.
  5. They look so pretty on my craft room shelf!

Survey Time

The decision of what type of album to use is certainly a matter of opinion. I was definitely in camp post bound until recently, but I’m happy with my switch. What is your preference: post bound or ring albums? I’d love to hear your reasons so please share in the comments to this post.

Posted on

Recipes for Featured August Stamp of the Month Projects

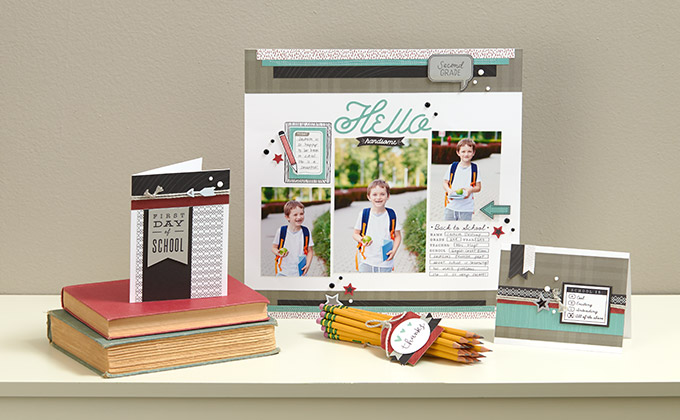
Each month, my Close To My Heart features beautiful projects made by home office artists using the current stamp of the month. This month’s projects are perfect to help make the first day of school a big success!

As you know, most teachers operate on a very low budget and supplement supplies out of their own project. Wouldn’t your child’s teacher love that bundle of pictures with a handmade tag to show your appreciation. Another idea is to create one of these featured cards for a personal note to slip in your child’s lunch box or back pack to let them know you are thinking of them through the day. And of course the layout is a must to show off those adorable first day of school pictures.

Below I’d added the list of projects needed to create these projects.

12″ × 12″ Hello Handsome Single Page

 School Year (August Stamp of the Month)
 Jack Paper Packet
 White Daisy Cardstock
 Whisper Cardstock
 Archival Black Exclusive Inks™ Stamp Pad
 Black & White Dots
 Jack Complements
 Watercolor Pencils
 Blending Pen
 Sewing Machine
 Thread

5½″ × 4¼″ First Day of School Card

 School Year (August Stamp of the Month)
 Jack Paper Packet
 Whisper Cardstock
 Archival Black Exclusive Inks™ Stamp Pad
 Black & White Dots
 Jack Complements
 Whisper Thick Twine

4¼″ × 5½″ School is… Card

 School Year (August Stamp of the Month)
 Jack Paper Packet
 White Daisy Cardstock
 Black Cardstock
 Archival Black Exclusive Inks™ Stamp Pad
 Black & White Dots
 Jack Complements
 Whisper Thick Twine

3D — Teacher Gift Tag

 School Year (August Stamp of the Month)
 Jack Paper Packet
 White Daisy Cardstock
 Juniper Exclusive Inks™ Stamp Pad
 Black & White Dots
 Whisper Thick Twine
 Cricut® Artbooking Collection
Cricut® Shapes:
Artbooking
2½″ Shift+Photo Mat 1 <Teamwork> (p. 83)
1¾″ Shift+Border <Teamwork> (p. 83)
Remember the Stamp of the Month, School Year, is only available in August 2017. In addition, you can get it for just $5 with a $50 purchase. So look over these supply lists, make your list and then be sure to add the stamp of the month.

Keep in mind that the Jack paper pack and some of the other products in these project retire at the end of this month. Retiring items are now while supplies last and items are starting to run out, so don’t wait to place your order. Also, when you order $26.95 of items from the Jack product line in August, I’ll send you a bonus stamp set!

Be sure to review all of my August specials which I posted earlier this month before you submit your order. Please let me know if you have any questions about these projects or the product used. 

Keep creating,

Rebecca

Posted on

New Die-cuts for favorite Stamp Sets!

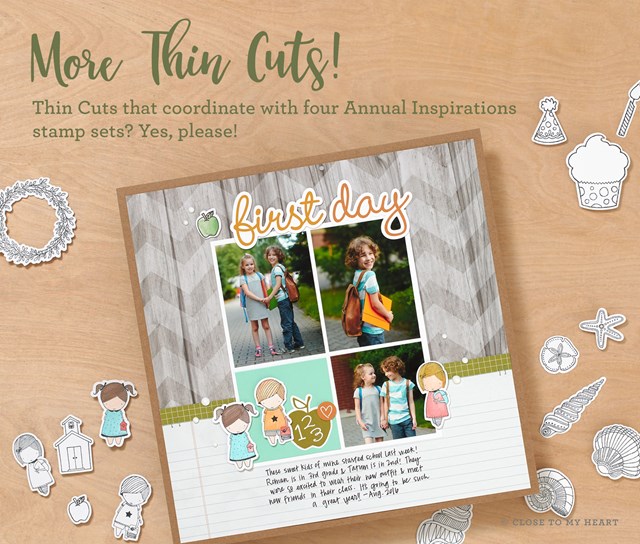
Love stamping, but hate “fussy cutting”? Thin cuts are a great way to have perfectly cut stamped images and we have just introduced four new sets that coordinate with stamp sets in the Annual Inspirations Idea Book.

You can use these thin metal dies with your favorite die-cutting machine (I use Cuttlebug) to quickly and easily cut shapes ont he stamp sets. The Thin cuts are packaged on their own magnetic sheet and work well with most die-cutting machines.

The first new set of thin cuts coordinates with the School Kids stamp set (D1706). Images include all three children, an apple and the school house.

We also have a new thin cut to go with the Wreath stamp set (A1193). I love this stamp set, but cutting out the wreath is so tedious. Now, I can literally just crank them out.

The next thin cut coordinates with images on the Sweet Birthday (B1532) stamp set. Images include the candle, cupcake and party hat. 

The last one is my favorite. These new thin cuts coordinate with the Swirly Seashells (C1664) stamp set. Note that each of the shells on this stamp set can now be cut from the thin cuts!

Start shopping now>>

Posted on

Back to School and Back to the Basics

This week is Back to School for my family. In addition to my daughter starting her Junior year of High School (where did time go?), I’m starting a new adventure this year by teaching an algebra class at our local college.

Our week has been filled with new books, school supplies and trying to get back to a more regular sleep pattern. So today, I thought it was fitting to dedicate a post to the hard working professionals we call teachers.

Fundamental_Basics_schoolhouse

If you are a teacher, you don’t hear these words nearly enough. So I just want to say: “THANK YOU!”

This card was inspired by a similar one presented at convention by Karen Pedersen. She showed us this technique of adding a watercolor wash to kraft paper. Instead of the bright color we normally get from watercolor, we get soft, natural looking colors.

For this card, I stamped the apples from the School Kids (D1709) stamp set with black ink on the dotted kraft paper in the new Rustic Home Fundamental Basics paper pack and added color with watercolors. For the school house and ruler, I used the solid back side of the dotted paper. Similarly, the red strip was made with plain kraft paper and a wash with red watercolor.

Just a reminder of our August special where you can get the Rustic Fundamentals paper for free when you order the Whimsy, Adventure and Enchantment papers! Learn more about the special>>

Have a great school year!

Rebecca

I used the following products that can be found on my CTMH website (www.rebeccabrown.ctmh.com).

School Kids (D1709)
product image
Watercolor Paints (Z3132)
product image
Paint Brushes (Z3188)
product image
Rustic Home Fundamental Papers (Z3262)
product image
White Twine (Z3216)
Posted on

#30yearsofhappy – Day 11

We are now on day 11 of our #30yearsofhappy challenge. Did you miss any of the first 10 projects? Click this LINK to check them all out.

I have also started collecting #30yearsofhappy projects from across the internet on a Pinterest board. Click HERE to see it.

Rock Star Student

I love this Ellen’s idea for using the “Rock Star” stamp from the #30yearsofhappy stamp set. As a former teacher, I can attest that EVERYONE loves to be praised. On a whim the first week of my first teaching job, I put little stickers on homework papers.

I really didn’t think high schoolers would care. I was really surprised what a big deal this became. Even the coolest students collected those stickers on the front of their notebooks. If I ever forgot to put a sticker on their paper, they would ask for it (demand really, lol).

It became a great incentive for them to do and double check their homework. There are actually several stamps in this set that would work to give that quick little boost of encouragement. Follow this link to her blog post to learn more Ellen’s thoughts on this idea.

Be sure to check back tomorrow to see the Julia’s next project in our #30yearsofhappy challenge.

Ready to get your own #30yearsofhappy stamp set? Click this link to go my CTMH website. Pick our ANY of our stamp sets with total retail of $30 or more and you will be prompted to add this set for FREE!

I hope you will join us on this 30 day challenge. How many projects can you make with this set in September? Add your projects using the link invitation below.

Make some time for creating today!

Rebecca

An InLinkz Link-up

Posted on

Back 2 School Shopping Event this Sunday

Need a little retail therapy before school gets back in session? 

Come to our Mom’s Back 2 School Shopping Event with Mary Kay, Thirty-One, Jamberry, Close To My Heart & Paparazzi thisSunday (August 10) from 2 – 5 pm in South County. 

Email me to RSVP and I’ll send you the address.


Know someone who needs a little extra encouragement on the “first day”? 

Make this {free} card for someone special at the event! 

I’ll have samples of the new papers and other great products in the Annual Inspirations Idea Book. Check out the new stuff online and start your wish list now! LINK>>

I hope you can make it. 

Rebecca

Posted on

Quote of the Week

“My home is where my books are.”

Ellen Thompson

My daughter Emily would certainly agree with this one. Reading is her favorite past time.

Emily’s five favorite book series:

1) Inheritance Cycle by Christopher Paolini

2) Inkheart by Cornelia Funke

3) Harry Potter by J. K. Rowling

4) Lord of the Rings by J. R. R. Tolkien

5) Fablehaven by Brandon Mull