Posted on

#30yearsofhappy – Day 21

It’s day 21 of our #30yearsofhappy challenge. If you missed any of the first 20 projects, you can see them by clicking on this LINK. Now, we’d love to see what you have made. Share your projects using the link at the bottom of this post.

Party! Party! Party! Card


Are you ready to Party? This fun card was made by Julia at www.createteachrepeat.blogspot.com using the “Party!” stamp from the #30yearsofhappy set.  I love how she repeated the sentiment tone-on-tone to create a custom background. Click on this LINK to Julia’s blog post for more details.

Be sure to check back tomorrow to see the next project in our #30yearsofhappy challenge.

Ready to get your own #30yearsofhappy stamp set? Click this link to go my CTMH website. Pick our ANY of our stamp sets with total retail of $30 or more and you will be prompted to add this set for FREE!

I hope you will join us on this 30 day challenge. How many projects can you make with this set in September? Add your projects using the link invitation below.

Make some time for creating today!

Rebecca

An InLinkz Link-up

Posted on

#30yearsofhappy – Day 16

We’ve made it half way through the month! It is the 16th day of our #30yearsofhappy challenge. My friends, Ellen & Julia, and I have been posting projects all month featuring stamps from the #30yearsofhappy stamp set.

This special stamp set, #30yearsofhappy, was designed to celebrate our founder and CEO Jeanette Lynton’s 30th anniversary in the scrapbooking and stamping industry. To get this stamp set free, simply place an order on my Close To My Heart website which includes $30 in current retail-priced stamps.

Are you up for a challenge? You are invited to join us! Scroll to the bottom of this post for an invitation to post a link to your project using the #30yearsofhappy stamp set.

Super & Awesome Card

As I was trying to decide what to do with the “&” stamp, I noticed that the fancy square looked familiar. Guess what? It is on the Art Philosophy Cricut cartridge (page 53). I cut it at 3/4″.

My supply list: Chalk It Up paper, Chalk It Up Assortment, Slate & Lagoon cardstock, Triangle border punch and Art Philosophy Cricut cartridge

Be sure to check back tomorrow, when Ellen at www.cardmonkeysjungle.com will share another project made using this fun stamp set.

Want to get your hands on one of this sets? Here’s how: Go to my CTMH website and pick out several stamp sets you love with total retail of $30 or more. This will be easy because there are so many great new sets to pick from! When you view your shopping cart, you will be prompted to add #30yearsofhappy for FREE!

In the meantime, keep creating!

Rebecca

An InLinkz Link-up

Posted on

#30yearsofhappy – Day 15

It is September 15. That means that we are halfway through our #30yearsofhappy challenge.  If you are just now joining us you can catch up by clicking on this link.

Lucky In Love Layout

Today’s project is this scrapbook layout created by Julia from www.createteachrepeat.blogspot.com. I how she pieced together the Lucky stamp from the #30yearsofhappy set with some letter stamps to create a word art title. I may need to “scraplift” this!

Be sure to read Julia’s blog post to see how to make one for yourself.

Be sure to check back tomorrow to see the next project in our #30yearsofhappy challenge.

Ready to get your own #30yearsofhappy stamp set? Click this link to go my CTMH website. Pick our ANY of our stamp sets with total retail of $30 or more and you will be prompted to add this set for FREE!

I hope you will join us on this 30 day challenge. How many projects can you make with this set in September? Add your projects using the link invitation below.

Make some time for creating today!

Rebecca

An InLinkz Link-up

Posted on

#30yearsofhappy – Day 6

It’s the 6th day of the #30yearsofhappy challenge. Each day this month, I will be posting a piece of artwork using one of the stamps from this special stamp set. My friends Julia & Ellen are joining me on this adventure and today’s card comes from Julia.

Thinking of You Chevron Card

Today’s artwork is this monochrome “Thinking of You card by Julia” from www.createteachrepeat.blogspot.com. I love the new Fundamental Basics paper and this card really showcases the back-to-back patterns. Hop over to Julia’s blog by clicking this LINK to learn more about this project.

Be sure to check back tomorrow to see the next project in our #30yearsofhappy challenge.

Ready to get your own #30yearsofhappy stamp set? Click this link to go my CTMH website. Pick our ANY of our stamp sets with total retail of $30 or more and you will be prompted to add this set for FREE!

I hope you will join us on this 30 day challenge. How many projects can you make with this set in September? Add your projects using the link invitation below.

Make some time for creating today!

Rebecca

An InLinkz Link-up

Posted on

One more Chalk It Up Project!

The month of August is winding down and all month I’ve been posting projects made with products from the Chalk It Up collection. I have one more quick and easy layout to show you.

For this layout, I moved away from the school theme and added some flowers and hearts. As you can see, this layout is missing a title. Since I have not yet decided what pictures to use on the layout, I figured I’d wait to add it later.

As you can see in this detailed shot of one of the clusters, I used fom tape to add dimensions and layer the flowers. I was tempted to color the flowers — they seemed to be begging for the new alcohol markers. But the layout already had lots of color so I left them white. I like how it turned out, don’t you?

You will also notice that I created my own B&T paper by stamping circles tone-on-tone randomly on Lagoon paper. This is a very inexpensive way to add some design to otherwise flat cardstock without over powering the pictures and other elements on the page.

Supply list (available on my CTMH website)

Chalk It Up Paper Pack

Chalk It Up Accessory Pack

Sequins Gold Assortment

Gold Shimmer Trim

Happy Birds stamp set (C1600)

Glitter Glam stamp set (B1465)

Here We Go Stamp set (D1600)

Black & Lagoon Ink Pads

I hope this project has given you some new ideas to try on your own projects.

Happy Creating!

Rebecca

Posted on

Flavored Water & Snack Gift Idea

Need a quick and easy gift idea? I love making a drink mix and snack holder by cutting “door hanger with box” on the Cricut. Just assemble the box, loop it over the lid of a favorite drink and fill with yummies.

The door hanger is from the Art Philosophy Cartridge. It’s on page 25 of the handbook using the shift key and layer function (bottom right hand corner of page).

The hanger is cut with a notch on one side. When I added the treats to the box, it didn’t want to stay on the bottle. So covered it with some washi tape and the hole was still large enough to slip over the water bottle lid. You can see this better in this side-view picture.

This “door hanger” can be used on other beverage bottles like soda or wine. In fact it would work on anything that is in a bottle — I just heard yesterday that Olive Oil collections are the new rage. How about buying a bottle of fancy oil for a friend. Put some seasonings, a special recipe or a gift card in the box. 

Until next time, keep creating!

Rebecca

Posted on

New Chalk It Up MIni-card Kit – FINALLY Available to Order

I had hoped to have this kit ready earlier this month, but with all the fall school busy-ness it didn’t happen. I’m so excited to finally share this project with you!

This new card kit is perfect for dropping little notes of encouragement to be found later. You can slip them in lunch boxes, brief cases and back packs or maybe leave them on a desk or a pillow. We all have special people in our lives and these cards will help you let them know that you are thinking of them even when you are apart.

Each kit includes everything you need to make 10 cards. 

  • 1 sheet Chalk It Up B&T Duos
  • 3 sheets Cardstock
  • 10 3″ x 3″ envelopes
  • 5 Black Enamel Stars
  • 1 pack Chalk It Up Accessories
  • Instructional Brochure

Note, you will need the following additional items to complete your cards.

  • My Acrylics Blue Ribbon Stamp set (C1464)
  • My Acrylix blocks of various sizes
  • Lagoon, Black, Sorbet and Thistle ink pads
  • Paper Trimmer & Scissors
  • Adhesives 

Order you kit now>>

Remember the August Collection of the Month is Chalk It Up. You have until September 30 to post your Chalk It Up projects on Social Media to win a prize from me. See this postfor more information about how to enter.

Have a wonderful weekend,

Rebecca

Posted on

Chalk It Up Picture My Life Mini-Album

Today, I realized that I never shared on my blog this adorable mini-album that we made at the Close To My Heart convention this summer. As you will see it is really easy to make following just a few simple steps.

1. Select a Picture My Life Program

Pick a Picture My Life Program that goes along with the event or theme of your mini-album. This is probably the hardest step because there are so many great Picture My Life kits! The cards for my mini-album are from the Chalk it Up program.

2. Choose Specific Cards.

You can make your album as thick or thin as you like. Mine includes10 cards. You will probably want all of your cards to have the same orientation — landscape or portrait. But hey, you can do whatever you want. The album will be small so turning it sideways for some pages isn’t a big deal.

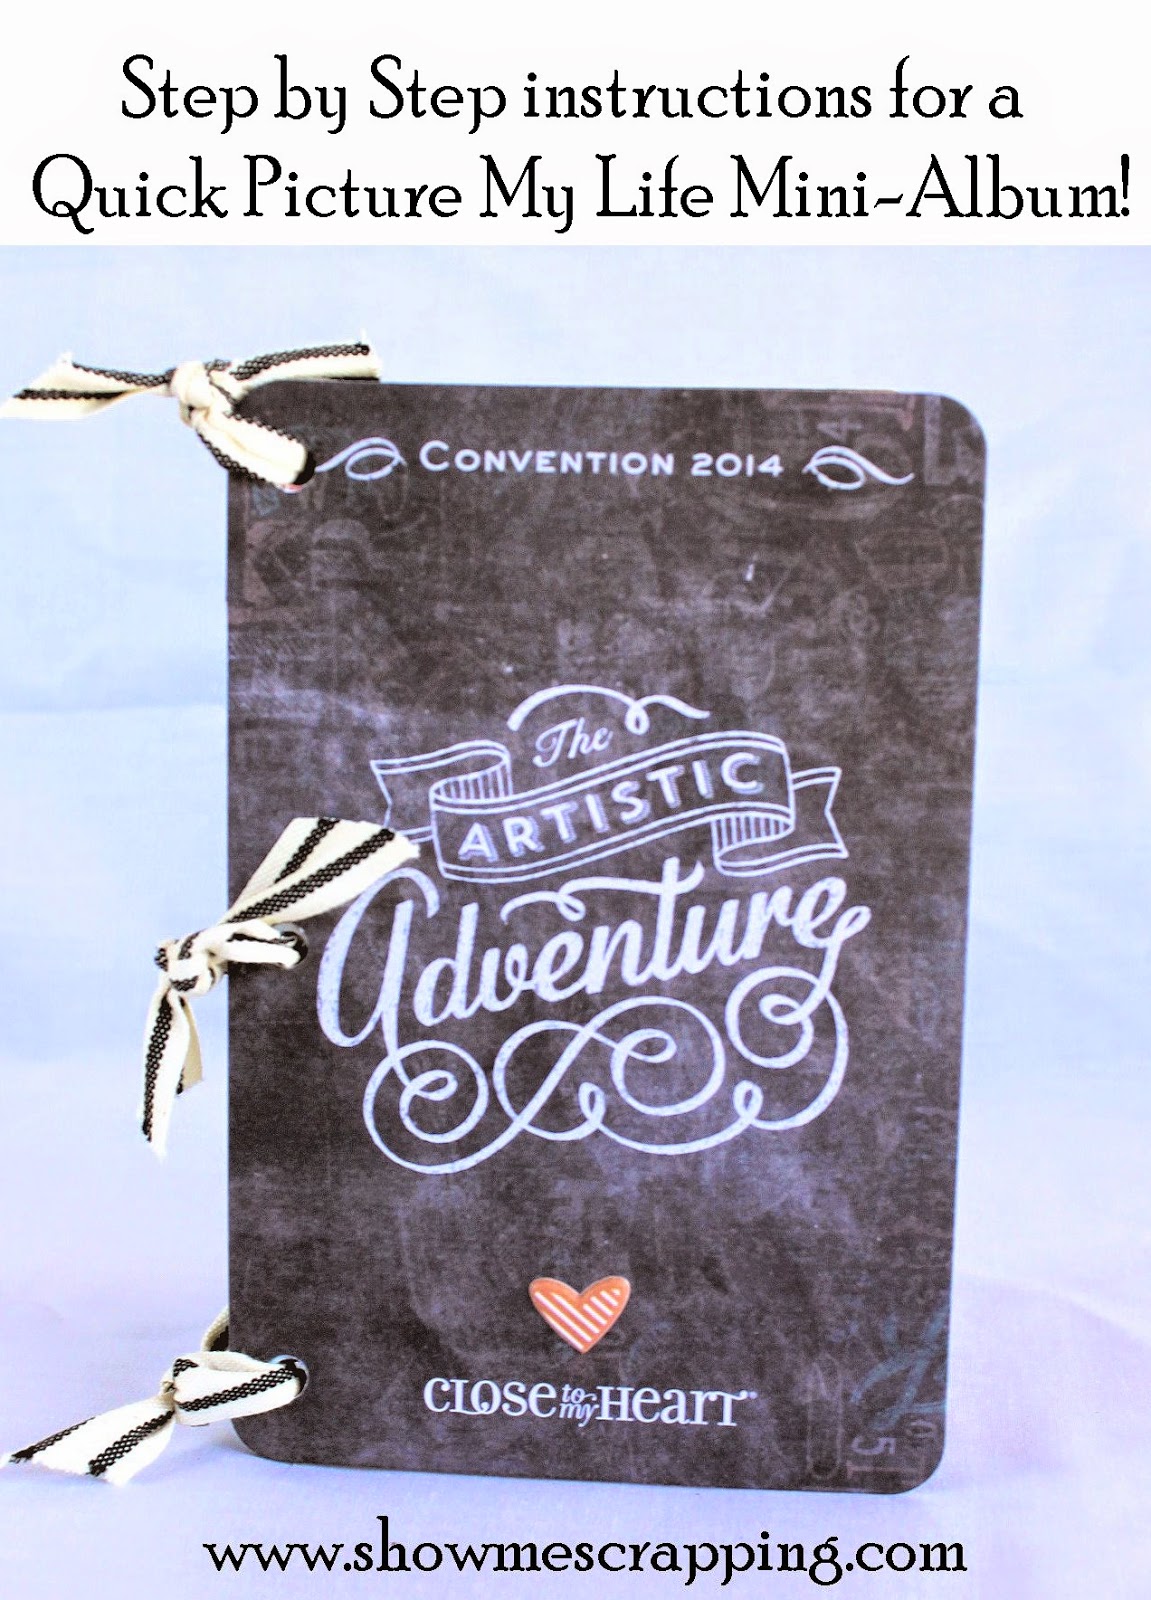
Choose one of the cards to be your cover. Close To My Heart provided convention attendees with the exclusive cover shown above. Isn’t that awesome? But don’t worry, there are still hundreds of title cards to pick from!

3. Personalize!

This is the fun part. Make the album uniquely your own by adding pictures, journaling, stamping and embellishments. I’ve added a few photo mats on the pages shown below. (Sorry, have not printed my convention photos yet.) In addition, I added some stamping, stickers from the Chalk It Up Assortment set and mini-sparkles.

You will find that some pages don’t need any embellishment or maybe just a sticker or two. 

4. Finish.

Punch holes along the left side of each card. Line up holes and thread a piece of ribbon through and tie in a knot. Make sure you leaves some slack in your ribbon. My first attempt was too tight and the album would not lay flat.

That’s all there is to making a Picture My Life mini-album. Close To My Heart has done most of the work for you by creating beautiful quality cards!

So, which Picture My Life set do you pick?

Just a reminder that you get the best deal when you order Picture My Life in August. For each program ordered, you can add a set of 10 page protectors for just $3!

See all the Picture My Life kits HERE>>

Got a mini to share? I’d love to see pictures. Post a link in the comments below.

Happy creating!

Rebecca

Posted on

Two layouts using Chalk It Up Complements

Today, I wanted to share these two layouts using the Chalk It Up papers and Complements. Although these layouts were made by the fabulous Close To My Heart artists, they are not featured in the Annual Inspirations book and I knew you’d want to see them.

I love how quickly layouts come together using the Complements that coordinate perfectly with each paper pack. The Chalk It Up Complements are sturdy chipboard and add colorful dimension to your projects. 

Don’t forget that my August Collection of the Month is Chalk It Up. Now is the time to order supplies for your projects so you can complete them at my house in September. In addition, you can post your projects on Social Media to enter my Collection of the Month contest. 

Click here for more information about the Collection of the Month>>

Have a wonderfully creative weekend!

Rebecca

Posted on

Chalk It Up – August Collection of the Month; Post your project to win!

Announcing the August 2014 Collection of the Month: Chalk It Up!

Each month, I feature a different product collection from Close To My Heart by posting information about kits for purchase and other project ideas on this blog, the Show Me Scrapping Facebook page and displays at events.

When you include products from the Chalk It Up collection on a qualifying August order, you are invited to complete your projects at one of my club workshops for free in September. In addition, I encourage you to show off these creations on Facebook to be entered to win a size M stamp set of your choice!

To be entered into the drawing, please complete these three steps:

1. Place an order of $25 or more in August that includes at least one product from the Chalk It Up collection: Chalk It Up Paper Pack (X7184B), Chalk It Up Complements (X7184C), Chalk It Up Assortment (Z3009), Chalk It Up Scrapbooking Workshop on the Go (G1081) or Chalk It Up Picture My Life Program (Z2018). You can order by contacting me or placing an order on my website. Be sure to join the current “club” gathering before finalizing your order.

2. Create a project that includes something from at least one of the products listed above.

3. Post a picture of your completed project to your Facebook, Twitter or Instagram account with the hashtag #showmechalk. (Because Facebook hashtags expire in about a week, please also share your post on Show Me Scrapping’s facebook page or tag me to make sure I see it.)

Enter as many unique projects on separate posts as you want. One winner will be chosen at random from the qualifying projects posted as of September 30.

Your project does not need to be original. Completed layouts or cards from workshop kits are completely acceptable for this contest. Feel free to find inspiration on pages 46 through 59 of the brand new Annual Inspirations, my blog, Pinterest or Google.

I can’t wait to see what you create!

Rebecca