Posted on

Capture Senior Year Memories with this new Workshop

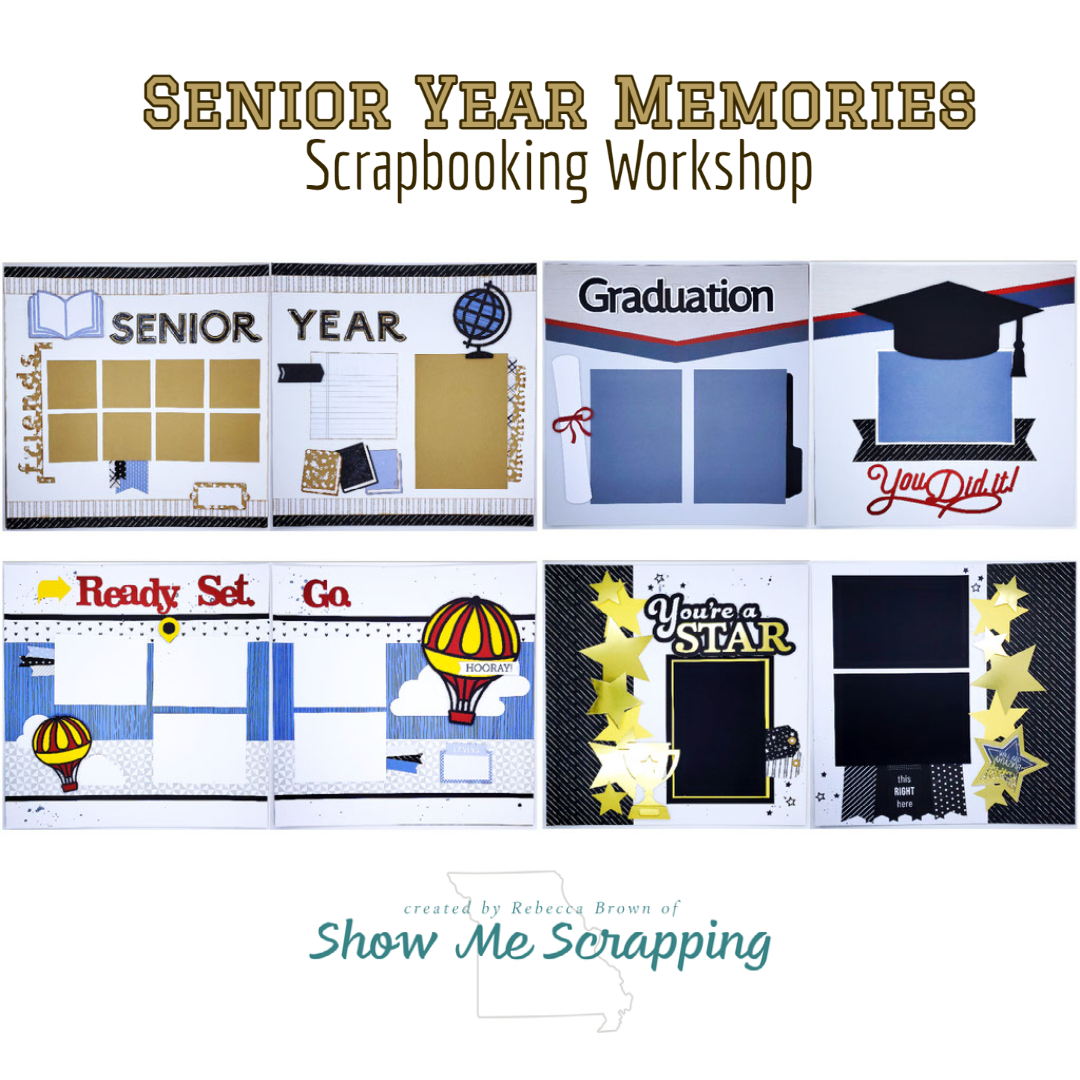
I’m so excited to announce my new graduation-themed scrapbooking workshop. These fun pages have big bold die cut images, a shaker element and lots of room for photos and mementos.

The workshop makes four Senior Year themed two-page 12″ x 12″ layouts with custom Cricut shapes created from CTMH images, a star shaker element and optional shimmer brush and stamping techniques. Let’s take a closer look at these layouts:

This workshop is available to order now! You can choose to get a complete kit, Cricut and die cut pieces only or just the instruction guide. You can also get a free instruction guide by placing an order of $40 or more on my Close To My Heart website. After placing your order, click here to request the guide.

Be sure to review the list of included and additional materials to decide which option to choose. If you are doing your own cutting, you will need the Star Shaker Window Thin Cuts (Z3871) and have access to the following Cricut collections in Design Space: Artbooking, Flower Market, You Are Here, Artiste, Art Philosophy. These collections are available through my Cricut affiliate link.

The sample layouts include optional stamping, distressing and shimmer brush techniques.

  • Stamping: The image inside of the star shaker window and other places in the workshop are stamped with the All-Star Birthday Stamp Set (C1888) and Intense Black ink.
  • Distressing: Papers in layout 1 are sponge distressed using a Toffee ink pad and sponge (or sponge dauber).
  • Shimmer: Splatters were added to the base pages for layout 2 and 4 using a Black Shimmer Brush. The brush can also used to add extra sparkle to several black cardstock pieces.

Step-by-step directions for cutting, prepping and completing the layouts, plus lots of helpful tips, are in the instruction guide.

Order now>>

Posted on

New Uptown Scrapbooking Kit for all your formal occasions

This year my in-laws celebrated their 50th wedding anniversary. As we were planning their celebration, I knew I wanted to make a special scrapbook to celebrate them. The new Uptown Fundamentals papers and complements were perfect for this project.

In addition to special anniversary pictures, my new Uptown Scrapbooking kit is perfect for wedding, engagement or even prop. These three layouts get their charm from the beautiful Uptown Fundamentals collection which includes paper with beautiful black and white prints and coordinating Complements pack with coordinating stickers and black and gold glitter die-cuts.

Here’s what you get in the Uptown Scrapbooking kit:

  • Z3263 Uptown Fundamentals Paper Packet
  • Z3269 You & Me Complements
  • Z3289 Uptown Ribbon Pack
  • X5789 Sea Glass Cardstock (1 sheet)
  • X5787 Blossom Cardstock (1 sheet)
  • X5930 Slate Cardstock (1 sheet)
  • X5929 Whisper Cardstock (1 sheet)
  • 1386 Black Cardstock (3 sheets)
  • 1385 White Daisy Cardstock (3 sheets)
  • Complete cutting and assembly instructions for six 12″ x 12″ pages (pdf)


Already have some of the products? You purchase just the instruction sheets!

<<ORDER NOW>>


Love Close To My Heart? I’d like to invite you to join my team, the Treasure Keepers, and get the instructions for this workshop free! Get started now>>

Posted on

My First Cricut Explore Project!!

My sweet hubby surprised me with a Cricut Explore earlier this month as a combined Mother’s Day & Birthday gift. I couldn’t wait to get it out of the box and start playing. But life has been in the way all week. Last weekend I hooked it up, ran the install program, set up my account, etc….and FINALLY got to play!

Here’s a peek at my first project:

Additional pictures below. Curious about how the Cricut Explore works? Read as I share my experience with you. 

After I installed Design Space, I arrived at this “landing page” with ready made projects. Scrolling down showed many additional projects….where to start??

I need a couple graduation cards, so I decided to make the card in the lower right corner. When I clicked on the image, this window popped up.

I planned to make is just as shown, so I clicked “make it now” which took me to this view showing the mats to be cut.

Since I wanted two cards, I changed the count and pressed Apply. (See red circle.) The additional pieces were added to my mats automatically.

When I pressed “Go”, I was guided through inserting the pen, loading and unloading mats. Then I assembled the card and Presto! My cards were ready to be assembled.

Here is on of my finished cards:

It doesn’t show up too well in the picture, but I cut the Congrats from shiny silver paper. It was in my stash without any wrapping so I can’t tell you where it came from. I also made some confetti with scraps of the silver paper using another predesigned project.

So far I am having a blast with my new Explore! Making a pre-designed project is a great way to start learning the ropes while creating. The pen worked much better than I anticipated and I’m looking forward to being able to both cut and draw with the same machine.

If you have a Cricut Explore, I’d love to see and hear about your projects. Please post links to your blog or gallery with pictures in the comments section below. Also, please let me know what questions you have — we can explore and learn together!

Happy Creating,

Rebecca

Posted on

Cards to celebrate your favorite Graduate’s Achievements

Last night I finished up the sample cards to next Sunday’s Graduation Card workshop.

This first card is not just for graduations and could be used for any occasion that you want to remind someone to be themselves. This fun card uses the Typeset paper with the Pair-a-Phrase Stamp set.

The second card can also be used for non-graduation occasions. The message is to “Follow your dreams for as you dream you shall become.” The inside has this Walt Disney quote “All our dreams can come true, if we have the courage to pursue them.”.

This card also uses the Pair-a-Phrase stamp set along with the Superhero paper pack.

The final card has more traditional graduation imagery, but has a fun shape depicting a cap and tassel. Here’s a picture of the closed card:

And here’s the view when you lift up the cap to open the card:

Stamping is done with the You Did It set.

I’d love to have you come to my house on Sunday, April 22 from 2:30 – 5:00 and make these fun cards with us. You will make 4 of each card (12 total) for $12. Please email me to register and receive directions to my home.