Posted on

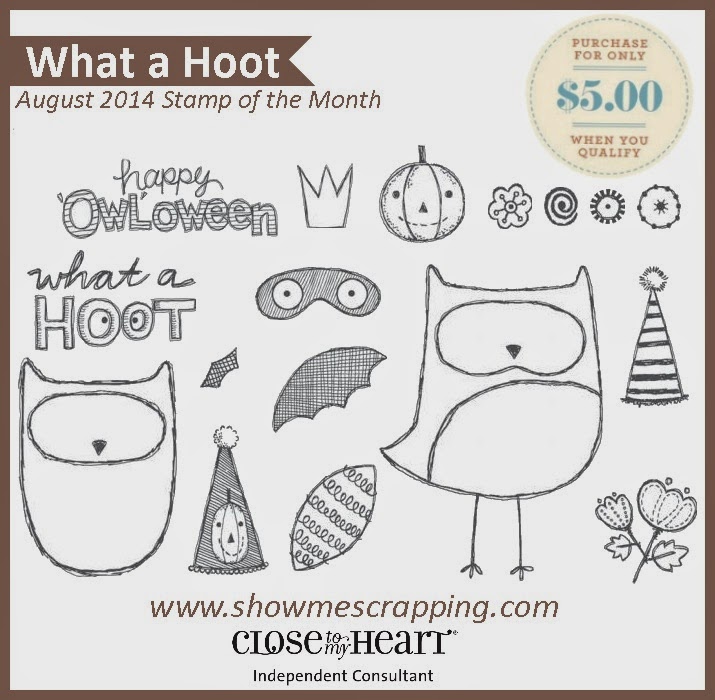
What a Hoot – August Stamp of the Month – Just $5

Are you ready for cute? This month’s stamp of the month has owls that are ready to be dressed up and decorated. Whether you are planning a Halloween, birthday or other celebration, you can use this set to make fun cards, favors and other decorations.

The August Stamp of the Month, “What a Hoot” includes all of these stamps:


This stamp set is only available through August 31. The full retail price is $17.95, but you can get yours for just $5; that’s over 70% savings. When you place an order of $50 or more in Close To My Heart products, you qualify for this special Stamp of the Month pricing.

Just $5 with a $50 purchase!

Start shopping>>


Here are a few fun projects the creative folks at Close To My Heart dreamed up:


If you love the artwork in this picture, you will love the new Scaredy Cat Collection. Follow this LINKto check it out and all the other awesomely new stuff!

Start Shopping>>

Posted on 16 Comments

Festive Friday Blog Hop: September Edition

Welcome once again to the Festive Friday blog hop! On one Friday each month through December, you can hop through our blogs to holiday cards, layouts or home decor items using the amazing new products in the Autumn/Winter 2013 Idea Book. I hope you enjoy this paper “eye candy”! Just one more reason to love Fridays!

If you missed my post for the August edition, you can find it HERE. If you came here from Diane’s blog, The Happy Scrapbooker, then you are on the right track. Your hopping path is circular and you will visit each of us by following the links.

This month, I’ve got a fun Halloween mini-album to show you.

Everything in the album was cut using the Artbooking Cricut Cartridge (pages 54 and 55 of the handbook). I set the size dial to 5″ and everything was cut in proportion which made putting it together a snap!

To speed things up, I loaded all of the images I was cutting out onto mats in Cricut Craft Room and I saved the file to share with you. You just need four sheets of cardstock for the entire album. 

<Download File>

Here’s pictures of all of the pages:

Now it’s your turn…use the CCR file to create your own album. Please share a link to pictures in the comments. I’d love to see what you come up with.

Be sure to check back on October 18 for our next installment of the Festive Friday Blog Hop. But for now hop on over to Michelle’s Wandering Scissors blog, your next stop in today’s hop.

Keep Creating!

Photobucket

Posted on

Halloween Treats!

Trick or Treat! No tricks, I have a treat for you.
I’ve decided to have a Halloween sale, plus a recruiting special!  


 20% off Cricut Collections
and Moonlight Workshop on the Go
!That’s right, I
am offering 20% off either the Art Philosophy Cartridge or the Artiste
Cartridge, plus the Moonlight Workshop on the Go.  This offer is only good
through midnight October 31th.  The list below includes hyperlinks
to the item descriptions on my website, however please do not order it on my
website.   You must email me to get this special pricing
and I will send you an PayPal invoice with your total. Please include your mailing address  and phone number in the email.


Artiste
Cricut Collection
– Regularly $99.00, now $79.20

Art
Philosophy Cricut Collection
– Regularly $99.00, now $79.20

Moonlight
Workshop on the Go
– Regularly $29.95, now $23.95

Join my team and receive $49 in product from me for a quick start!Sign up before midnight October 31 and I will refund your kit price in your
choice of CTMH products when you reach your Straight To The Top goals. These
targets consist of sales of $300 in the first month and $1,200 total in the
first three months. When you achieve these goals, CTMH will reward you with $100
in Select Product Credit. I will add to that an additional $49 in products of
your choice. Ready?Click
here
for the simple online application.

Happy Haunting!

Photobucket

Posted on 1 Comment

Moonlight Haunted House

We are getting in the Halloween spirit at our house. Earlier this week, I posted pictures of the Halloween banner my daughter made for our mantle. Well, she’s added another item to the display. Last weekend, Emily worked with her cousins to decorated this paper-mache house using Moonlight paper and dimensional elements and the Wicked stamp set.

IMG_5803

I especially like how they made the door look like it is falling off it’s hinges. The knocker is from the Haunted Assortment.

IMG_5802

Our Halloween Mantle

I am so happy that my daughter and nieces have caught the creative bug. I look forward to spending time with this next generation creating. What about you? Does your family like to craft together?

Photobucket

Posted on 1 Comment

Artiste Key Notes #5–My Halloween Mantel

Today, I am showing off my beautiful banner that my daughter made for my mantel.  Big thank you goes to my sister-in-law, Stephanie, who shared the Cricut cut sizes that she used for her similar banner.

IMG_5798

Isn’t it cute? She made this using the fun Halloween images on page 77 of the Artiste Cricut cartridge handbook. Have I told you how much I love that the images on each key of this cartridge work together to create fun and unique projects?

p 77

Want to make one for yourself? A list of the cuts and a few hints are below. All papers listed are from the Moonlight paper pack. Please note that although the picture of the Spellbinder workshop was used as inspiration for this banner, Emily and Stephanie did not have access the instructions and they made a few modifications in the design. Their creation may have different measurement than that pattern.

Artiste Cricut Cuts:

Owl/leave B&T – Cut 2 of <Accent 1> at 8”

Striped B&T – Cut 2 of <Accent 1 (shift)> at 8”

Black check B&T – Cut 1 of <Accent 1> at 8”

Black cardstock – Cut 4 <Accent 2> at 2”; cut 3 <Accent 2 (shift)> at 5”; Cut 1 <Boo (shift)> at 2.25”, Cut 2 <Accent 4 (shift)> at 2.5”

Colonial White cardstock – Cut 5 circles (p. 48 <card>) at 3”

Goldrush cardstock – Cut 5 <3D Object (shift)> at 4” with real dial size selected

The rosettes under the spiders were a challenge at first, but we have a few tips to help you.

IMG_5799

We recommend first scoring the rosettes every 1/2”. We lined the score marks up with the groove in the paper trimmer and traced them with the bone folder to make nice straight lines.

IMG_5813

Then accordion fold (mountain/valley) the entire length.


IMG_5815

Each rosette will take two of the border strips which you will attach at the ends. Make sure that you position them together so that you don’t mess up the mountain/valley pattern of the folds. To secure them, we used tombow tape runner (for immediate stick) with a few dots of liquid glass (for permanent hold).

IMG_5816

Each rosette is now a ring of paper. Prepare a circle of paper (scrap approximately 2” diameter) for the base by filling it with several glue dots (immediate) plus some liquid glass (permanent). Set the ring on the table with the fancy side down. (Note: After taking this picture, we decided it was better to have the circle off to the side instead of setting in the middle of the ring. But I forgot to retake the picture.)

IMG_5817

Then flatten by squishing the top edge down on the table and toward the center. Lay the prepared base with sticky side down on top of the rosette. To keep it in position, set something on top to hold while the glue sets. We used a large My Acrylix block.

IMG_5819

The cut from the Goldrush paper may have seemed odd since we are not making the owl bag. Take another look at the picture…do you see them? That’s right, the “eyes” become the scalloped circle on each banner piece. How creative is that?

IMG_5800

I hope this project has inspired you. I’d love to see you creations – post a link to your picture in the comment section!
Posted on

It’s Party Time!

This September newsletter article focuses on Halloween themed party decor using the new Artiste collection.

My newsletter is the best way to stay informed of events, specials and fun tutorials like the one below. Please email me to subscribe.

Artiste jump-starts your party preparations

Join my Team in August and receive an adorable Close To My Heart bag for free!

The brand-new Cricut® Artiste cartridge knows how to party! Fifty themed keys with over 700 shapes including cute cards and 3-D projects galore add up to a staggering number of party favors, invitations, and decorations, all at your fingertips when you have the Cricut® Artiste cartridge!

As one example, take a look at the coffin-shaped treat boxes above. If you’re planning a Halloween party—or if you just want to make Halloween treats with a spooky flair—these coffin boxes are a snap! Here’s how to do it:

First, gather these materials:

  • Z1790 Cricut® Artiste Collection
  • C1462 My Acrylix® All Hallows Eve Stamp Set
  • Z1375 Kraft Cardstock
  • 1243 Goldrush Cardstock
  • Z2118 Desert Sand Exclusive Inks® Stamp Pad
  • Z2105 Black Exclusive Inks® Stamp Pad
  • Z1701 Baker’s Twine Neutral Assortment
  • Z1754 Sparkles Black & Grey Assortment
  • Z1151 3-D Foam Tape

With your Artiste cartridge in place, load your Cricut® machine with kraft cardstock and cut the coffin by setting the size dial to 5 1/2″ and pressing the “3D Object” feature key, then press the “Eek” key, which is the sixth key in on the bottom row. At this size, you can fit two coffins per 12″ × 12″ sheet of kraft cardstock.

Thanks to the brilliant coordination of elements on the Artiste cartridge, you’ll cut the lid to the box at the same size setting for a perfectly coordinating size and fabulous fit! Press the “Shift,” “3D Object” and “Eek” keys. Two coffin lids will fit on a 12″ × 12″ sheet of kraft cardstock at this size.

Next, before folding the coffin, stamp the diamond pattern image from the All Hallows Eve stamp set several times with Desert Sand ink on the coffin lid. Stamp the cobweb and spider images in Black ink. Follow the easy instructions on page 58 of the assembly booklet to put the box together.

Next, cut a 1/2″ × 2 1/2″ strip of Goldrush cardstock for each coffin and stamp the “Beware” sentiment on the strips. Trim a pennant edge on each strip and then attach it to the lid of your coffin using 3-D foam tape.

Finish your coffin by attaching a Black Sparkle over the spider’s body. Ooo! After filling the box with your treats, wrap the coffin lid to the base using a few inches of Black baker’s twine. Give to your favorite goblin or ghoul!

This is just one example of how the Cricut® Artiste cartridge can help make preparing for all of your parties and celebrations even easier! Check out the brand new Workshops on the Go® Spellbound Cricut® Kit (page 14 in the Autumn / Winter 2012 Idea Book) for another great Halloween-themed party idea using this fabulous cartridge.

Buy supplies for your party essentials »

Posted on

Studio J – My Happy Place!

My first “real” blog is about one of my new favorite scrapbook products, Studio J. When I heard that Close To My Heart had an online scrapbooking product, I was not very interested. I’ve done some digital scrapbooking (using Paint Shop Pro) and created bound books on photo websites. I was not expecting this to be any different than what I have seen elsewhere.

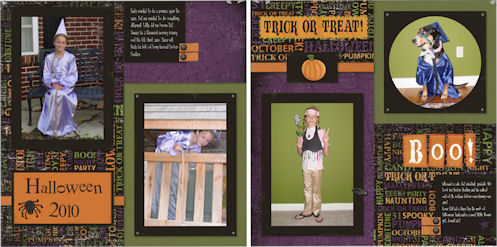
After becoming a consultant, I thought I should at least try out Studio J — just in case someone asks me about it. Since this is a “try before you buy” product, so I logged on one morning when I had an extra half hour to burn. In less than 30 minutes, I created these two complete layouts!

The intuitive step-by-step process makes it so much fun! I simply chose from many beautiful paper kits and layout patterns. Then I personalized my layouts with embellishments and Stickease. There are many choices, but the presets make it easy to decide what will work the best for my pictures.

Here are a few more layouts I’ve made in Studio J:

If this makes you want to try your hand, just click on the Studio J link on the left. You can create as many layouts as you want with no stings attached. If you like what you create, you can purchase 12×12 prints.  There are several options for purchasing and I’d be happy to help you determine which is the right one for you.

Have fun!