Posted on 23 Comments

Scattered Hearts Cricut Blog Hop: Beach Vacation Scrapbooking Layout using the new You Are Here Cartridge

Today’s post is brought to you by the Scattered Hearts Team! I’m proud to be a member of this leading team at Close To My Heart. This team is full of amazing artists and I have a real treat for you today: a blog hop of projects made by team members using the Close To My Heart Cricut collections.

If you arrived from Pink Cloud Scrappers with Lori, you are on the right path. My project is this beach layout using images from the You Are Here cartridge and stamp sets.

The hardest part of this project was deciding where to start since this cartridge has 700 images. They are all travel related and I love to travel, but the sand castle really won me over so my first You Are Here page has a beach theme.

If you’d like more information about this project, continue reading. If you are ready to see the another Cricut project, hop on over to Scrappin with Heather to see what she’s made.

Project Details

One of the things I love about this layout is the use of our new two-toned cardstock. The front of each sheet is the original color, but the back side is a slightly lighter shade. I love how it works for the sandcastle — using two different colors in our palette would have made the contrast too bold. But cutting the layers out of the two sides of our new Toffee paper made it just enough to highlight the details.

You can also see the difference two-toned makes in the Lagoon water. Our paper still has a white core which helped me create the waves in the ocean.

This layout also introduces our new Color of the Year, Bashful. This beautiful soft pink is so trendy and was the perfect addition to my beach layout. 

We have a full lineup of Bashful items including Cardstock, dye and pigment inks, reinker, glitter paper, albums and even the pearls.Don’t they add so much to the cute beach bag on this layout? You will also see this trendy color pop up in other products through out the year.

The You Are Here cartridge is part of a bundle that includes a paper pack plus three great travel stamp sets that coordinate with the images on the cartridge. This tag was made from a cut on the cartridge and stamped with one of the includes stamps. Toffee paper and ink were used to get the soft tone-on-tone look which was perfect for this layout.

Design Space Link

Click on the link below to open to the Design Space file I used to create this layout. Remember you have to purchase the You Are Here Cricut Collection before you can cut the images.

YOU ARE HERE BEACH LAYOUT DESIGN SPACE LINK

Project Recipe:

Lagoon, Bashful, Toffee and White Daisy Cardstock

Toffee Exclusive Ink Pad

You Are Here Cricut Collection (Z3389 for physical cartridge, Z3387 for digital only)

Bashful Pearls (Z3369)

3D Foam Tape

Posted on 3 Comments

Studio J Blog Hop “Anything goes”

Hey friends, let’s talk a little about Studio J. If you have a camera, a phone or a computer full of pictures, you need this program! If you want your memories preserved in books, but don’t have time to build paper scrapbook pages, you really must give Studio J a try.

To get started, you simply follow this link to set up your personal account. There is no software or kits to purchase. Once you have an account, you can start designing your pages! The Studio J wizard will guide you through the steps of uploading pictures, picking a paper pack, choosing a layout and adding finishing touches. If you get stuck along the way, just drop me an email and I’ll help you along.

I pulled together these two layouts of our trip to Florida in January in less than an hour. And there was NO MESS to clean up!! Plus I got to set in my comfy recliner watching a favorite show with my hubby.

This post is part of a blog hop brought to you by Close To My Heart Consultants to showcase Studio J projects.

So it is time to get hopping! Your next stop is Jen Patrick’s blog, roxybonds-scrappin.blogspot.com.

If you get lost along the way, here’s the full list of blogs participating:

1. Adeline Brill – www.adeline-brill.blogspot.com2. Marianne Hancock – www.thescrapbookchick.blogspot.com
3. Julie Sinnott – www.12X12travels.blogspot.ca
4. Heather Plotzke – www.heatherplotzke.blogspot.com
5. Rebecca Brown – www.showmescrapping.com (you are here!)
6. Jen Patrick- http://roxybonds-scrappin.blogspot.com
7. Traci Godbee- www.createwithtraci.com

Enjoy the ride!

Rebecca

Posted on 7 Comments

Festive Friday Blog Hop: November Edition

Welcome once again to the Festive Friday blog hop! On one Friday each month through December, you can hop through our blogs to holiday cards, layouts or home decor items using the amazing new products in the Autumn/Winter 2013 Idea Book. I hope you enjoy this paper “eye candy”! Just one more reason to love Fridays!

Follow these links if you missed my earlier posts:

August Post

September Post

October Post

If you came here from Diane’s blog, The Happy Scrapbooker, then you are on the right track. Your hopping path is circular and you will visit each of us by following the links.

This month, I’ve decorated a My Creations Star with the Frosted Paper. The first thing I did was ink the outer edges, ridges and valleys of the star with Champagne ink.

Cutting the paper to cover the star was made much easier using a template provided by Close To My Heart. You can access it HERE. Simply print this page on a 8.5″ x 11″ sheet of paper. You can either cut five pieces of decorative paper using the first pattern and fold each one in half to cover each point of the star. Or you can ten pieces using the second pattern. 

I choose to use the second so I could use all the beautiful prints in the Frosted paper pack. As I cut them out, I laid them out to find the best order. 

The Peace banner is from the Artiste Cricut Cartridge (page 80). To make the centerpiece, I stamped Classy Doily (B1424) twice on Champagne and Frosted Blue cardstock. I trimmed the Champagne image down to the 10-pointed star and the Blue one to the 5-pointed star in the middle. 

I used several layers of foam tape to get the banner and star to be flat. The final touches are a couple Small Sparkle Flourishes and a small flower from the Base & Bling Floral Accents assortment.

Be sure to check back on December 13th for our next installment of the Festive Friday Blog Hop. But for now hop on over to Michelle’s Wandering Scissors blog, your next stop in today’s hop.

Here’s a complete line up of the hop:

1. Diane Tuggle2.Rebecca Brown (you are here!)3.Michelle Bowley  4.Carol Loftus5.Linda Pekrul6.Jamie Barney7.Paige Dolecki8.Mary Ellen Driggs9.April Grigson10.Theresa Miller11.Brenda Lapp12.Ashley Denny13.Mary Schwimwer

Keep Creating!

Photobucket

Posted on 4 Comments

Illuminate Blog Hop

Welcome to our November Stamp of the Month Blog Hop! This month Close To My Heart is offering a stamp set called “Illuminate” throughout the month of November. This versatile set can be purchased exclusively through a Close To My Heart Independent Consultant for $17.95 or for only $5 with a qualifying purchase of $50.

In this hop, you will see projects featuring this exclusive and inspirational stamp set by many talented crafty ladies! Enjoy our blog hop.

If you have just hopped onto my blog, please start at the beginning at Lucy’s blog – Love2Create. If you came from Love2Create then you are in the right place!

My project is this hand-stamped candle. I absolutely love all the lamps and lanterns on this stamp set and I am planning to use them in other projects. But for this project, I decided to start with a source of light (my candle) instead of stamping one and just stamp the lovely sentiment.

Stamping on a candle has be on my crafty bucket list for awhile and I found that it was not as hard as I had feared. Thanks to a couple great tutorials (Melissa Rikerand Julie Staab), I was able to complete this project in about an hour.

The first thing you need (obviously) is a candle. You will also need tissue paper, wax paper, a craft heater, stamps and ink pad.

Ideally, your tissue paper will match your candle, but I did not have any that matched the soft yellow of this candle. So I made my own by inking a piece of white tissue paper with Buttercup ink. I started out sponging, but that was too slow so I got inky and just pressed the tissue into the ink pad. Then let it dry for a few minutes.

Although this tutorial is called stamping on a candle, that is not actually what I did. Instead I stamped on the tissue paper which I later adhered to the candle. I used Black ink and once it had dried, I trimmed around the sentiment.

Next, I laid the stamped image on the candle and cover with wax paper. 

Then I heated it with a craft heat gun until the wax paper turned shiny due to the wax melting. You want to make sure the wax on the underside of the sheet and the surface of the candle melts, so heat it just a few seconds after you see it change.

Next, I gently rubbed over the wax paper pressing the tissue into the melted wax of the candle. Slowly, I lifted off the wax paper. The first time I lifted it, one corner of the tissue paper stuck to the wax paper instead of the candle, so I just set it back down, heated and rubbed some more.

When I removed the wax paper, there were a few rough spots on the candle where the layers of wax had separated. To fix this, I heated those areas a little more and smoothed the wax by rubbing with the wax paper.

I finished off the candle with a little Huntington paper (cut with the Scalloped Border punch), Bronze Shimmer Trim and Brown Sparkles.

Your next stop on our Illuminate blog hop is 4 Hearts Scrapping with Jennifer.

Here is a complete lineup in case you get lost along the way:

Thanks for hopping along with us – we hope we were able to inspire you.

Have fun creating!

Photobucket

Posted on 16 Comments

Festive Friday Blog Hop: October Edition

Welcome once again to the Festive Friday blog hop! On one Friday each month through December, you can hop through our blogs to holiday cards, layouts or home decor items using the amazing new products. I hope you enjoy this paper “eye candy”! Just one more reason to love Fridays!

Follow these links if you missed my earlier posts:

August Post

September Post

If you came here from Diane’s blog, The Happy Scrapbooker, then you are on the right track. Your hopping path is circular and you will visit each of us by following the links.

This month, I’ve made this Nativity easel card.

Here’s a look at the front of the card when it is closed.

The card opens from the bottom. Here’s what you find on the inside. 

The papers at the bottom of the inside allow the card to stay open when you stand it up.

Here’s a side view of the card when it is standing.

Materials:

Sparkle & Shine Paper Pack (X7176B)

Mary and Babe Stamp Set (C1562)

Silver Glimmer Trim (Z1799)

Clear Sparkles (Z1752)

To make this card, I used Beate’s directions found HERE.

Be sure to check back on November 15 for our next installment of the Festive Friday Blog Hop. But for now hop on over to Michelle’s Wandering Scissors blog, your next stop in today’s hop.

Keep Creating!

Photobucket

Posted on 12 Comments

Scandinavian Wishes Ornament Card

Today, I have another Christmas project to share with you as part of the Holidays From The Heart Blog Hop. This little layered  card was really quick thanks to the Art Philosophy Cricut cartridge.

For this card, I used papers from the new Sparkle & Shine pack from the Holidays from the Heart Gift Guide. These items just became available for purchase yesterday. I love the details of this particular paper and I thought that it was a great match for the detailed ornament on the Scandinavian Wishes stamp set.

You may know that the October Stamp of the Month, Scandinavian Wishes, coordinates with the Art Philosophy Cricut Cartridge. Each of the shapes with a red outline are shapes that can be cut out. The stamp carrier sheet tells you what page in the handbook to find the image and what size to set the dial on. 

When I turned to page 33, I noticed that in addition to the ornament shape, there is also a decorative layer in the top right corner with the ornament shape in the top right corner.

I cut the layer out at 4″ from Slate cardstock, it was just smaller than the 2″ ornament I cut from White Daisy cardstock. Finally, I cut the scalloped square card at 4″ from a sheet of B&T from the new Sparkle and Shine paper pack.

Here’s a peek at the inside of the card:

Even though it is only the middle of October, the holidays are coming quickly. Now is the time to get your holiday projects started. The new Holidays from the Heart mini-catalog has lots of fun new products. You can view it online HERE.


To see more projects using Holiday Gift Guide products, visit my fellow CTMH consultants participating in this hop by clicking on the photos below. 


This blog hop is open for members of the CTMH Blog Boosters. Please do not enter if you are not a member of the group. If you are a consultant, you can join the group on facebook. If you are interested in becoming a consultant, I’d love to help get you started!


Keep creating,


Photobucket

Posted on 12 Comments

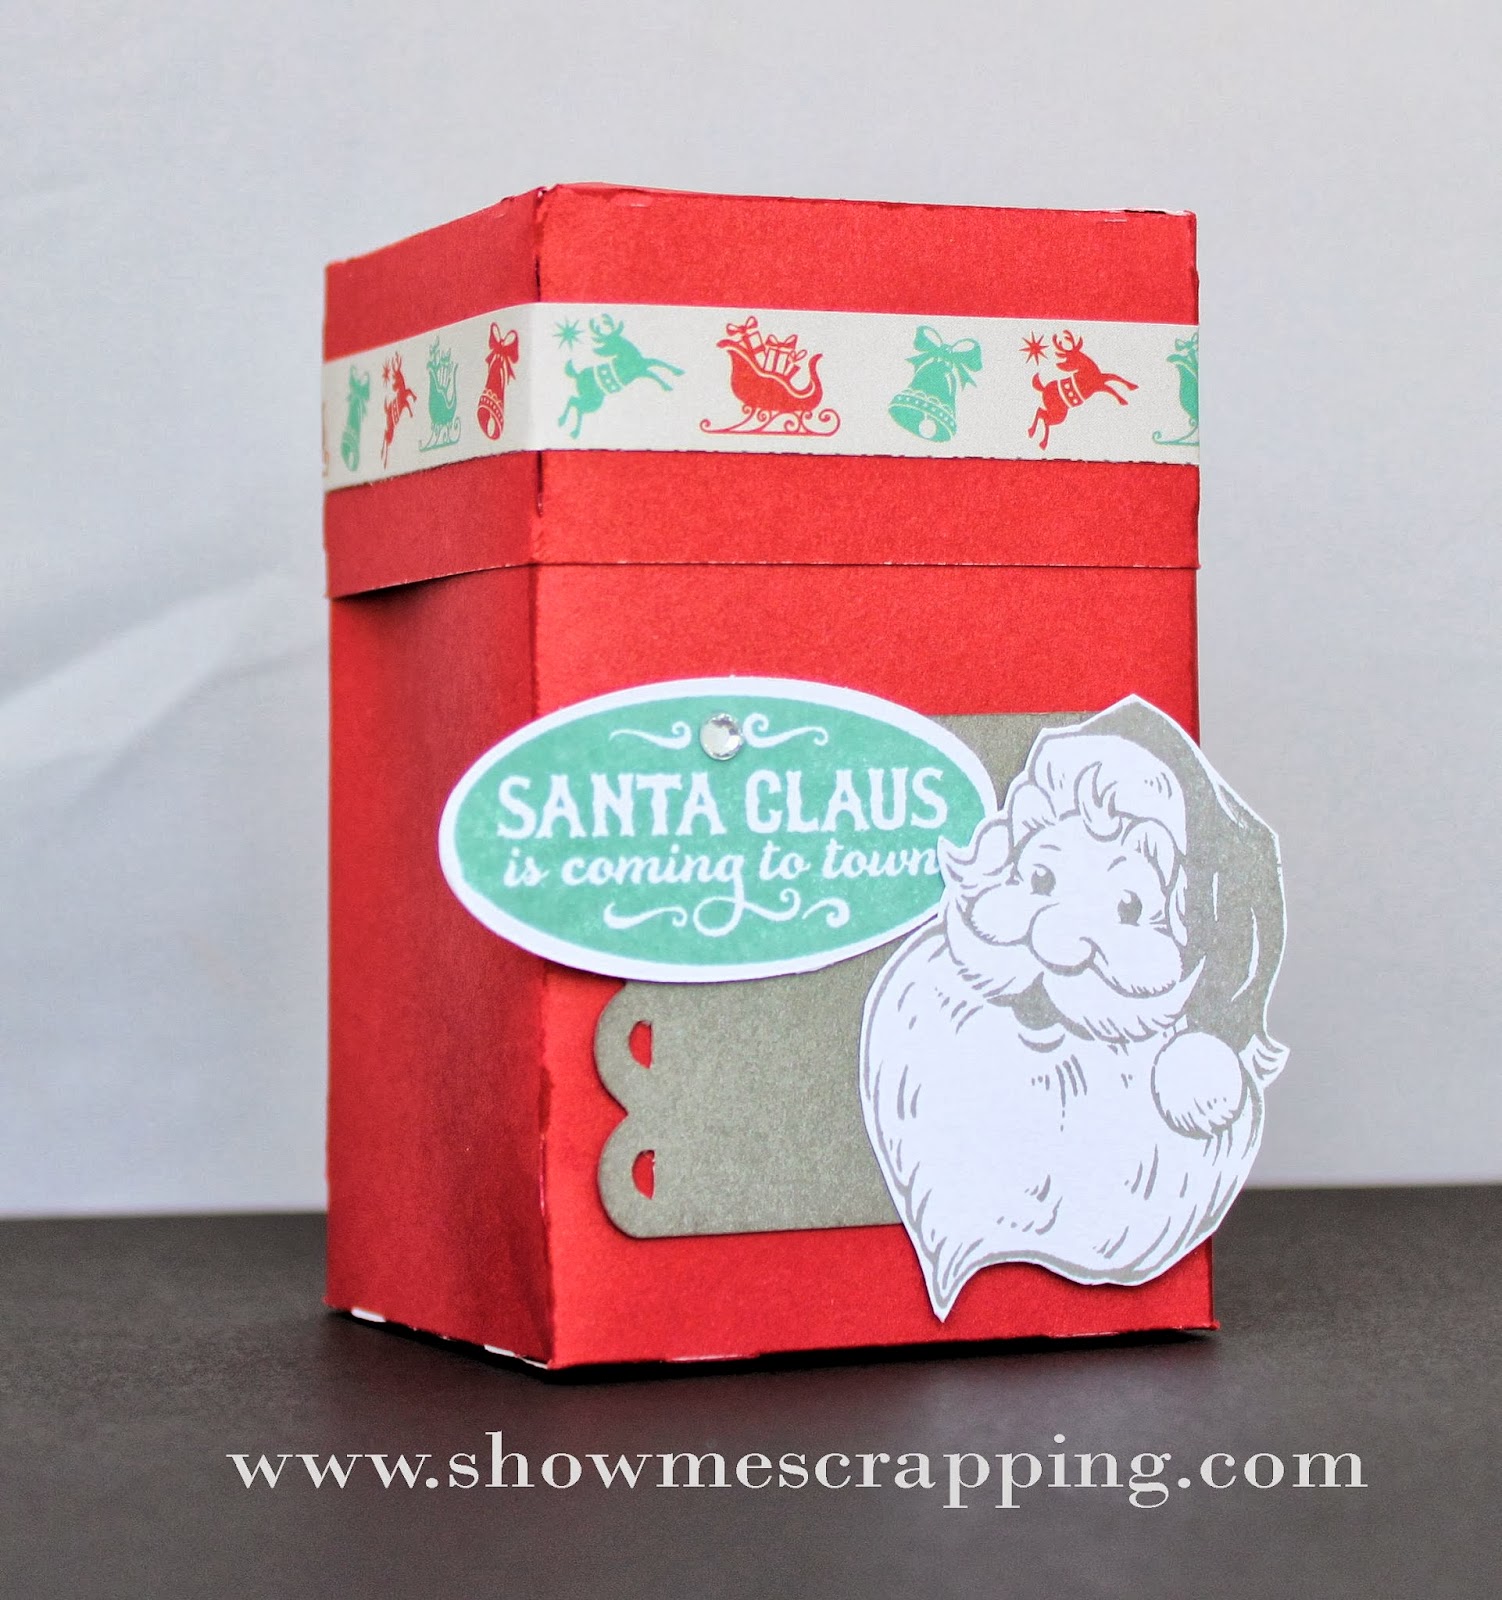
Holidays From The Heart – Santa Gift Box

Welcome to the Holidays From The Heart blog hop!  I’m so excited to see what everyone made with the new products in the 2013 Close To My Heart Gift Guide! These items go on sale today! 

This mini-catalog comes with a great new deal: When you spend $100 you get one of the starred items from the Gift Guide FREE!

Ever since the Artiste Cricut cartridge was released, I have been wanting to make this box found on page 55 of the handbook. 

I’m not sure if there is a name for this type of box, but I’m calling it the “All-in-one” box because the lid is connected to the box.

Fortunately, the cartridge comes with an assembly instruction book. After a few trials and errors, I got it figured out.

Once assembled, lifting the lid opens the box so it can be filled with Christmas goodies. Isn’t that the coolest thing ever?

Supplies:

Sparkle & Shine Paper Pack (X7176B)

Santa Claus Stamp Set (C1567)

Slate & Juniper Ink Pads

Artiste Cricut cartridge

Artbooking Cricut cartridge


To see more projects using Holiday Gift Guide products, visit my fellow CTMH consultants participating in this hop by clicking on the photos below. 


This blog hop is open for members of the CTMH Blog Boosters. Please do not enter if you are not a member of the group. If you are a consultant, you can join the group on facebook. If you are interested in becoming a consultant, I’d love to help get you started!


Keep creating,


Photobucket

Posted on 4 Comments

Scandinavian Wishes Blog Hop

Welcome to our October Stamp of the Month Blog Hop! This month’s stamp from Close To My Heart is “Scandinavian Wishes” and is available exclusively through your Close To My Heart consultant from October 1 – 31, 2013. This month you can receive this stamp set for $5 with a qualifying purchase of $50. 

If you don’t already have a consultant you are currently working with, please contact one of the consultants on our hop with any questions you have.

If you have just hopped onto my blog, please start at the beginning at Lucy’s blog – Love 2 Create. If you came from Scrapper’s Therapy then you are in the right place!

My project today is super simple. You may notice the red outlines on several images on the stamp set. Each of these shapes are available on the Art Philosophy Cricut cartridge

The first image — a fancy square — is on page 53 of the cartridge handbook. The stamp set carrier sheet tells you to cut the square at 2″ for the image to fit exactly. 

However, instead of cutting the square, I decided make the folded square card on the right. Since the front of the card is the same fancy square, the stamp fit it perfectly when I cut it at 2″.

The stamp included “To:” and “From:”. However, since I’m making a folded card gift tag, I wanted to stamp the pretty greenery on the front and the words on the inside. So I (gasp!) cut the stamp apart. This is much easier than masking and you can always reassemble the stamp on the block if you want on a later project.

Here’s the front of my gift tag card:

And the inside:

Your next stop on our Scandinavian Wishes” hop is Pam’s Crafty Creations.

Here is the entire lineup in case you get lost along the way:

1. Lucy at Love 2 Create

2. Amber at Scrapper’s Therapy

3. Rebecca at Show Me Scrapping (you are here!)

4. Pam at Pam’s Crafty Creations

5. Traci at Paper Crafting 101

Thanks for hopping along with us – we hope we were able to inspire you.

Photobucket

Posted on 16 Comments

Festive Friday Blog Hop: September Edition

Welcome once again to the Festive Friday blog hop! On one Friday each month through December, you can hop through our blogs to holiday cards, layouts or home decor items using the amazing new products in the Autumn/Winter 2013 Idea Book. I hope you enjoy this paper “eye candy”! Just one more reason to love Fridays!

If you missed my post for the August edition, you can find it HERE. If you came here from Diane’s blog, The Happy Scrapbooker, then you are on the right track. Your hopping path is circular and you will visit each of us by following the links.

This month, I’ve got a fun Halloween mini-album to show you.

Everything in the album was cut using the Artbooking Cricut Cartridge (pages 54 and 55 of the handbook). I set the size dial to 5″ and everything was cut in proportion which made putting it together a snap!

To speed things up, I loaded all of the images I was cutting out onto mats in Cricut Craft Room and I saved the file to share with you. You just need four sheets of cardstock for the entire album. 

<Download File>

Here’s pictures of all of the pages:

Now it’s your turn…use the CCR file to create your own album. Please share a link to pictures in the comments. I’d love to see what you come up with.

Be sure to check back on October 18 for our next installment of the Festive Friday Blog Hop. But for now hop on over to Michelle’s Wandering Scissors blog, your next stop in today’s hop.

Keep Creating!

Photobucket

Posted on 4 Comments

Poster Tidings Blog Hop

Welcome to our September Stamp of the month Blog Hop! This month’s stamp from Close To My Heart is “Poster Tidings” and is available exclusively through your Close To My Heart consultant from September 1 – 30, 2013. This month, you can receive this stamp set for $5 with a qualifying purchase of $50.

If you don’t already have a Consultant that you are currently working with, please contact one of the Consultants in our hop with any questions you have!

If you have just hopped onto my blog, please start at the beginning at Darla’s blog – Crafting is Contagious. If you have come from Scraper’s Therapy with Amber, then you are in the right place!

Now, without further ado….here’s my project:

I have been wanting to get out my embossing powders and this large Christmas stamp gave me the perfect opportunity. If you have never worked with embossing powder, you are really missing out on some crafty fun! I like to think of it as grown-up glitter!

To emboss an image, first you stamp the image with Versamark ink which is colorless, but sticky. Can you see the faint outline of the stamped image in the lower right side of the picture below? That is what it looks like when you stamp with Versamark. Not too exciting, right?

But wait! Sprinkle on a little Silver Embossing Powder and shake it off — just like you used to do with glitter. Viola! You now have a silver outline of the stamped image. 

But wait there’s more! The final step is where the magic really happens. All those little specks of powder melt and merge together when you blow it with a craft heater. The grainy image becomes smooth and shiny. Isn’t that fun?

I finished the card off with a flower and baker’s twine from the Ruby Mini-Medley Assortment and a little Silver Shimmer Trim.

Your next stop on our “Poster Tidings” hop is 4 Hearts Scrapbooking with Jennifer.

Here’s the entire lineup in case you get lost along the way:

  1. Darla at Crafting is Contagious
  2. Amber at Scrapper’s Therapy 
  3. Rebecca at Show Me Scrapping (you are HERE)
  4. Jennifer at 4 Hearts Scrapbooking
  5. Janna at The Creative Princess
  6. Pam at Pam’s Crafty Creations
  7. Michelle at My Creations With Michelle

Thanks for hopping along with us. We hope we were able to inspire you.

Keep Creating!

Rebecca