Posted on

Get your Valentine’s Memories preserved with a Free Workshop Guide

Did you have a nice Valentine’s Day? Whether you had a fun evening out or enjoyed a cozy night at home, I hope you made some great memories and remembered to take pictures.

In case you have not yet saved a copy, I just wanted to remind you of the free workshop guide for the Oh My Heart special paper suite. This guide has cutting and assembly directions for the the a two page layout and a single page with room for all your Valentine’s Day photos.

Download Guide Now>>

In addition to the scrapbook layouts, the workshop also has directions for making 40 mini (3″ x 4″) Valentine’s Day cards — it’s too late for this year, but you could have them all ready to go for 2021!! If you opt to not make the cards, you’ll have plenty of paper left over for additional scrapbook pages or other projects. 

Download Guide Now>> 

To make all of these projects exactly as shown, you’ll want to order the Oh My Heart workshop kit. This bundle includes paper, stickers, stamp set, stickles cards and envelopes needed for these projects. The Oh My Heart items are also available to order separately.

Download Guide Now>> 

Be aware that the Oh My Heart products retire at the end of February, so get your order in before it is too late!

Keep Creating,

Rebecca

Posted on

The 3-2-1 Method and a free project download!

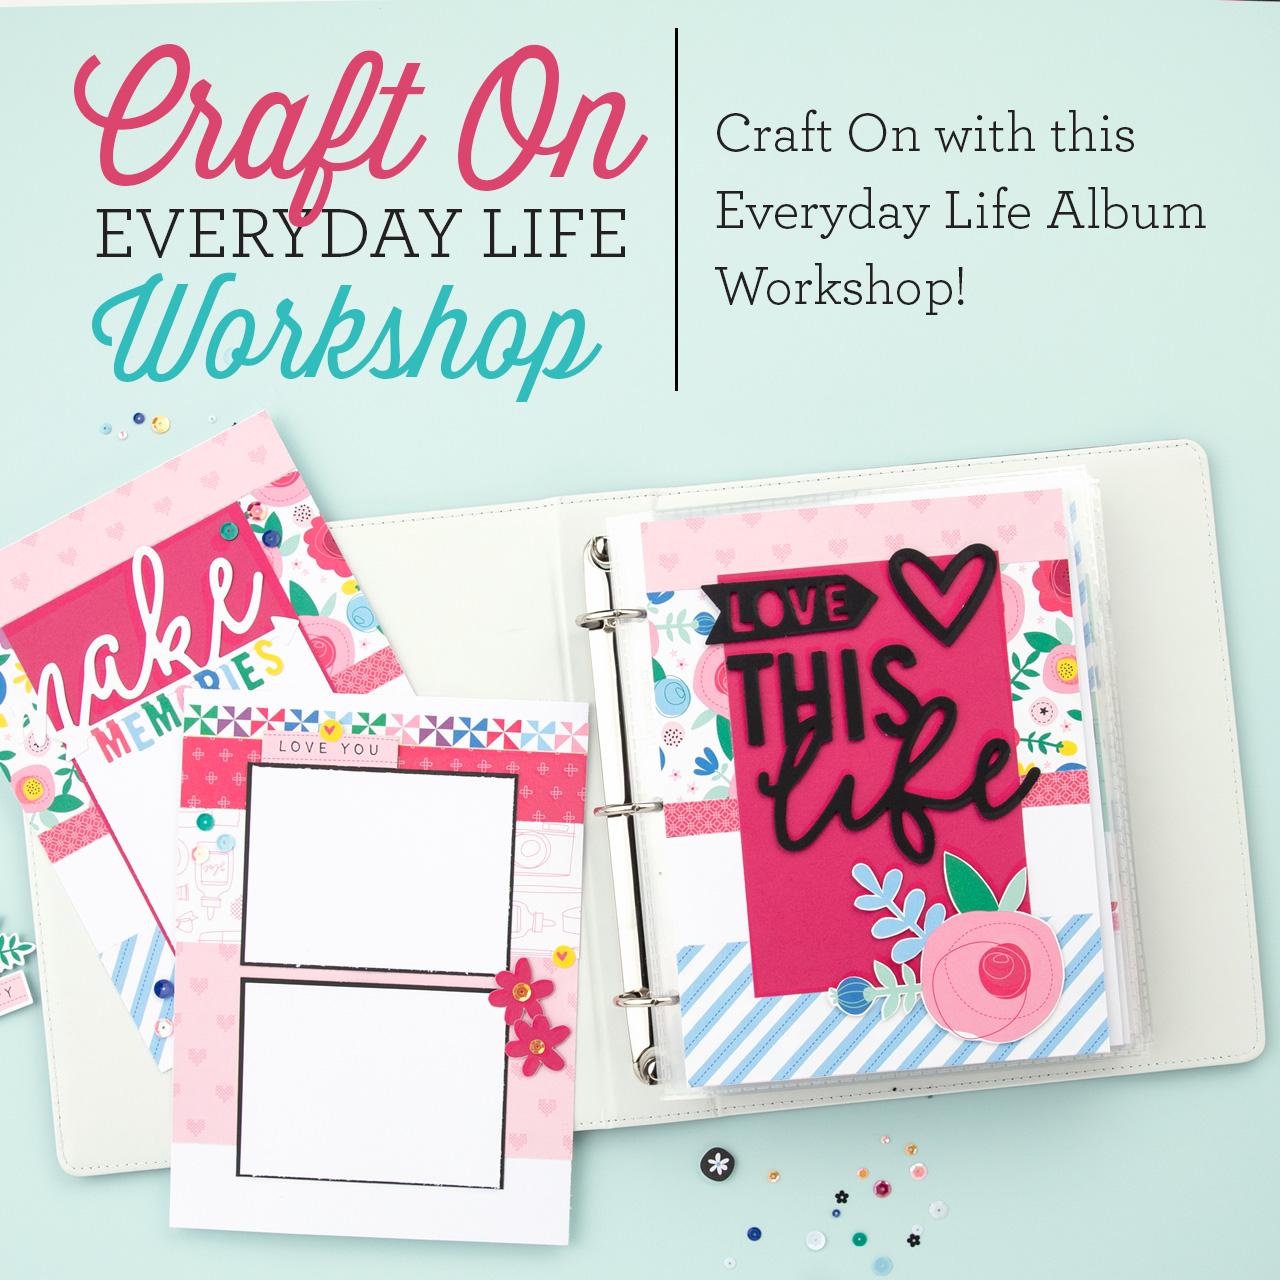
Learn a quick and easy approach to memory keeping in this fun project featuring the Craft On paper packet! This album workshop will guide you through using the 3-2-1 method to make cutting your paper and assembling your album a cinch.

What is the 3-2-1 Method?

This is a formulaic approach to page design. This means that you will follow you follow this formula as you create each page which leaves you have creative freedom to add your own flair when creating your pages. There are just four simple steps to creating pages using the 3-2-1 Method:

  1. Start with a base page 
  2. Add 1″, 2″ and 3″ strips of paper horizontally to the page to create a background design
  3. Layer on top of these your photos
  4. Add decorative elements like stamped images, die cuts and sequins

That’s it! Isn’t that brilliant?

Sample Project!

To help you get the hang of this method, this post includes a link to download instructions for creating an Everyday Life album (6″x 8″ pages) using papers and coordinating products from our Craft On collection.

Download Workshop Instructions

This guide has complete cutting and assembly directions to complete 20 pages. However, I’d suggest you use the photos of the sample pages for ideas and inspiration. Once you’ve cut the strips of paper, mix and match them on the pages. Have fun creating pages using the combinations that you love ant that best suit your photos!

Here’s a look at a few of the pages made for this project:

What is in the kit?

1 – Craft On Paper Packet (X7245B)
14 – cardstock sheets (1 Black, 1 Carolina, 1 Lemon, 1 Raspberry, 10 White Daisy)
1 – Craft On Complements (X7245C)
10 – Everyday Life™ Memory Protectors™ 6″ × 8″
1 – Flip Flaps™ Memory Protectors™ 3″ × 4″
3 – Flip Flaps™ Memory Protectors™ 4″ × 6″

Download Workshop Instructions

To complete the project as shown, you will also need Crafty Loose Sequins, Fancy Tags Thin Cuts, Basic Circle Thin Cuts (or any 1-1/2″ circle punch or die), a paper trimmer, scissors and your favorite adhesives. 

Your completed pages will fit beautifully in one of our Everyday Life albums. Alternatively, you could use 1″ rings to make a loose album. Add some ribbon to the rings for decoration!

This workshop is only available through August 31, while supplies last. So ordered your kit today and download the guide so you can learn this fast and easy way to create a beautiful album today!

Posted on

What Makes Your Heart Happy? New kit just in time for Valentine’s Day projects! {FREE download}

Hi friends! I hope everyone is having a refreshing new year
thus far! One of my new year resolutions for 2019 was to be more organized and
make more time doing things that make me happy. For me, scrapping and crafting
is a form of self-care. It’s my creative outlet. It’s good for all of us to
find something we really enjoy and spend more time doing that thing. What about
you? Do you have a creative outlet too?

I got super excited when I saw the new Close To My Heart
workshop kit and stamp set. They named it “Heart
Happy
” and rightfully so. When you see all the adorable stuff it includes,
it’s going to make your heart happy too!

Even if you aren’t really big into celebrating Valentine’s
Day, that’s okay because this kit is so cute and versatile, it could be used
for a number of things. It’s perfect for couples, yes, but also for kids,
family, friends, spring time, and the list goes on. The possibilities are
endless.

Kit Contents

It’s such a fun bundle of goodies! Some of the things you
will discover in the Heart Happy kit
are heart happy stickers, silver glitter gems, red shimmer trim, heart happy
paper packet, A Piece of My Heart Stamp Set, 8 cardstock sheets (such a cute
variety of these), and of course 12 white card bases and envelopes.

Make a love letter, send out handmade valentine cards, make
scrapbook pages… these are just some of the ideas I have floating around in my
head right now. I’m so in love with this kit! J

Need Inspiration? 

The sky is the limit on what you can do with this kit, but if you like some project inspiration, click below for a download a FREE WORKSHOP GUIDE that includes the directions for the project below. This includes 2 single-page layouts, 1 two-page layout, 10 cards and 5 tags. Believe it or not, you can make ALL of these projects from a single workshop kit!

Click for FREE Project Guide!


If you are excited to try it, just click here to order and start
having some fun! Right now you can get the entire kit + stamp set for the
special price of $40.95 or if you’d like the kit without the stamp set, it’s
available for $35.95. When you place your order, be sure to check that you have the following ink pads: Ballerina, Candy Apple Red, Raspberry & Sapphire (if you are making the projects shown above).

As you can see, there are all kinds of special hand-made
with love goodies you can create with this kit! If you’d like to share any
creations or ideas, please feel free to drop it in the comment section. We can
inspire one another to create some beautiful projects!

Have a Creative Day!

Rebecca

Posted on

Here’s to You: Exclusive Stamps + Free Guide Download + Design Space Link!

I’m excited to share with you a brand new set of stamps a that are only available today through August 31. In this post, I’m also sharing with you a free download with directions to make the seven cards and layout pictured above, including the link to the Design Space file for the Cricut Cuts!

First let’s take a look at the new stamps.

These stamps are designed so that they can be paired to use on the front and inside the same card. The two on the left have a similar font and scroll designs and the sentiments together complete a thought. These stamps will help you create cards that express friendship or appreciation. The two on the right also coordinate and are perfect sentiments for congratulation cards — wedding, graduation, new job, etc. 

Now let’s take a look at the workshop projects. First we have this beautiful wedding layout. Isn’t it gorgeous? Can you see the rose embossingon the bashful cardstock? This is a really simple detail to create, but it really adds so much!

The workshop also includes directions for seven cards. As you’ll see in the pictures below, these cards also include embossed pieces.

If you are inspired by these pictures like I am, you can’t wait to get your hands on this kit and start creating! We’ve made it easy but creating a Here’s To You Bundle bundle that includes all four stamp sets, 10 sheets of cardstock, a sheet of silver glitter paper, a sheet of vellum, a pack of White Pearls, Rose Embossing Folder plus 7 cards and envelopes. 

Once you’ve ordered your workshop, use the links below to download the FREE workshop guile and Design Space project below. 

FREE WORKSHOP GUIDE

DESIGN SPACE PROJECT LINK

Additional tools and materials needed to complete the projects as shown:

  • Artistry Cricut Collection and Cricut Machine (Explore or Maker family)
  • Embossing Machine
  • Exclusive Ink Pads: Glacier, Lagoon, Pacifica
  • Various blocks
  • Adhesives 
Posted on 1 Comment

FREE Cricut Design Space Project links!

I’ve added a library of Design Space project links to the resources on my website. On this page, you’ll find some of my favorite Cricut projects.

Click link below to open this page.

Open FREE Design Space Links Resource Page>>

On this page, you’ll find both scrapbooking and card-making projects. Simply click on the link to open them in your Cricut Design Space account. Save as a new name and they are yours forever! You can cut them as is, or modify at will!

Here’s an example. Here are the Design Space images for the first project, Springtime in TEXAS layout.

Note that the Design Space project only includes the images that were cut on the Cricut. Making the layout as pictured requires additional straight cuts of paper. Although the papers, embellishments and other materials used may no longer be available, you can substitute and create a similar layout.

If you have any questions about any of these projects or how to get your hands on the cartridges used, I’d be happy to help.

Open FREE Design Space Links Resource Page>>

While you are on my website, feel free to explore the other resources I’ve compiled for the Cricut and other topics.

Posted on

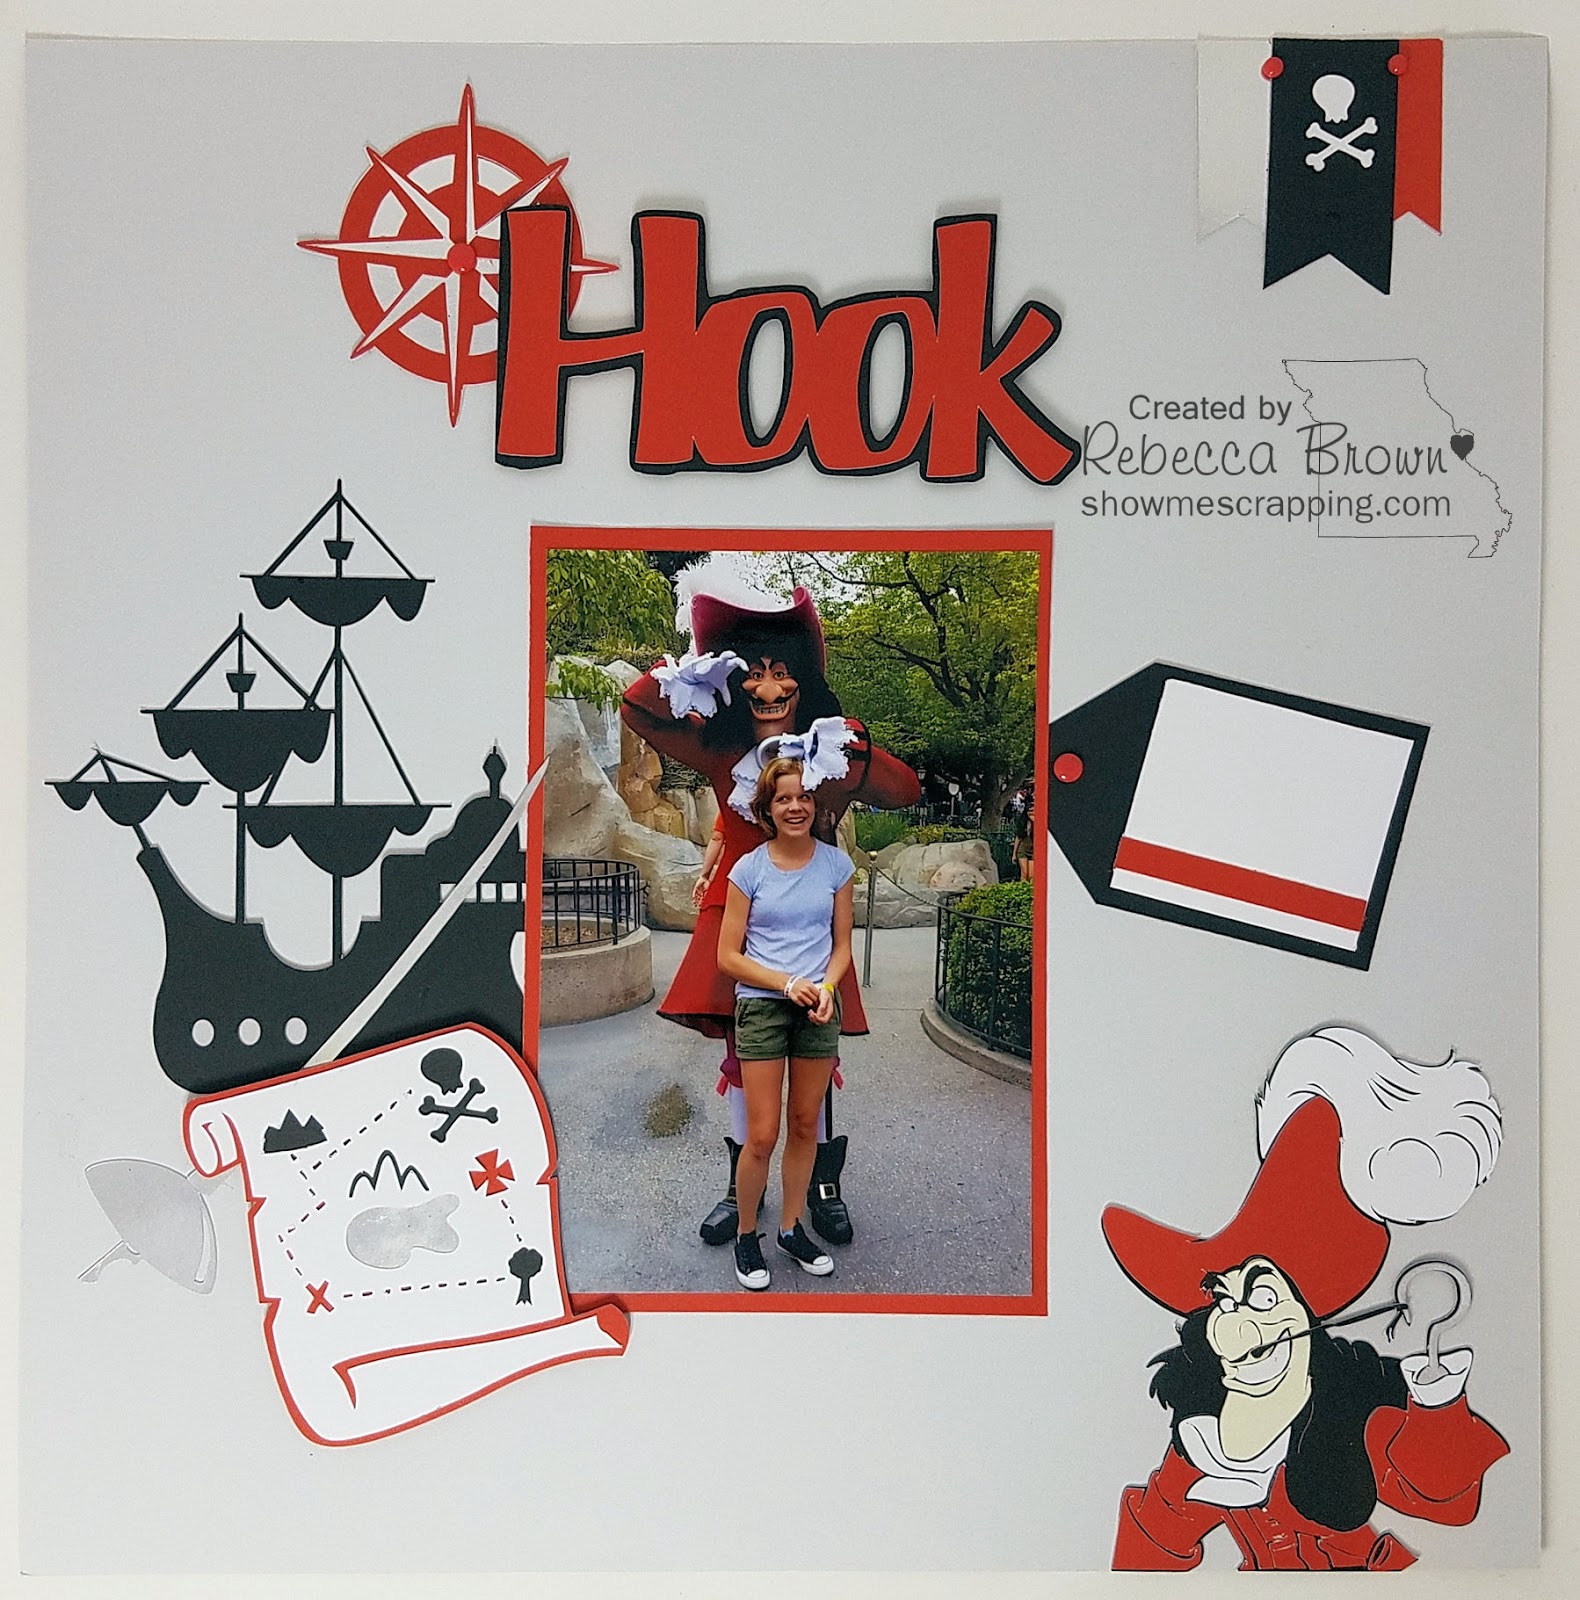
Disney World Captain Hook Scrapbook Page (Free Design Space File!)

Over the last year or so, I’ve realized that I use most of my creative time to work on projects for my business. My old scrapbooks have been somewhat neglected. When I have worked on my personal pages, it is often when my energy and creative juices are depleted. The goal is often to just “get it done” and as a result the pages are over-simple.

So, I’ve decided to be sure to have a little time carved out each week to focus on a project or two JUST FOR FUN!  This page is a result. Note that NONE of the images are from my beloved Close To My Heart cartridges — gasp! Instead, I pulled from the Disney Classics cartridge to create this Captain Hook themed layout. (However, I did use CTMH cardstock of course and also our Silver Foil Paper.)

Want to make this project? Click here to open project in Design Space.

Are you like me and need to start making time for your personal projects? Maybe you don’t have a scrapbooking business distracting you, but I bet you have other things that fill up your days. I started with Close To My Heart for this very reason — I was not finding time to scrapbook and thought that doing it as a job would force me to make time. I had found that I needed regular creative time to handle the stresses of life. My plan has worked well for me most of the time, but I still have to be careful to carve out time for my personal projects.

I’d love to hear from you! In the comments, I’d love to hear your struggles with making time for your hobbies — scrapbooking or other. If you are inspired to mark off some creative time, please share what you are working on!

Keep creating!

Rebecca

Posted on 4 Comments

Flower Market Index of Flowers by Key (Free Download)

Earlier this month, I posted an overview of the Flower Market showing all the different types of images on this fully-loaded cartridge. In addition to flowers, there are containers for flowers, backgrounds for flowers, darling images and two complete fonts! Today I’d like to focus in on the flowers. 

This weekend, I spent some time really looking at the handbook and was amazed to find detailed depictions of a few flowers that I’m familiar with. For example, here’s a picture of the layered hydrangea in Design Space (p. 20 of the handbook) and a picture from my backyard.

Pretty cool likeness, right?

This made me curious about the rest of the flowers on the cartridge. So I went though each page of the handbook and looked up the main flower shown. There are actually 50 different flowers featured on the cartridge! Each one has either a 3D or layered image plus containers, backgrounds and sentiments that go along with that flower. Many have simpler versions or individual flowers vs. grouping. There is so much content on this cartridge!

Here’s all of the shapes that coordinate with the hydrangea:

I looked up the meaning of a hydrangea and found a wide variety — some good and some actually not so good. One that stood out to me was that these colorful clusters of flowers represent apology, forgiveness and gratitude. I think that’s the meaning that the designer of this cartridge choose to depict with the hot air balloon, sun, fluffy flowers and “Today”. 

To help you find your favorite flowers, I summarized the primary flowers on each page of the handbook (or key on the overlay) in a handy reference page that you can download for free!

Download Flower Market index now>>>

Don’t own this cartridge yet? I’d love to help get one into your hands! View Flower Market in my online shop>>

Before you check out don’t forget to add on the Stamp of the Month and aCreate Kindness kit

Have $150 or more on your wish list? Given that two new amazingly beautiful Idea Bookswere just released, I bet you do! I’m offering DOUBLE HOSTESS REWARDS for parties that close in September! Contact me right away for details.

Posted on

Balloon Animals A2 Box Card: Printable Directions!

Before February ends, I wanted to share this fun card I made with the Stamp of the Month, Balloon Animals. 

If you are a card maker, you have probably seen the box cards that have become so popular lately. They are so much fun because they fold flat in the envelope but pop up into the shape of a box. You can add images on the front, back and even in the middle of the box to make it really interactive.

Take a look by watching this video!

The patterns I’ve seen fold to fit into a 6″ square envelope. After a few calculations, I created this one that will fit in a standard A2 envelope. 

Want to make one of your own? You can download nad print the cutting and assembly directions!  

<<Download Directions>>  

Don’t forget that the Balloon Animal stamp set is only available during February, so if you want one you need to place your order right away.  I love this set — check out all the cute images you get:

February 29 is also the last day to get the Share the Love stamp set:

Start shopping now>>

Posted on

Decluttering, Donating and free workshop directions

This spring, we installed cabinets in my craft room/office. So I spent much of the summer sorting, purging and organizing all the stuff I’ve collected over the years. I have been separating my craft supplies into piles to keep, give away and trash. Those that I’m keeping need to be assigned containers and a space. It really is a big job and still a work in process, but my stacks are getting smaller. You know how it is, it seems to get worse before it gets better. I excited to finally be getting closer to the “better”!

Last month, I found a new home for some of my scrapbooking papers that I know I’ll never use by donating them to a charity that is close to my heart. It feels good to be released from the guilt of keeping and storing unused things and I’m happy to know that what had become clutter to me will be used by someone else.

Do you have extra crafting supplies you’ll never use? 

Consider donating them to a worthy cause. 

Possible organizations include your local children’s hospital, nursing home, women’s shelters, day cares, library and retirement centers. Be sure to call ahead to see if your excess aligns with their needs. Also, be considerate to volunteers and workers of the organization by sorting out any used or damaged goods and donate only what is appropriate for their needs.

While I’ve been focusing on reducing paper clutter, I realized I also have a lot of electronic clutter. It may not be stealing away precious storage space the same way as the physical stuff, but it is not being used. Wouldn’t it be great to get some of these things out, dust them off and repurpose them?

So today, I’m sharing with you the directions for this twelve card workshop.

CLICK TO DOWNLOAD FREE INSTRUCTIONS

I designed these cards to be made using the Flirty paper and Pun Fun for a workshop last February. Both the paper and the stamp set have now been retired. But the card design will work well with image based stamp sets including our M-sized stamps.

To prove my point, take a look at this set of Surf’s Up cards.

Yep! These use the same basic pattern as the Flirty cards. I switched out the paper and the stamp set (Under the Sea C1500). I also changed the size of the stamping rectangles to match the stamp size and cut the mats for these rectangles with 1/2″ larger length and width. Add a few matching accessories and boom — a new set of cards.

So here’s your assignment: Go to your stash and dust off a stamp set or two with images that are around 1 or 2 inches. Now look through  your paper scraps — I know you’re saving them for something fun — well this is it! Now print the directions and get creative!

Ready for more projects? I have some kits that you may be interested. I love working with kits because you receive all the materials needed for the project so there is no excuse to keep you from getting started. Plus, when you get done there is minimal excess materials that need to be disposed of or stored. That means less clutter to deal with later!

You can check out all of my current kits in my shop at www.showmescrapping.com/shop.

Enjoy!

Rebecca

Posted on

Free Journaling Prompts Printables

Want to learn more about who you are? Or maybe learn more about your spouse, kids or a friend? 


Close To My Heart has posted free journaling prompts that you can print through January 31!  


  • 20 Fun Facts About Me
  • 6 Things that Make Me Happy
  • 4 Foods I love
  • My 3 Greatest Blessings Are…
  • This Makes Me Laugh Until I Cry

Each one prints about 3″ x 4″ so they are perfect to add to the half-size pockets in your Project Life or Picture My Life albums. Or snap a picture or two and add them to a fun, informal layout.

I printed a set for my daughter and will have her fill out a each week for her Middle School scrapbook album.

Click HERE to get your set. Have fun!