Posted on

Cards by the Dozen – Congratulations!

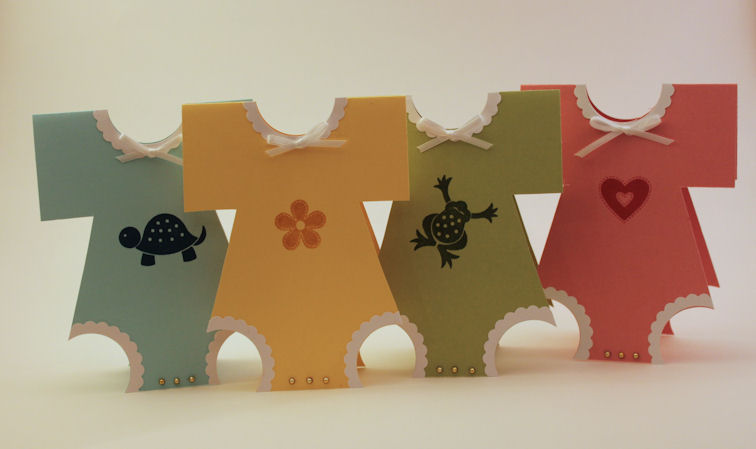
At this month’s Cards by the Dozen workshop, we will be making 12 Congratulations cards. The first set are these cute Baby Congratulations Onsie cards. You will make one each of yellow, green, pink and blue. So you will be ready to congratulate the new parents of a girl, a boy or a still unknown!

Recipe:

Daisy White, Heavenly Blue, Buttercup Yellow, Green Leaf and Baby Pink Card Stock

Pacifica, Honey, New England Ivy and Tulip ink pads

My Acrylix Fun Times and Jubilation (upcoming June Stamp of the Month!)

Thin white ribbon and gold jewels

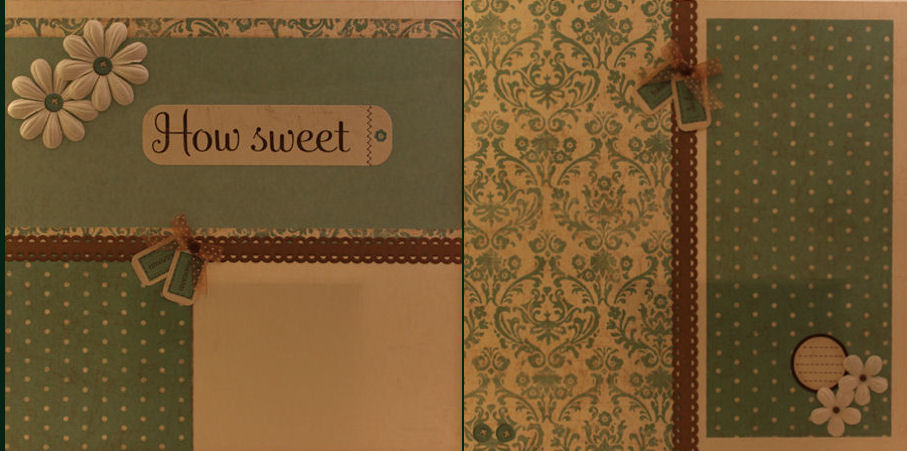
You will also make four each of the following “All Purpose” Congratulations cards.

Recipe:

Miracle My Reflections Paper Pack

Colonial White Card Stock and brads

My Acrylix Salutation Seals stamp set

Chocolate ink pad

Recipe:

White Daisy Card Stock

My Acrylix Friendship and For Every Occasion stamp sets

Outdoor Denim ink pad

As always, there will be a Lucky 13th Mystery Card. Hint: It is for a special holiday in early March.

Date: Sunday, April 17

Time: 2:30 – 5:00 PM

Location: My house (address provided upon registration)

Cost: $12

RSVP via email (space is limited!)

If you have not ever come to one of the card workshops, you don’t know what you are missing. We chat, create and congratulate each other on how clever we are. It is total fun! Please RSVP today!

Posted on

Lovin’ Level 1

During the month of April, you will get your choice from a selection of Level 1 kits FREE when you place an order of $100 or more online. You may be wondering just what a Level 1 kit includes and how to use it.

The kit comes with 4 sheets of preprinted cardstock which are perfect bases for your layouts. Two solid sheets of cardstock provide the other bases. You also get 2 sheets of B&T Duos paper and two sheets of coordinating Stickease. One page of the Stickease always includes an alphabet. The back of the Stickease sheets even have instructions for two layouts! How easy is that?

I made the three layouts below with just one Level 1 kit! The kit I chose is Perfect Day (which is one of the options for the Lovin’ Level 1 promotion). I added just a few items for dimension, including kraft borders, paper flowers ribbon, brads, 1 sheet of cardstock, and canvas badge buttons. Everything else I used was in the Level 1 kit.


The Level 1 kits are a great way to speed through your scrapbooking. Try one free this month by placing an order of $100 or more online.

Go to my website to start shopping. Be sure to check out the discounted items available exclusively online under the category of “While Supplies Last”.

Posted on

Lunch Time Mini-Book

Today I’d like to share with you another mini-album I made. The base for the book is just two lunch-sized paper bags. I decorated it with Close to my Heart’s Unforgettable B&T Duos paper and the April Stamp of the Month, Blessed.

The openings of the lunch bags form two built-in pockets for jounaling tags.

Making this mini-book is super simple, so I’ve included directions so you can make one for yourself. Thanks to fellow CTMH consultant Pat Pobst for the great idea.

Materials:

2 lunch-sized paper bags

8 – 5″x5″ pieces of paper (check to make sure this is the approximate size of your bags when folded in half)

2 – 4″x4-1/2 pieces of paper (to make the “tags”)

2 – 5″x2″ pieces of paper

4 – 1-1/4 inch circles of paper

15″ ribbon

stamps/inks or embellishments of your choosing

Directions:

Trim 1/4″ or so off the top of each bag (removing jagged edge, but keeping the crescent shaped thumb tab). Glue the long folds on either sides of each bag shut.  Fold each paper bag in half horizontally and form a sharp crease with a folding bone. Turn your bags on the side so that it is oriented like a book. Punch two holes in each bag about 1/4″ from the “book spine” approximately 1″ from the top and bottom.

Glue a 5″ square piece of paper to each cover and page of your book. Glue a 5″x 2″ pieces inside the opening of each bag opposite the thumb tab but over the extra folds on the sides. Assemble and bind your book together by threading ribbon through the holes and tying a bow.

Glue paper circles to the tags and insert in pockets.

Decorate using stamps, ink, or other embellishments.

Recipe:

“Blessed” My Acrylix Stamp Set

Unforgettable B&T Duos paper (retired)

Cocoa, Desert Sand, Juniper and Sorbet Cardstock

Chocolate Exclusive Inks

You can get the stamp set I used “Blessed” discounted or free during the month of April with additional purchases. Here’s a link that explains the Stamp of the Month program –> link.

I’d love to see your versions of this fun album. Please share by putting link to pictures of yours in a comment to this post. Thanks!

Posted on

Badges and Flowers

Seems like an unlikely combination, but “Badges and Flowers” describes a the next papercrafting night which will be on April 8.

The “Badges” part of the title refers to the new Canvas Badge Buttons which will be given as a sample to everyone that comes. These self-adhesive embellishments can be used plain or inked up to match your layout.

I stamped the first badge below with the cherry stamp from the Mayberry stamp set using Smoothie and Olive ink. Then I sponged the edges with Cocoa. Isn’t that sweet?

I sponged the second larger button with Olive ink, then stamped the small flower with Cocoa ink. Those of you that are more creative will probably come up with lots of other ways to decorate these fun buttons.

The picture also shows what the badges look like without additional decoration. The smaller button is turned over to show the backing that is easily peeled to reveal adhesive.

The second part of the title refers to the FLOWERS pictured below.

Hopefully, you are not getting tired of making paper flowers because I just can’t seem to stop. This little arrangement was just too sweet to resist. It is simple to make using round and scalloped punches.

The night will also include:

  • An Easter Egg Hunt
  • Sample Rub-Ons
  • Creating a leather look from cardstock
  • Your choice of a 1×1 stamp
  • Door prize drawing

Additional information on this papercrafting night is here. Don’t miss out! Please email me if you are planning to come.

If you want to purchase a kit, I need to know by tomorrow (Thursday March 31). Follow this link to see pictures of the mini-kits available for $6. You can also purchase the full Mayberry Workshop On The Go for $29.95 (plus shipping and taxes).

Have a PEARFECT day!

Posted on

Hope for Japan

My mind can not begin to understand the magnitude of the destruction in Japan. Today, about 264,000 people remain in shelters and many don’t know when they will be able to return to their homes. People are not only relying on the government and relief organizations for housing, but also for food, water, medicine, clothing and other personal needs. Many of these people are still reeling from the loss of friends and family members. Reading about the suffering leaves me with a sense of helplessness.

Most of you are probably aware of work that is done by the American Red Cross when tragedy strikes. The Japanese earthquake and tsunami is no exception. You can visit the American Red Cross website to read about the work they have been involved in since the March 11 tragedy.

I am proud to announce the Close To My Heart has provided a way that you can participate in these efforts. The “Hope for Japan” stamp set will be available through April 30 for just $5. Close To My Heart will be donating 100% of the profits to the American Red Cross to benefit relief efforts in Japan. 

Just drop me anemail if you would like to order this set. UPDATE – This stamp set is now available and the item number is A1118. You can still email me to order or shoponline.

Please visit the American Red Cross website if you would like to  make a personal donation. Together we can make a difference in the lives of the people of this nation who have suffered so much over the last couple weeks.

Posted on

Cards by the Dozen X 2

It’s almost time for another Cards by the Dozen workshop and this time we are making two dozen mini-cards (3″ x 3″). These cute little cards are not mailable, but are great if you want to leave a little note for someone to find or use as a gift enclosures.

The workshop will be on Sunday, March 27 from 2:30 – 5:00 pm. You can make four of each of the cards above for $12 (includes envelopes). Please let me know by Thursday (3/17) if you will be coming so that I can order supplies and prepare the kits. Hope to see you there!

Posted on

Sensational Seasons

Today, I’d like to share with you all the fun I’ve had with the March Stamp of the Month, Sensational Seasons. My 10-year old daughter grabbed this as soon as I got it and has been creating all kinds of things ever since. It is her favorite of all the stamp sets I have. I finally had a chance to try it out for myself and I have to say, it is a good one.

For the first three pieces below, I used my daughter’s technique of stamping the image in black and filling in with colored pencils. I used one page from a Mix & Mingle album for the base for the wall hanging below.

Recipe:

My Creations Mix & Mingle Album

Sensational Season and Friendship Alphabet Small My Acrylix Stamp Set

Black and Chocolate Exclusive Ink

Bamboo, Sweet Leaf and Blush Cardstock

Colored Pencils

Here’s a couple 3″x3″ cards that would be perfect for Easter baskets.

Recipe:

Sensational Season My Acrylix Stamp Set

Black Exclusive Ink

Bamboo, Smoothie and Sky Cardstock

Smoothie brads

Colored Pencils

Recipe:

Sensational Season My Acrylix Stamp Set

Black Exclusive Ink

Desert Sand Cardstock

Chocolate brads and ribbon

For this next card, I used markers to color the stamped images to get a brighter look. The stamped sentiment says “You hold a special place forever in my heart”.

Recipe:

Sensational Season My Acrylix Stamp Set

Cocoa Exclusive Ink

Mayberry B&T Duos Paper

Colonial White and Smoothie Cardstock

Chocolate ribbon

For the final card below, I stamped the image directly on the B&T Duos paper for a completely different look. I love the simplicity of this application. It looks to me like the little bunny is embroidered on the onesie.

Sensational Season My Acrylix Stamp Set

Cocoa Exclusive Ink

Mayberry B&T Duos Paper

Daisy White and Smoothie Cardstock

The last two cards use paper from Mayberry, which is the featured paper set for April’s Paper-crafting Night.

Thanks to fellow consultant Debra Squires who shared the 3D card pattern and to Lauren Meader who shared directions to make the cute baby onesie card.

Just a reminder that the Sensational Seasons stamp set is only available through March 31, 2011. It is available this month at a discounted price or free with additional purchases. Click on this link to get the details.

Thanks for looking at my artwork. I’d love to hear your comments.

Posted on

Pearfect Spring Day

This weekend, I squeezed in a few minutes (ok, a couple hours) to play around with the Mayberry Workshop On The Go kit. Because I am so ready for warmer weather, both projects I completed have a Spring feel.

The first thing I made is the All Occasion card below. You could send this card to wish a loved one well any special occasion like a birthday, interview or test day. You could also use it on an ordinary day to make it special day.

You can make four cards with this design by choosing the Card Making Mini Kit option for the April 8 Paper-crafting Night.

Recipe:

Mayberry B&T Duos paper

Mayberry My Acrylix Stamp Set

Friendship Small My Acrylix Stamp Set

Cocoa, Smoothie and Bamboo Cardstock and Ink

Next, I chose the layout below to celebrate the coming of spring. I listed ten things that I am looking forward to in the next couple months. It is now assembled and waiting for me to add some fun pictures from these upcoming events. For once I am a little ahead of schedule!

You can make a similar layout (choose your own Top Ten list) by choosing the Scrapbooking Mini Kit options for the April 8 Paper-crafting Night.

Recipe:

Mayberry B&T Duos Paper

Giggles Caps, Friendship Small and Sensational Seasons My Acrylix Stamp Sets

Cocoa, Olive and Colonial White Cardstock and Ink

“Give Me Ten” design from Originals by Jeanette Lynton

If you are interested in coming to the April Paper-crafting Night and make one of these kits, please drop me an emailto sign up.  Follow thislink for more details.

Posted on

Miracle Fun!!

There is still time to sign up for this month’s Show-Me-Scrapping craft night this coming Friday, March 4. I wanted to share with you some of the fun things that we will be doing. First, we will be making the fun pinwheels pictured below using the Miracle My Acrylix stamp set.

Did you know that you can use a fork to make perfectly symmetrical bows? Come on Friday to learn how!This technique is especially good if you want a double or triple bows. It is also good if you need several bows exactly the same size. No more guesswork!

Everyone who comes will also get to sample one of the new Kraft Color-Ready Borders. They can be colored, are self-adhesive and come in lots of fun designs. Pick your favorite to try on your current project.

If you missed last month’s craft night, you may also be interested in trying your hand at making some of the paper flowers pictured below.

All of this, plus door prizes and up to 5 hours of crafting time (6:30 – 11:30 pm) for $4. Please email me if you have any questions or to sign up.

Currently, I also have a couple extra each of the Miracle scrapbooking and card mini-kits (pictured below). You can choose from the 2-page (12″x12″) scrapbook layout or set of four cards. These are $6 each and include everything listed above for the craft night. You can also order both for $8.

Please email me right away if you would like one of these kits as quantities are limited.

Posted on

Super Sunday Cards by the Dozen

Yes, the Show Me Scrapping card workshop is on for February 6 despite the big football game happening the same afternoon. We start at 2:30 and should be done around 5:00, so you’ll still have time to catch the kickoff at 5:30.

Here’s a picture from the last card workshop.  Don’t these ladies look like they are having fun? Doesn’t it make you want to join us?

At the “Super Sunday” workshop, you will make a dozen cards, four of each of the designs below.  You can also make a valentine card of your own design for someone special!

Please shoot me an email if you are planning to come, so that I can make sure we have enough supplies and materials ready.

Recipe

Left: Perfect Day B&T Duos, Party Pennants and Giggle Caps My Acrylix stamp sets

Center: Daydream B&T Duos, Party Pennants My Acrylix stamp set

Right: Unforgettable B&T Duos, A Little Thanks My Acrylix stamp set