Posted on 1 Comment

Baby Memory Box

Hello! I’m really excited that in just a few days, I will have a new nephew! This afternoon is my sister’s baby shower and here’s some pictures of the gift I made her with the Victory papers. (I’m banking on the fact that she will be way to busy to check out my blog before the shower.)


This decorated recipe/photo box will help these busy new parents remember the precious times over the next few years. Text inside lid:

Baby books are great ideas

but sometimes you’re too busy.

Living with little ones

can put you in a tizzy.

Milestones pass too fast at times

to find the proper page,

So jot note of each event

with date or baby’s age.

Like, “took 3 steps on May the 1st”

or “Teething – 5 December”

Then drop it in this Memory Keeper

to help you remember.

I’ve had this poem in my idea folder for a couple years and there was not a source on the print out. If you know where it came from, I’d love to give credit where credit is due.

Inside the box are a bunch of notes cards for them to use to write down milestones or everyday moments.

The sentiments and images on the It’s Your Day stamp set were perfect for this. The two special cards below will go on top. “Hello Life” to record the birth event and one for me to write a special welcoming note for the shower.

Through September 30, you can get a copy of this stamp set for yourself for just $5 with a qualifying purchase of $35. Click here to start shopping.


This is one of my favorite projects ever. I hope it has inspired you to find creative ways to remember the special times in your life.


Rebecca

Posted on

Summer Workshop Schedule is here!

Set aside some time for creativity this summer! My workshop schedule is below. Be sure to update your calendar as some dates have changed. All workshops will be held at my home in Arnold, MO. Please email me for registration information.

Scrapbooking Night – Pemberley*

Friday, June 15 from 6:30 to 10:30 pm

This workshop is
included when you order either a Pemberley Workshop On the Go or Level 2 Paper Pack. We will all be working with the same paper
set which means you will will maximize your creativity by being inspired by
others’ ideas. Deadline to order kits is May 30.

Creative Day – Summer Mini-Album

Tuesday, July 31 from 1:00 – 3:30 pm

Take a break from the
summer heat and create a keepsake paper bag album. Bring a few pictures or add
them later. Creative days are a chance to try something new and spend time with
the younger generation of crafters. Price per attendee is $5. All supplies and
materials are included in the price. This workshop is open to all ages. (Anyone
under age 10 must be accompanied by an adult.)

Cards by the Dozen – Wedding &
Anniversary*

Sunday, August 5 from 2:30 – 5:00

Come to this workshop and make 12
fabulous wedding and anniversary cards (4 each from 3 designs) for $12. The
price includes all supplies and materials needed to make the cards, plus
coordinating envelopes.

* Must be 16 years or older to attend these
workshops.

Posted on

May Special – starting April 17

In honor of National Scrapbooking Month in May, we are celebrating starting April 17 with the new Dotty for You papers. This fun set includes 24 sheets of paper in 12 unique double-sided coordinated patterns to mix and match. It also comes with a free project set to get you started.

There are three ways to get the Dotty for You paper:

  • Place an order of $35 or more in products from the Spring/Summer 2012 Idea Book between April 17 and May 31, and add the Dotty for You paper packet for just $5*.
  • Host a Gathering with a sales total of $400 or more between April 17 and May 31 and receive a Dotty for You paper packet FREE.
  • Join Close To My Heart as a new Consultant between April 1 and May 31 and receive a Dotty for You paper packet FREE.

Here’s a video that shows some projects made with the Dotty for You paper packet:

Even though this special lasts through the end of May, be aware that the offer is only good while supplies last. So make sure you don’t wait too long. If you want it, act early.

Posted on

Potential

March has blown in! This morning, I’d like to share with you the new Stamp Of The Month, Potential. This stamp set has romantic flourishes and a encouraging sentiments. It is great to dress up cards or scrapbook pages.

Like the projects pictured above? Supply lists and directions are on the Close To My Heart website via this link.

Here’s a picture of all the great images you will get with this set.

You can only get this set during the month of March 2012. It is $17.95 or save over 70% and get it for just $5 when you spend $50.

Posted on

Magic Rock the Block

I’ve been debating for weeks on what to do with my Rock the Block. So many ideas — how could I narrow it down to just one? Then I saw what my fellow consultant Tammy did with hers and my mind was made up!

She made a wonderful Magic Folding Cube. It is made with eight of the blocks that are connected so that as you fold them down different pictures appear.

Here’s some pictures of my Magic Block:

Don’t we look cute? Maybe a little odd because of the cuts between cubes. My mouth looks like I’m on JibJab!

To decorate the block, I combined papers from Typeset, Elemental and You & Me. All stamping is from the exclusive Rock the Block set.

Click here to see Tammy’s version. She also posted a great video showing how it works.

Finally, if you want to make one yourself, here’s a link to a site with complete directions.

OK, I know you are asking how you can get one of these for yourself. Here’s the
scoop:

Place a minimum order of $25 from the Autumn/Winter 2011 Idea Book
between December 19, 2011 and January 31, 2012, and you can get both the blocks
and stamp set for just $15. The retail value of these two items is nearly $45,
so that is a savings of almost $30!

In addition, one lucky reader of
my blog and/or Facebook page will WIN a set of of these blocks and
stamps!

To enter, simply share how YOU would use your block set by commenting on
this post — either on the blog or on Facebook. On January 31, I will draw one
name from the list of “commentators” to win the set.

Need some some inspiration? Follow this link to a Blog Hop put together by some CTMH consultants showing how they used their Rock the Block sets –> Blog Hop Link.

Feel free to share
as many ideas as you would like because I really want to hear your creative
ideas. However, each name will only be entered in the drawing once. I will post
the winning name on this blog and on the Show Me Scrapping facebook page. It
will be the responsibility of that person to provide me with the address for
shipping (continental US only).

OK – start the ideas rolling!

Posted on

Rock the Block!

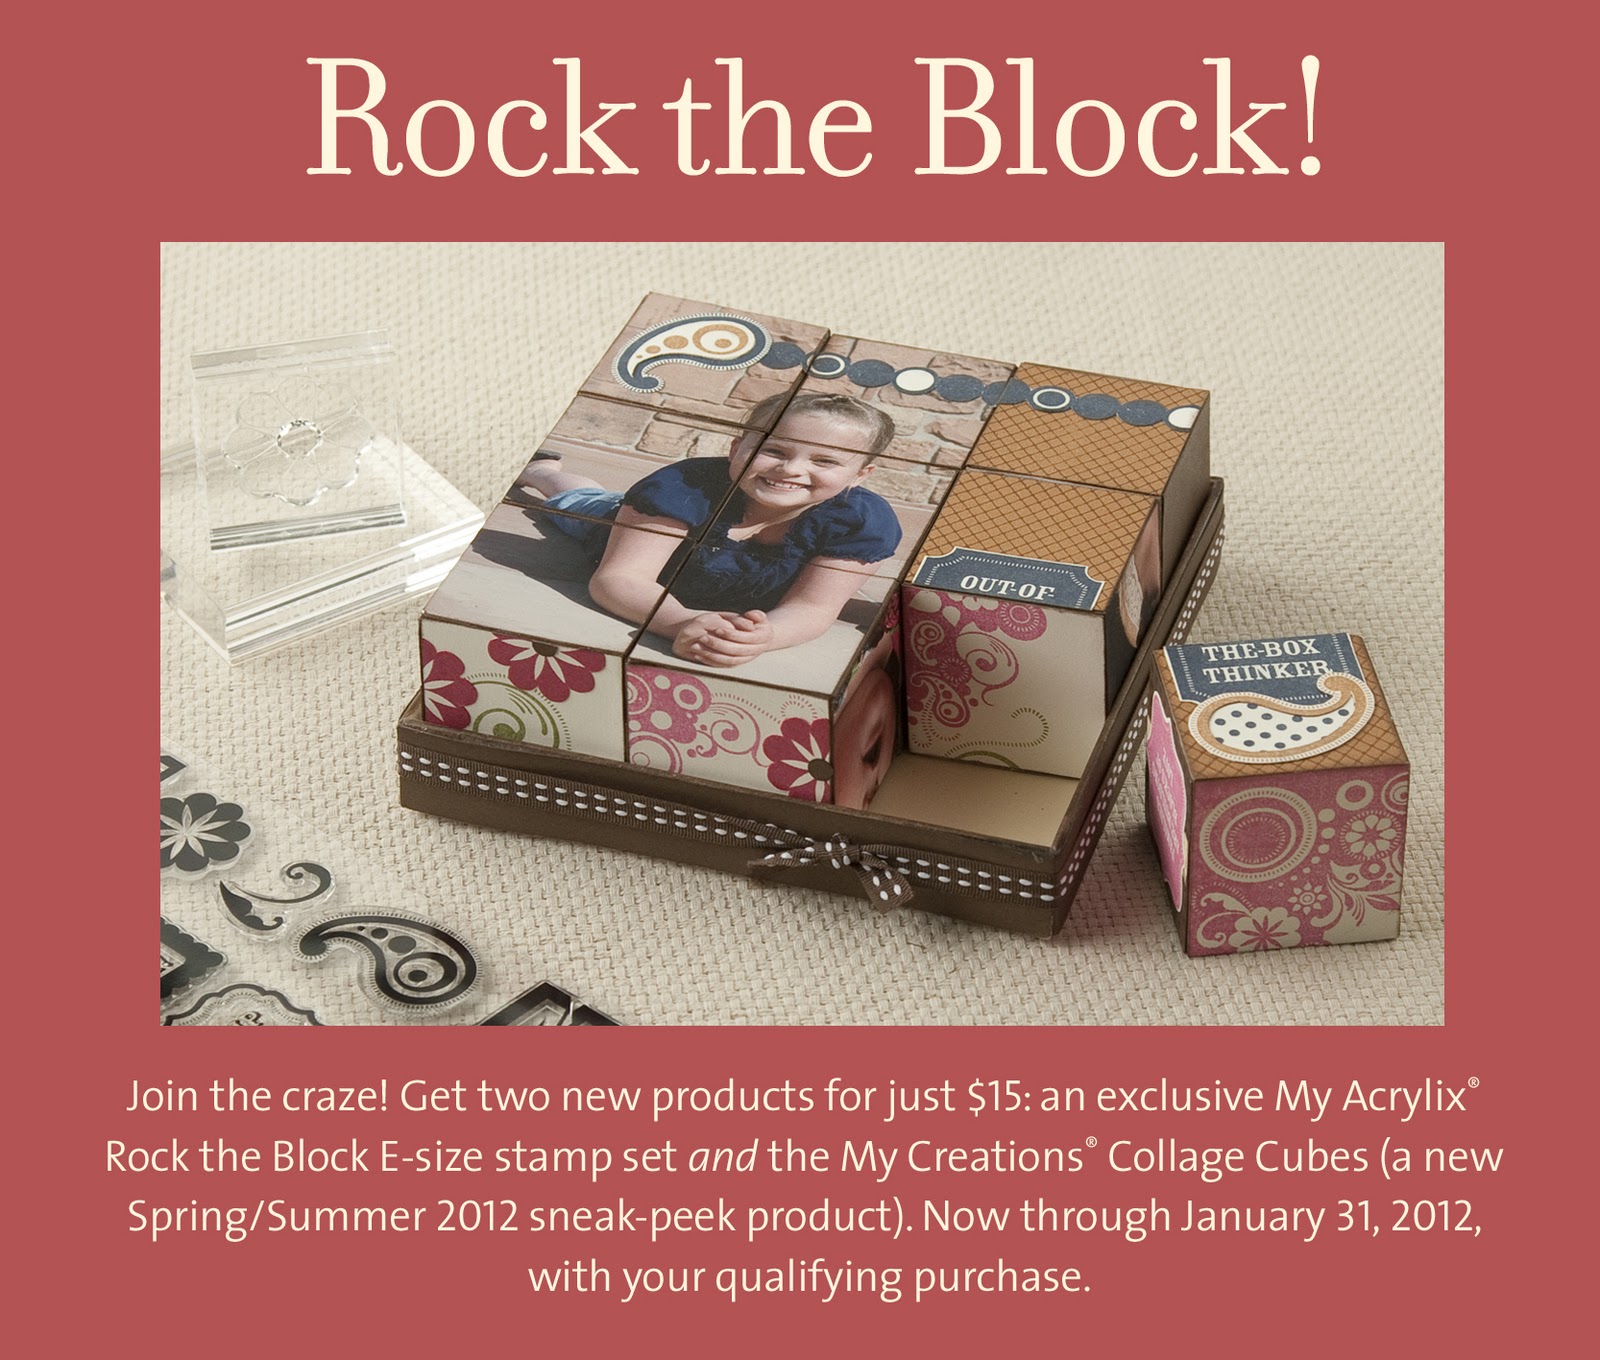
For National Scrapbooking Month, you can get the NEW My Creations Collage Cubes and the exclusive E-size (i.e. large!) stamp set shown below for just $15 with your qualifying purchase of $25 or more.

Be sure to read this entire post to see how to purchase or WIN one for yourself!

The block set is a sneak-peek product that will be in the Spring/Summer 2012 Idea Book. The Rock the Block E-size stamp set is only available during this promotion.

Here’s a video to introduce the set.

Here’s a picture of all of the included stamps:

OK, I know you are asking how you can get one of these for yourself. Here’s the scoop:

Place a minimum order of $25 from the Autumn/Winter 2011 Idea Book between December 19, 2011 and January 31, 2012, and you can get both the blocks and stamp set for just $15. The retail value of these two items is nearly $45, so that is a savings of almost $30!

One lucky reader of my blog and/or Facebook page will WIN a set of of these blocks and stamps!

To enter, simply share YOUR IDEA of how you would use your block set if you win by commenting on this post — either on the blog or on Facebook. On January 31, I will draw one name from the list of “commentators” to win the set.

Feel free to share as many ideas as you would like because I really want to hear your creative ideas. However, each name will only be entered in the drawing once. I will post the winning name on this blog and on the Show Me Scrapping facebook page. It will be the responsibility of that person to provide me with the address for shipping (continental US only).

OK – start the ideas rolling!

Posted on

Memory Game Box – Convention Project #2

The second project we made at convention is a decorated “Memory Game” box. We used lots of new materials: Elemental paper pack, a great stamp set called Blue Ribbon, Foundry Pins, and Elemental Complements. You may also notice some Kraft paper and olive brads.

A key to making this project look great is to sponge Desert Sand over the box (it started out white) and the edges of all of the papers. That really ages it and makes everything look like they belong together.

Here’s a look at all the fun stuff on the top of the box. I love all the layering achieved by using the Complements deminsional elements and foam tape. (Remember that trick I mentioned in the last post about pins and foam tape?)

The box comes with a set of 24 three inch chipboard squares. They are nice and sturdy, so they will hold up to lots of use.

This item gets it’s name from the children’s matching game and you can certainly use it to make a customized memory game for a child (or grown up kid) in your life. Using doubles of family pictures would make a fun game.

However, there are so many other possibilities, for example you could use the cards for scripture verses, prayer lists (names of family and friends), your bucket list, your goals, your hopes for someone special in your life, scavenger hunt clues, list of achievements, Christmas family traditions, or wishes for the bride or new mom from shower guests.

One on display at the convention used a 12″x12″ picture, cut into 3″ squares and mounted on the squares to make a 16 piece puzzle. Another consultant plans to send the box with her milatary husband on his next assignment. Then she will send him notes on the squares one at a time. What a great gift that I’m sure will be cherished for years to come.

What would you use a Memory Game Box for? Please comment with your ideas!

Posted on

American Celebration!

I love the July Stamp of the Month, American Celebration. We used this stamp set in the May Creative Workshop. Those that selected the patriotic option made the photo holder and a wall hanging similar to those in this picture.

Follow thislink to learn how you can purchase this stamp set at a discounted price or free!

Last month I posted a tutorial on making the photo holders. Follow this link if you are interested.  Today, I’d like to show you a technique I used on the top wall hanging. In the close up below, take a look at the red strip of paper in the background. What to learn how to make the distressed white stripes? Then read on!

I started with a piece of red cardstock. To make the stripes, I first scored it every quarter inch using my new Martha Stewart scoring board. (I love this tool!) Then I simply turned the paper over and lightly sanded it to expose the white core on the raised score lines.  

This technique can be adapted in many ways. You can make your scoring lines in a pattern to represent wooden bead board or turn your paper 90 degrees to create hash marks. In fact, you can use sandpaper to bring out any design that you dry emboss with a stylus. Remember this only works with cardstock that has a white core.

Have fun creating and have a wonderful July 4th!

God Bless America,

Rebecca

Posted on 1 Comment

Altered Binder Clip Photo Holder

Today, I want to show you how to take a large binder clip to make a cute photo holder like the one below.

Recipe:

My Reflections Zippidee paper

Disney Stamp Set by EK Success

Gemstones by the Paper Studio

First, just to make sure we are on the same page, here is a picture of the binder clip that I started with.

It is about 2″ wide and around 4″ tall when standing with the clip part up. The first thing to do is cut a piece of paper to cover the body of the clip. The size needed for mine was 3-1/4 by 1-7/8 inches, but you’ll want to check as sizes may vary. Starting with the short side of the paper on the top edge of the clip (where the metal curls), wrap this all the way under and around to the other curled edge of the clip. Although you are attaching paper to metal, I found that my Tombow tape runner worked fine. 

Now you can decorate your clip to your heart content. I wanted to use mind to hold a picture from a Disney World trip, so I chose Mickey Mouse stamps from EK Success. Let’s take a closer look at the picture of Mickey.

To make the blue frame around, I first punched a 1-1/2 circle from a piece of blue cardstock. Then I tossed the circle (actually saved it for a later project) and put the outer piece of cardstock in to my 2″ scallop punch. By turning the punch upside down as shown below, I was able to make sure that the frame was an even width all the way around.

I layered this ring on top of the Mickey I had previously stamped on white card stock, and viola, it becomes a frame. I found that glue dots worked the best for sticking embellishments to the metal rods.

Below are a couple photo holders that we will be making at my next Creative Workshop on May 22. For more details on the workshop, click here.

Recipe

My Reflections Fanfare paper

My Acrylix American Celebration stamp set

Recipe

My Reflections Veranda paper

My Acrylix Dreams Come True stamp set