Posted on

You Are Loved Heritage Layout (last convention layout)

This is finally my last convention project post. Consultants like me who lean more toward scrapbooking vs. card-making were really spoiled this year. Similar to the last one I posted, this is perfect for heritage photos. And also like the last one, I have not yet chosen pictures for it. I’m not currently working with any black and white or sepia photos, so it will wait until I tackle the project of organizing and scrapping some older ones.

This layout really shows off some of the gold foil accents in the Better Together complements pack. I love the contrast between the smooth shine of these pieces and the flat, almost dull, look of the fundamental and solid basic papers.

This layout also has touches of soft Bashful in the paper, stickers and pearls.

Hope you have enjoyed seeing all the projects we made at convention this year. It really is a highlight of my year. If you’d like to join me at the next one in Las Vegas next year, ask me for more information about joining my team. You would love to be a part of this fun group of consultants. 

Posted on

A layout to remember a special “today” in Salt Lake City

One of the highlights of the Close To My Heart convention in Salt Lake City was a tour of the Home Office. This is another one of the layouts we made at convention and it was so pretty, I reserved it for my most special photos from the tour.

In the first picture, my friend Faye and I are posing in front of a nice photo opp they had set up soon after we came into the building. The second is on the steps leading from the main entrance to the upper floors where we got to see Jeanette’s office and the art studio. The final picture is in front of the picture —– this is the “Mecca picture” for Close To My Heart consultants. It really felt like going home seeing this building that so much creative goodness flows out of. Such a memorable experience.

Because I have so many pictures of the tour, I plan to add a few Protector Pluspages between the pages of this layout. Or perhaps, I’ll use Flip Flaps to layer more photos directly on the layout. I’ll figure that out once I print the remaining pictures.

Although the floral accent pieces look like they were made to match the paper, they are actually stamped using the new  Beautiful You (D1741) stamp set. They are perfectly trimmed because of the coordinating thin cut set. The flowers on this stamp set are triple layered creating a lot of depth in your images.

Getting the layers lined up can be a little tricky. Once you pull the stamps off of the carrier sheet, you lose the orientation and it can be difficult to line the layers up properly. A little trick I learned from another consultant was to use a sharpie and mark the top side of each stamp BEFORE removing it from the sheet. Then when you are stamping you know which side is up and if you are consistent you will have good results. 

Here’s a card using that same beautiful stamp set.

Hope you have enjoyed these projects and feel inspired to create some of your own!

Always create,

Rebecca

Posted on

Heritage Home Layout — Another lovely project from convention

If it seems like I’ve been posting a lot of projects from convention, you are correct! This year’s convention theme was “Who Will Tell Your Story” and the whole event had a focus on scrapbooking. Most of our projects were layouts and our speakers stressed the importance of telling our stories. 

I have not yet decided what pictures to put on this layout. The colors and prints would make it perfect for vintage black and white or sepia toned photos. Although I have quite a few heritage photos, I have not yet tackled them, so I may tuck this layout away for when that project begins.

This layout uses more of the updated Fundamental Basicspapers. You may also recognize splashes of our Color of the Year, Bashful

The pages are adorned with elements from the Better Together complementspack and the beautiful newBashful pearls

What about you: do you have heritage photos waiting to be put into books to be viewed by future generations? How do you plan to tackle this project?

Posted on

My Page Celebrating 23 Years of Marriage

This month, my husband and I celebrate 23 years of marriage. We thought we had it all figured out in 1994 when we tied the knot, but we had no idea where life would lead us. 

This one-page spread is another layout from the Close To My Heart convention. It uses several prints from the Basic and Adventure Fundamental paper packs. If you have been following my other posts with convention layouts, you know I’m a big fan of the Fundamentalline of papers. Each of these pages gives you a somewhat neutral print using a single color. Once you have picked your color palette, you can replace any solid papers with one of these prints with no change to your color scheme.

The stickers, including this title, are from the Better Together Complements pack. There is also a scattering of the new Bashful pearls on the page.

Posted on

Sweet Memories from our Salt Lake City Convention

Today, I wanted to share with you a special picture that deserved a special layout. 

In June, I traveled to Salt Lake City, Utah to the Close To My Heart Convention. I spend four days with some of the most lovely people in the world, many are in the photo above. These are my people, the Scattered Hearts team and our leader, Tina Sutton (holding the white heart in the front row).

In addition to catching up with old friends and meeting new ones, a highlight of convention is playing with all the new products. This layout was one of our projects and it uses papers, embellishments and stamp sets from the new 2017 Annual Inspirations Idea Book. I love how this layout has lots of layers created by a combination of papers, stickers, Cricut-cuts and pearls.

Recipe:

Whimsy Fundamental Paper

Adventure Fundamental Paper

Better Together Complements

You Are Here Cricut Collection

Hello USA Cricut Collection

Splash of Color Stamp Set

Bashful Pearls

Ink pads

If you are looking for a place to belong, you should consider becoming a Close To My Heart consultant. In addition to being part of the national Scattered Hearts team, you will also be part of my Treasure Keepers team. We have an active team Facebook group, regular calls, quarterly meetings and much more. When you join my team, I will offer you one-on-one coaching to the extent you want. I’d love to help you dream big and meet your goals!

Earn a bonus when youjoin in August! Place $300 in orders before September 30 and you can choose between an Alphabet thin cut bundle, any of our Cricut Collections or $99 in product credit!

Learn more about joining and the August Special>>

If you have any questions, please email me. I’d love to chat!

Posted on

Replace your solid paper with Fundamentals to add excitement to your projects

If you have been following the Close To My Heart products for a couple years, you may be familiar with our Fundamentals line of products, you’ll want to check out our all new patterns. If are not familiar with the Fundamentals, it’s time to introduce yourself! 

These unassuming collections include papers, embellishments and ribbons that go along with our color palette. There is a separate Fundamentals collection for each group of colors: Whimsy (pastels), Adventure (brights), Enchantment (bolds) and Basics (neutrals). The amazing thing about them is each sheet of paper has a pattern that incorporates just one color (plus white). So you can replace any solid cardstock in your projects with these papers to add interest without compromising your color scheme. 

With the new Annual Inspirations Idea Book that went live on August 1, we have a whole new set of fundamental products! Today, I have a couple simple cards made with products from this line.

This card could have been made with all solid cardstock and it would sbe ok. But it is much ore interesting due to the Fundamaental papers. Three of the Fundamental paper packs are represented: the Willow watercolor print from Adventure, the Sweet Leaf open circles from Whimsy and the Peacock dots from Enchantment.  The banners, stars, heart and sentiment are all stickers straight from the new Happy Momentscomplements pack. So fast & simple!

Recipe:

Whimsy Fundamental Paper Pack

AdventureFundamental Paper Pack

Enchantment Fundamental Paper Pack

Cardstock (two-toned): Peacock and Willow

Happy Moments Complements

Here’s another card where I used Fundamentals instead of solid cardstock. Both pieces of fundamental paper on this card are from the Whimsy pack: Sorbet floral and Flaxen small open circles. Thanks to our new two-toned cardstock, both blues on the card are Sapphire. The only stamping on this card is the words “My Friend” that come from theBeautiful Youstamp set. 

Recipe:

Whimsy Fundamental Paper Pack

Cardstock (two-toned): Sapphire, Flaxen, Sorbet and Poppy

Happy Moments Complements

Beautiful You stamp set

If you like easy, yet interesting, the fundamental papers are exactly what you need.  Because each side of the paper has just one color (plus white) you can mix them up just as you would solid cardstock. So for your next project, pick your color scheme then decide where to use solid and where to use pattered (fundamental) papers. Your resulting project will have more detail by simply adding a couple of these prints.

Each pack of fundamental paper has a whopping 24 sheets of paper at less than $1 per sheet. Pick up one or all four today!

Whimsy Fundamental Paper
Adventure Fundamental Paper
Enchantment Fundamental Paper
Basic Fundamental Paper

By the way, as part of this week’s Warehouse Special, there is currently a Basic Fundamental bundle at 50% off regular retail value. Although these products are based on the retired Basics color palette, it would be a great addition to your stash to add detail when you add neutrals to your project. 

This pack includes a pack of patterned paper, stickers and embellishments in neutral colors. It will only be available until next Tuesday (or when supplies run out). Keep your eyes out for the next set of Warehouse Sales posted every Tuesday in August at 1 am (CST). 

Posted on 8 Comments

Whimsy Baby Girl Scrapbooking Scrapook — free workshop download! (better now than never)

Did you ever have great intentions to do something and even do 90% of the work, but then not get back to it? That’s what happened with the scrapbook I’m sharing with you today.

A few months ago, I created a 12 page scrapbook using a half pack of the Whimsy Fundamentalpapers and the Baby Girl Complements. I loved how these products go together! It was so much fun creating this album that I wanted to make another book using the other half of the paper pack and the Baby Boy Complements. I shelved my blog post about the pages I already made because I wanted to present the two books together.

However, in just a few days these products will all retire! Since I believe this is a great project (wouldn’t it make a great new mom gift?), I want to get this posted so now so you’ll have a chance to order the supplies before they are gone.

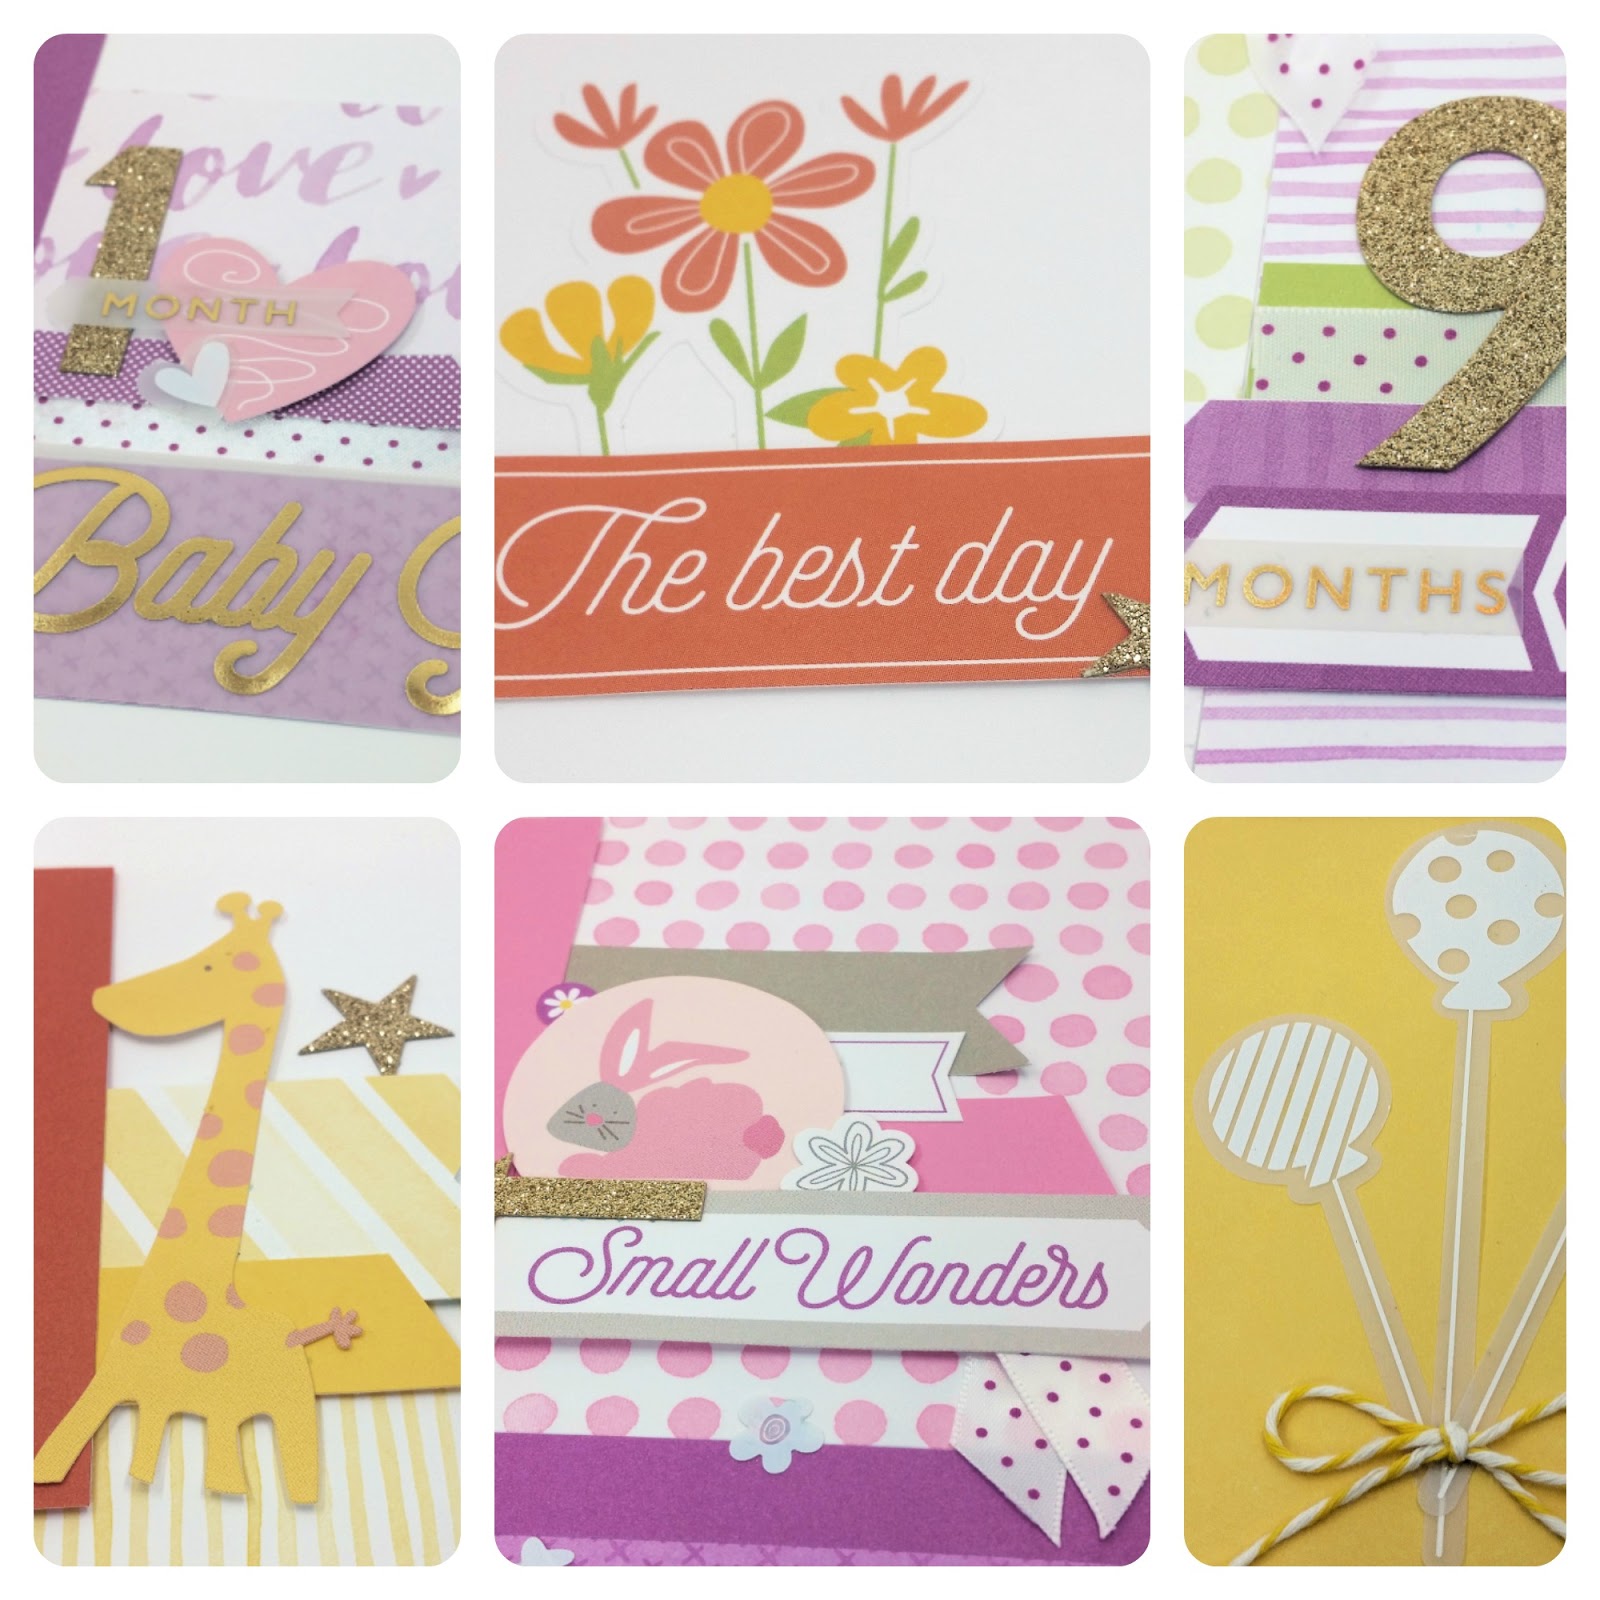
To make this album, I made use of the numbers 1 through 12 from the complements pack and made a page for each year of the baby’s life. So the first page has room for a photo of the newborn little girl.

I then created a layout for each of the following two months of the baby’s life. For each of these layouts, I choose a color combination that I thought went well together. I used a mix of solid and the patterned fundamental papers.

Once I had the basic pattern for the page laid out, I added coordinating ribbon, stickers and chipboard from the Complements pack. Of course, I also added the gold glittery number for the month.

The final page of the album is for month 12 or 1 year. For this page, I added some balloons to celebrate this special birthday.

If you have more pictures than the space allowed in this album, I have a couple solutions for you! 

Extra Photo Idea #1 – Attach Flip Flaps to your Memory Protector on top of the photo wells. I love this visual created by Close To My Heart to show hwow Flip Flaps can triple the number of photos on your pages. 

Learn more about using Flip Flaps in this poston the Close To My Heart blog. 

Extra Photo Idea #2 – Add some pocket Memory Protectors between the pages. These come in several designs including the new Pocket Plus protectors which are narrower than the full size protectors and allow the outer edge of the layouts to show as you flip through the photo pages. 

Click hereto see all the Memory Protector designs.

Ready to make one? First click on the link below to download the free cutting and assembly directions. Then review the materials list to make sure you order everything you need before these products retire on July 31. Use the links to go directly to the items on my Close To My Heart website.

DOWNLOAD FREE ALBUM DIRECTIONS

Materials

·       
Z3255 Whimsy Fundamentals Paper Packet (UPDATE: Already sold out! However, I have a couple packs in my inventory.Email me to order.)

·       Z3272 Baby Girl Complements

·       
Z3287 Whimsy Ribbon Pack

·       
1385 White Daisy Cardstock (12 sheets for page
bases)

·       X5769 Thistle Cardstock (1 sheet)

·       X5639 Sweet Leaf Cardstock (1 sheet)

·       X5772 CanaryCardstock (1 sheet)

·       X5751 SorbetCardstock (1 sheet)

·       
X5773 Pixie Cardstock (1 sheet)

·       
X5763 Smoothie Cardstock (1 sheet)

·       
X5930 Slate Cardstock (1 sheet)

In addition to the materials listed above, you will need a paper trimmer and detail scissors to complete this workshop. I’d also suggest the following adhesives: tape runner, glue dots, glue pen and 3D foam tape.

I still think these pages could easily be modified to make a Baby Boy album with the remaining papers from the Whimsy Fundamental paper pack. I’ll leave that as a challenge for you since my time is running out. Please contact me if you have any questions about this project.

Keep Creating,

Rebecca

Posted on

Simply Fundamental Scrapbooking Discounted Starter Kit!

Whether you are a seasoned scrapbooker or a want-a-be, this month’s special gives you a bundle of products to get your scrapbooks done. 


Order before November 31 to save over 1/3 off retail on this huge bundle of products.

Using the workshops directions I’ll send you via email, you can create five layouts (10 pages) plus have plenty of products left for addional pages for your book. The bundle even includes 10 memory protectors!

I’ve decided to make this deal even sweeter by adding this fun New Year’s stamp set for free to any orders that include this bundle! (To get the free stamp set, you must email me your order rather than placing it online.)

Here’s what you get:

1) Album: Your choice D-ring or Post-bound

2) Paper Fundamentals Enchantment: 20 sheets of our unique double sided paper. A white design is on one side and a shiny resist of the same pattern on the other.

3) Fundamentals Stickers: Four 6″ x 12″ sheets including letters, words, speech bubbles and shapes!

4) Fundamentals Assortment Peacock: Add just the right amount of sparkle with bows, clips, glitter stickers and wood pieces.

5) 3 bonus sheets of White Cardstock

6) 10 Memory Protectors: Your choice of side or top load.

7) Cheers 2016! Stamp Set

8) Exclusive Fundamentals Workshop with directions for 5 2-page layouts to start your album off beautifully.

The total value of this bundle is $109.70, but your price is just $71.80! That’s over 1/3 off retail on this huge bundle of products!

Email me to order>>>