Posted on

Celebrate dads with handmade cards or scrapbook pages!

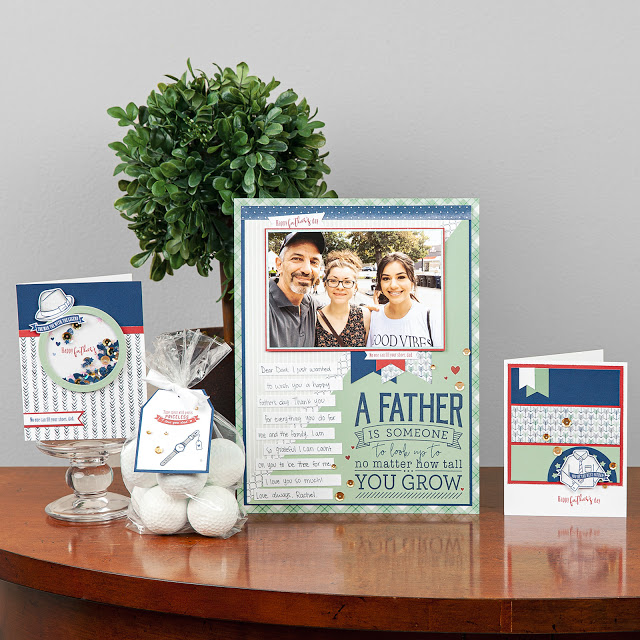
Make Father’s Day unforgettable this year with two exclusive stamp sets. 

Celebrate the man who means the most in your life by making a card, layout or gift using the exclusive stamp sets available through the Legendary Father’s Day special.  

The first stamp set, Legendary Father’s Day includes a complete wardrobe for your guy. Stamp the shoes, hat, watch or shirt plus great sentiments like to let him know that he is special.

The second stamp set, Someone to Look Up To, is a single stamp so you can create quick cards or layouts in one step. 

I know you are going to want both of these set, so be sure to add the bundle with both stamp sets to your cart and save 20% off the retail price!

Shop now>>

Keep creating!

Rebecca

Posted on 4 Comments

Quick Tip: Cut four 5″ x 7″ mats from a single sheet of scrapbook paper

Earlier today, I was cutting 5″ x 7″ mats for a page kit and thought others may be interested to see how to get FOUR from a standard sheet of scrapbook paper (12″ x 12″).

The trick is to not make your first cut all the way across the paper. Otherwise, at most you will be able to create THREE 5″ x 7″ pieces.

Here’s how you do it:

STEP 1: Make a cut 5 inches from the left side of the paper just over 5 inches long.

STEP 2: Turn your paper so that this cut is perpendicular to the blade and 7″ from the top of the paper trimmer. Make a cut 7″ from the edge starting at the top and stopping at the previous cut. If you are using a Fiskar’s paper trimmer, you can use the horizontal handle of the blade casing as a guide for where to stop. This creates your first 5″ x 7″ piece!

STEP 3: Turn the paper 90 degrees counterclockwise and cut 5″ from the left edge. This creates your second 5″ x 7″ piece!

STEP 4: Repeat STEP 4 to create the third 5″ x 7″ piece.

STEP 5: This leaves you with an odd L-shaped piece of paper. Trim the 2″ square off to create the final 5″ x 7″ piece. 

Want a visual? Here’s a video showing the process.

VIOLA! It’s that simple! With a little practice you’ll wonder why you settled for getting three pieces in the past!


Enjoy this tip? Please like the video on YouTube and follow my channel.


Posted on

Stock up on Adhesives with my October Special!

Adhesivies are a necessary (but not so exciting) part of crafting. It is a shame to spend more than necessary on these products. For this reason, I have periodically offered my local customers a chance to order adhesives in bulk to save a few bucks and this time I’m opening it up to you!

During October only, when you order 7 adhesives from me, you will get 3 more of equal value or less for FREE! In otherwords, you will get 10 for the price of 7! That’s a savings of 30%.

Mix and match from any of the adhesives on the list below  to get exactly what you want! 

Z3022

3L EZ Dots Adhesive

$7.95

Z3023

3L EZ Dots Adhesive Refill

$4.50

Z3033

Duck Easy Stick Adhesive (4 pack)

$18.95

1512

Bonding Memories Glue

$7.95

Z663

Bonding Memories Glue Pen

$4.50

1772

Memory Book Glue Dots

$7.50

Z341

Memory Book Mini Glue Dots

$7.50

Z2089

Micro Glue Dots

$7.50

Z1151

3D Foam Tape

$5.95

Z2060

Thin 3D Foam Tape

$5.95

Z1903

Base & Bling Adhesive Dots

$4.95

Z1904

Base & Bling Adhesive Strips

$4.95

Z679

Liquid Glass

$6.95

Note that this special is not available on my website. You can only get the free adhesives by emailing a list of what you want. I’ll talley your order and contact you for payment. 

Remember you only have until the end of October to send me your order. 

Happy Creating,

Rebecca

Posted on

Artfully Sent Cricut Collection from Close To My Heart: Making Envelopes

I’m so excited to finally have the Artfully Sent Cricut cartridge in my hands and have been playing around with it. I can’t wait to show you my creations. However, first I thought it would be helpful to share with you some details about how to make the various types of cards on this cartridge. Today we’ll take a closer look at the envelopes you can make using Artfully Sent.


2019 Update: Our retired Cricut image collections are now available to purchase using my special Cricut link! The Artfully Sent Cricut collection was first released by Close To My Heart in 2014 in a physical cartridge bundle. It retired a few years later without being offered as a digital-only collection.  This made all of these great images unavailable to anyone who was unfortunate enough to miss out on this cartridge while it was available.

This fall (2019), Close To My Heart began a new partnership with Cricut which allows all of our image collections, including retired collections like Artfully Sent, to be purchased using special links only available from Close To My Heart consultants! This is an exciting development because many of you missed these collection the first time around. 

Browse all Close To My Heart image collections>>

Note that the Artfully Sent images are also available in Cricut Access or can be purchased individually in Design Space for $1.99 for each project and $6.99 for the font. However, the best value is to purchase the full collection which includes all 700 individual images (projects plus font) for just $49.95. You can subscribe to Access or purchase the full collection on Cricut.com. (If you use the Cricut link in this post for your purchases, I’ll earn a small commission. Thank You!)


This week, I’m writing a series of posts showcasing all the types of cards available on this cartridge, plus the envelopes and font. Click the links below to learn more! I’ll update the list after the remaining posts in this series are available.

Envelope Options

You will also find multiple options for envelopes to cut on Artfully Sent. There are seven choices for 4 1/4″ x 5 1/2″ envelopes and six different 5″ x 7″ envelopes. Each envelope has a coordinating optional liner that you can use to dress up the inside of your envelopes.

Setting the size

Expression and other cartridge machines

If you are creating with a cartridge-driven Cricut machine like the Expression, find envelope in the handbook. Under the image of the envelope, there will be a blue box with either 4.25″ which indicates that it designed to go with a 4.25″ x 5.5″ card or the blue box will have 5″ which indicates that it is designed to go with a 5″ x 7″ card. Set the size dial to either 4.25″ or 5″ as indicated and the machine will automatically make the adjustment so that the envelope is the right size.

Keep the dial size in the same position to cut the liner and the machine will automatically cut it the right size to coordinate perfectly.

Your finished envelope and liner will have tic marks to indicate where to fold. 

Explore and Maker Machines

In Design Space, you first need to find an envelope that is designed for the size card you are making. To do this, click on the information button in image search. The name of the image will start with either “5×7” or “4×6”. (The latter is a typo in DS because these are the 4.25″ x 5.5″ envelopes.)

Once you have selected an appropriate envelope for your project and added it to your canvas, you will need to resize it. This can be difficult because the envelope will have flaps that will fold in to create the pocket. The trick I found is to assume that the liner is the same width as the card and size it appropriately.

When you add the envelope to the Design Space canvas, the liner is automatically added as well and the two images are grouped. This means if you change the size of one, the other will change in proportion. To get exactly the right size of envelope, you must hide (click on the eyeball) the envelope and attached score lines so that all you see is the liner. Now adjust the width based on the card size. Make sure that you keep the width and height proportional (keep padlock closed).

Once you have set the width, you can unhide (click the eyeball again) the envelope and score lines. It will be perfectly sized to fit your card.

Sample envelopes

Are you ready to get your hands (and Cricut machine) on this collection? Hop on over to Cricut using my special link to view and purchase from the Close To My Heart Cricut library!

Browse all Close To My Heart image collections>>

Inspired? Get out your Cricut and your Artfully Sent cartridge and start creating.

As always, keep creating!

Rebecca

Posted on 2 Comments

Are you ready to Ombré?

You’ve probably seen the Ombré look in magazines, on TV and at the market — it’s everywhere! If you’ve heard of this trend, most likely you are picturing hair that gradually lightens (or darkens) from the roots to ends. The latest wave of this trend also includes gradually changes in color.

This style trend has extended well beyond the doors of a salon and can now be seen in clothing, nail color and even food.

Blue Ombre Petal Cake
Ombré Cake by The Hungry Housewife

You can also use the Ombré technique in your crafting. Here’s a video showing you one way to add this current trend to your paper projects.

Posted on

Retiring Items Update

Don’t forget that a lot of our favorite Close To My Heart products are being retired at the end of July. In addition, these are only available now while supplies last.

The following items are already gone forever!

G1054 Worksops On The Go® Buzz and
Bumble Kit
G1056 Workshops On The Go® Claire
Scrapbooking Kit
G1057 Workshops On The Go® Later Sk8r
Scrapbooking Kit
G1061 Workshops On The Go® Chantilly
Cardmaking Kit
X7155B Avonlea Paper Packet
X7156B Clementine Paper Packet
X7157B Dakota Paper Packet
X7164B Buzz And Bumble Paper Packet
X7164C Buzz and Bumble Stickease
X7166B Claire Paper Packet
X7167B Later Sk8r Paper Packet
Z1081 Colonial White Waxy Flax
Z1088 Chocolate Waxy Flax
Z1089 Black Waxy Flax
Z1350 Topiary Embossing Powder
Z1408 6″ X 6″ Pansy Purple
Quick Pic™ Album
Z1695 Urban Felt Alphabet
Z1736 My Creations® Mini Banner
Z1739 My Creations Milk Carton
Z578 Corner Rounder
Z659 Cranberry Embossing Powder
Z670 Black Embossing Powder
Z672 Red Embossing Powder
Z673 White Daisy Embossing Powder
Z724 Embossing Pen
Z906 Bamboo Waxy Flax

For a complete list of items that are being retired see these posts:

Retiring Stamp Sets

Other Items Retiring

If there is something you want, order it before it is too late!

Start Shopping Now>>>

Photobucket

Posted on

Retiring Items Reminder

Don’t forget that a lot of our favorite Close To My Heart products are being retired at the end of July. In addition, these are only available now while supplies last.

The following items are already gone forever!

G1054 Worksops On The Go Buzz and
Bumble Kit
G1061 Workshops On The Go® Chantilly
Cardmaking Kit
X7155B Avonlea Paper Packet
X7156B Clementine Paper Packet
X7157B Dakota Paper Packet
X7164B Buzz And Bumble Paper Packet
X7164C Buzz and Bumble Stickease
X7166B Claire Paper Packet
X7167B Later Sk8r Paper Packet
Z1081 Colonial White Waxy Flax
Z1088 Chocolate Waxy Flax
Z1089 Black Waxy Flax
Z1350 Topiary Embossing Powder
Z1408 6″ X 6″ Pansy Purple
Quick Pic™ Album
Z1695 Urban Felt Alphabet
Z1736 My Creations® Mini Banner
Z1739 My Creations Milk Carton
Z578 Corner Rounder
Z659 Cranberry Embossing Powder
Z672 Red Embossing Powder
Z673 White Daisy Embossing Powder
Z724 Embossing Pen
Z906 Bamboo Waxy Flax

For a complete list of items that are being retired see these posts:

Retiring Stamp Sets

Other Items Retiring

If there is something you want, order it before it is too late!

Start Shopping Now>>>

Photobucket