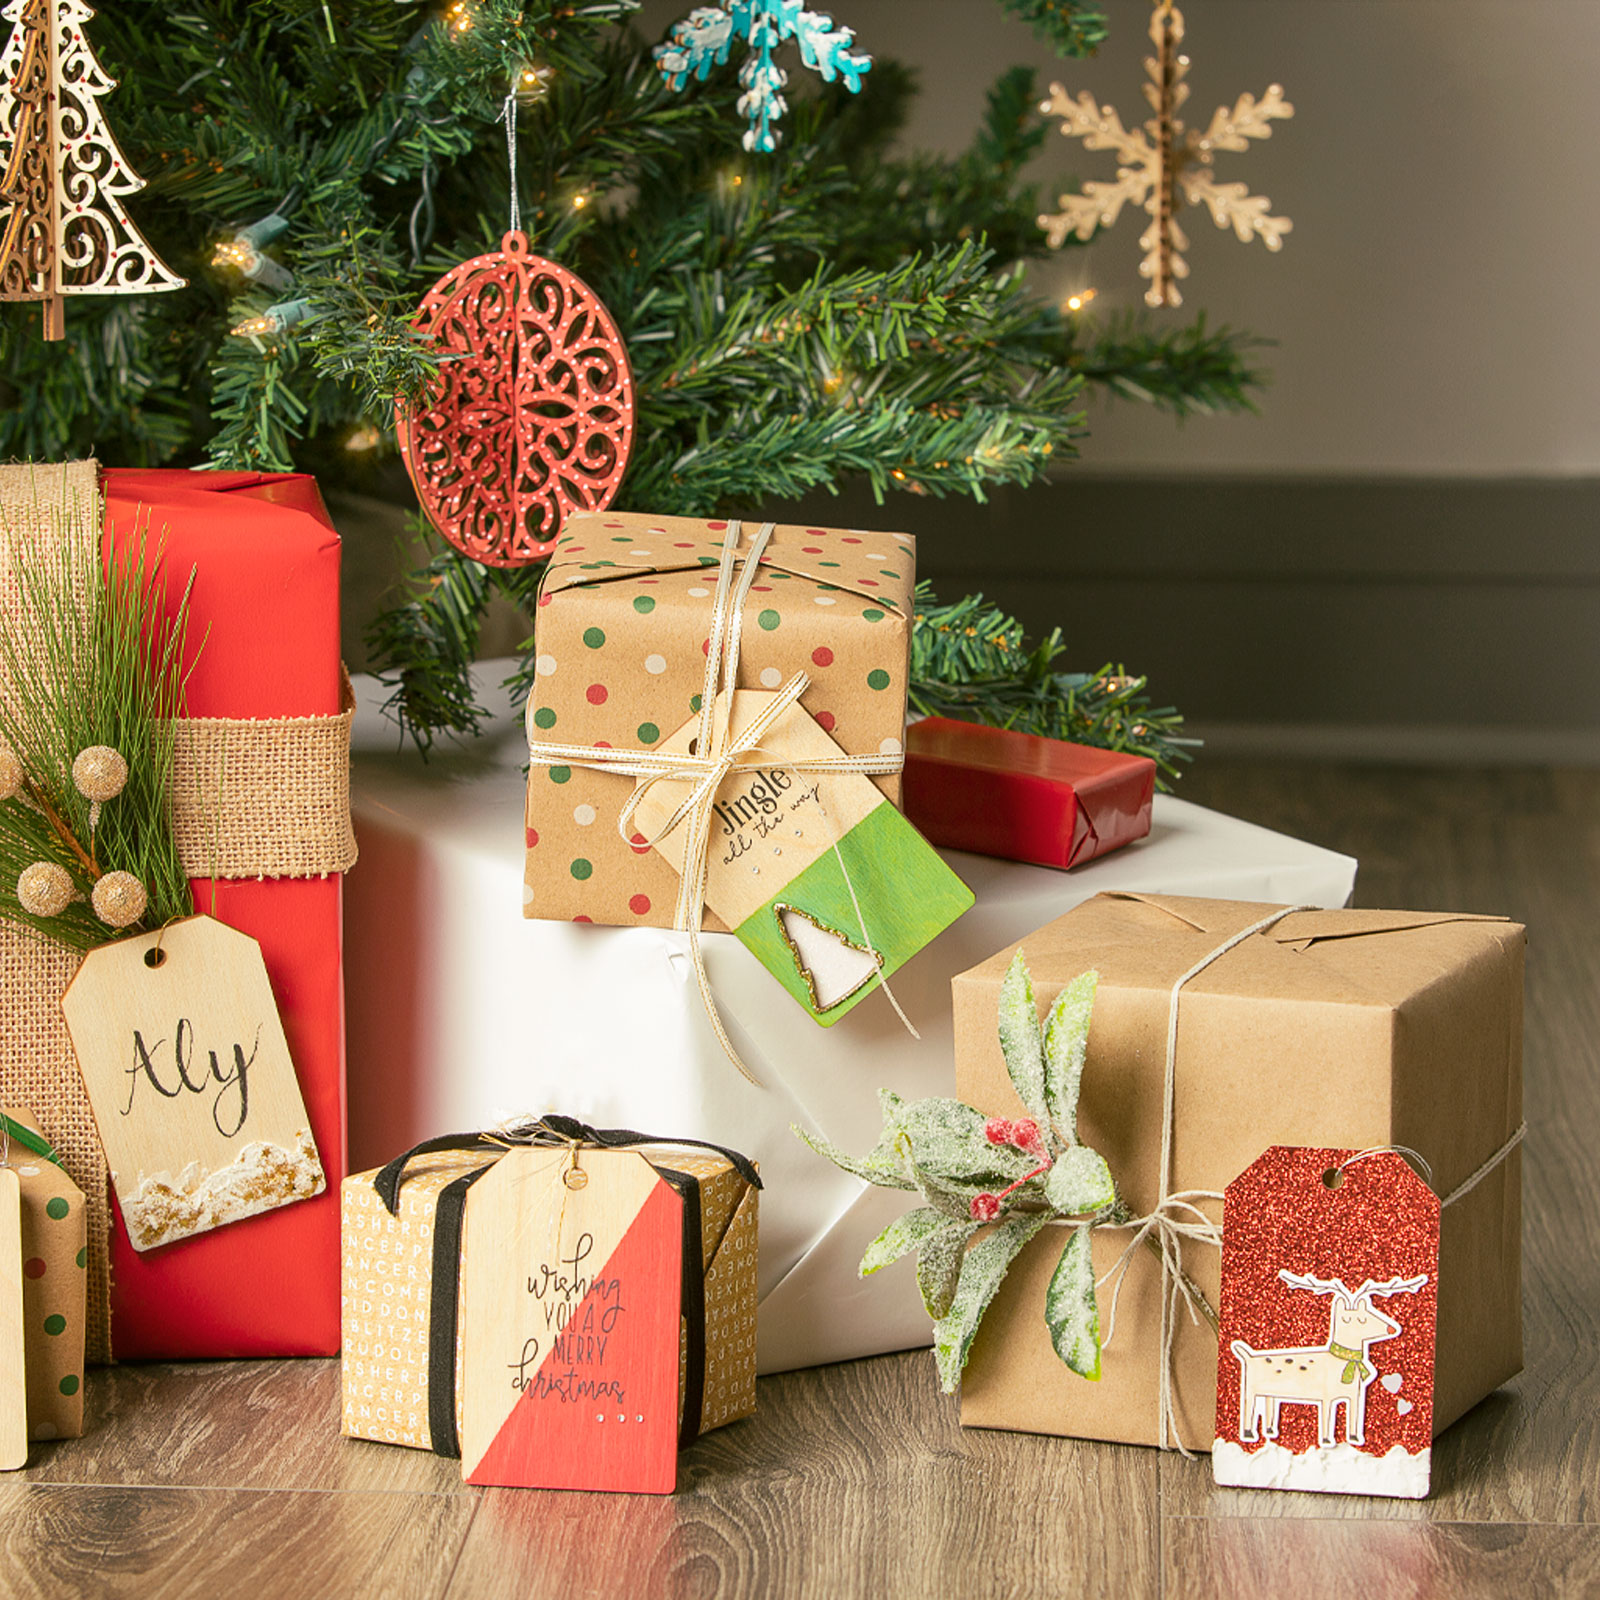
Bring some personalized rustic beauty to your holiday festivities with the wooden ornaments and tags in the Merry Little Christmas special! With a variety of ornament and tag options, you can choose which ones fit your celebrations best. The included SVG files allow you to match any decor and theme!
It’s been a busy month so I’m just getting the card kit for this month’s stamp of the month finished. Although we just have a few days left, but there is still time to get this beautiful stamp set!
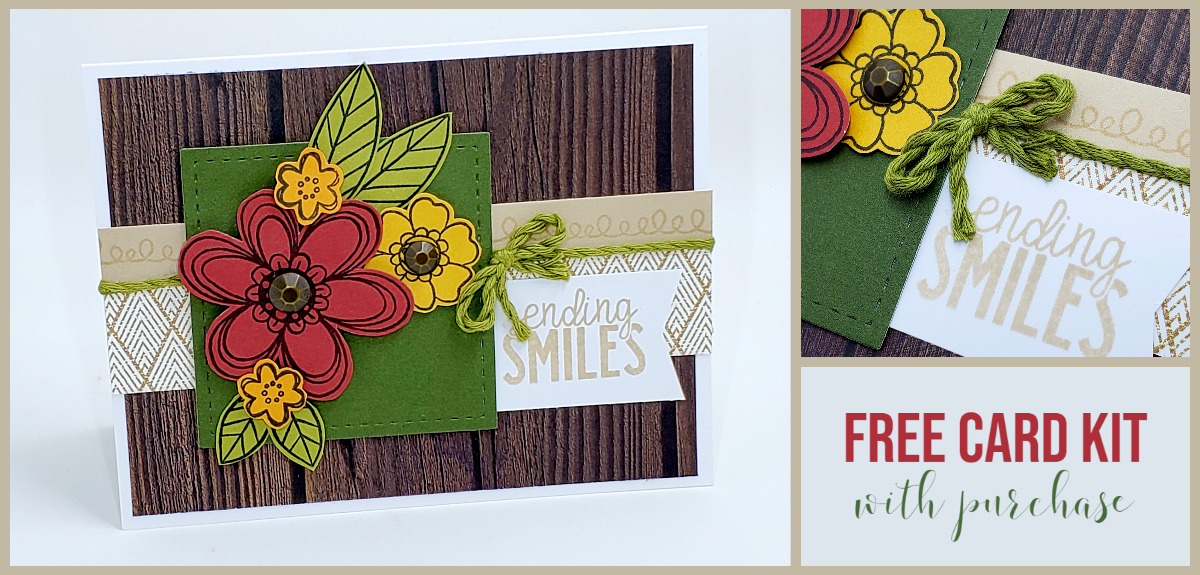
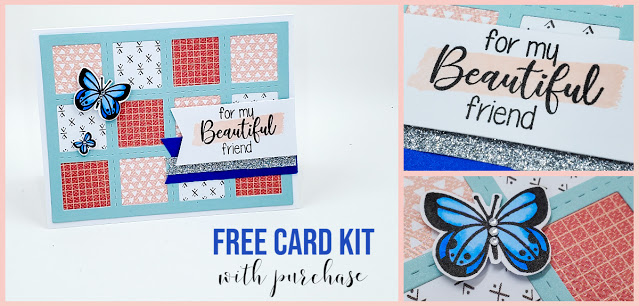
The July Stamp of the Month, For My Beautiful Friend, is filled with sweet messages to send to someone special plus flowers, butterflies and even a dragonfly. I love the swish of paint image that allows you to highlight a specific word. I used it in the card above to add a watercolor brush to “Beautiful”.
This great stamp set is only available to purchase in July 2020. It is a “size D” (AKA large) stamp set and regularly priced at $18.95. However, when you have $50 in your cart, you can add it for just $5!
When you purchase the For My Beautiful Friend stamp set on my Close To My Heart website (at full or discounted price), I’ll send you a kit to make this pretty friendship card! The foundation for this card is the stitched grid die cut which was cut with the Multi Square Window Thin Cuts set. I love that this cut piece is the perfect size for a standard card. There is an even white border all the way around it.
The beautiful pattern papers in the grid windows are from the current Mix-in paper packet. These beautiful papers get over shadowed by the themed paper packs, but they are great to add a little texture to any project.
Kit includes
– Card base
– Die cut grid overlay
– Cut pieces of solid and pattern paper
– Extra white cardstock for stamping
– Silver shimmer trim
– Bitty Sparkles
To finish the kit as shown, you’ll need Black and Peach ink pads, True Blue Tri Blend marker and adhesives.
If you’d like one of these kits, simply place an order on my Close To My Heart website that includes the For My Beautiful Friend stamp set. Start shopping now>>
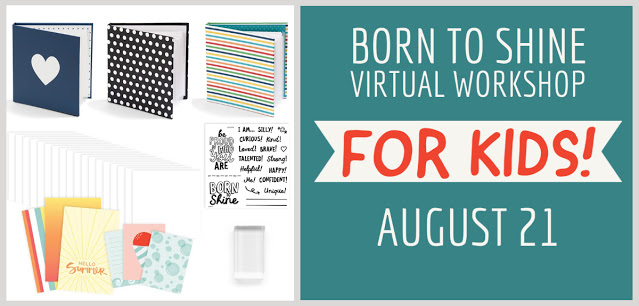
Announcing a NEW virtual event! This one is a little different because it will be aimed at younger creators!
I fell in love with crafting as a child. I love making things in school, at church and at home. I’m so glad that my creativity was encouraged. I still have embroidery thread and books given to me by my grandma while I was in elementary. Although my style and type of projects have changed over the years, the love of making things with my hands is here to stay!
I’m really excited to announce a new virtual event that will be created for and lead by children! I’m reminded note I wrote in the margins during last year’s Business Builders conference while our founder and CEO, Jeanette Lynton, share her thoughts with us. She said, “As long as little girls have hands, there will be crafting.”
She said it so well and I agree 100%. I saw this when raising my daughter who learned to knit before her age was double digits and I see it every time I work with children. The love of creating is an important part of development.
The live event will be hosted by Maya, the 9-year old daughter of our president, Monica Wihongi on the Close To My Heart Facebook Page. You may have seen her helping her mom teach at other events. She has grown up at Close To My Heart and is a natural instructor! At this event, Maya will walk participants through each step of creating a fun mini album. Order the Born to Shine kit today so you’ll be ready to create during the class.
Here’s some of Maya’s completed pages:
This fall many of you will be home schooling either entirely or part time to allow your school to maintain social distances. This would be a great addition to your curriculum! The stamp set is filled with positive messages and journaling prompts to help them maintain a strong sense of self during these uncertain times. This stamp set is exclusively available in this workshop — you can’t get it anywhere else!
This would also be a great workshop to do with your grandchildren or nieces and nephews. Their parents are likely overwhelmed with all of the changes and would love to have some help. Wouldn’t to be fun to see them create their own personal memory book? If you can’t physically be in the same place, you could join them virtually through zoom or other meeting app.
4″ x 4″ Story by Stacy Album (one of the three designs shown)
4″ x 4″ White Daisy cardstock
Born to Shine Stamp Set
Summer Vibes Picture My Life cards
2″ x 3.5″ stamping block (1/4″ thick)
In addition, you’ll want to have an ink pad (Maya will be using Intense Black) and writing tools (like our black journaling pens) available for them to use.
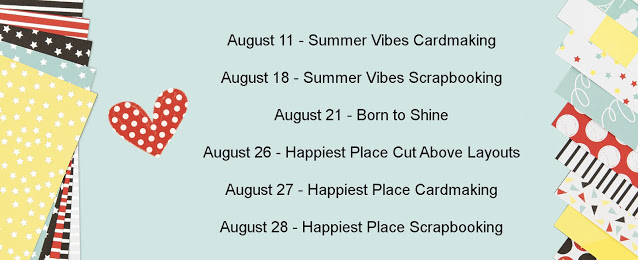
This is a great addition to the already planned virtual events on the Close To My Heart Facebook page. Here’s all of the events currently scheduled in August.
Be sure to go to the event pages and mark yourself as “Going” to be entered to win prizes! It’s going to be a fun, creative month!
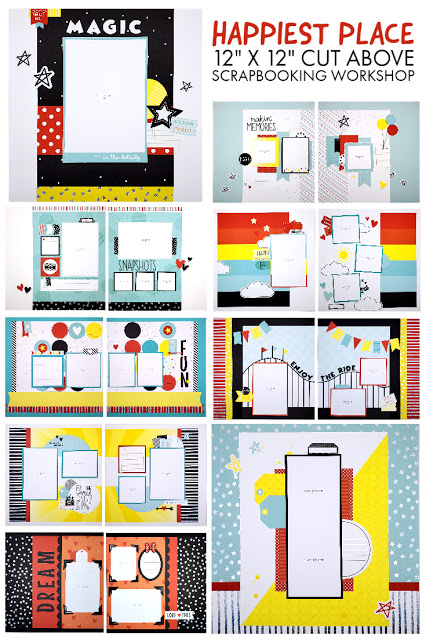
If you are a 12″ x 12″ scrapbooker like me, you may not have thought the Happiest Place kit was for you. But with a little extra paper, you can tweek this kit to make 16 beautiful Disney-themed pages!
I’m so excited about this kit! The Cut Above page designs are perfect for 8.5″ x 11″ albums. Gut since all of my albums are 12′ x 12″, I added added base pages, the beautiful silver trimmed Coordinating cardstock plus a few extra pieces of solid cardstock to make these full size layouts.
I kept a lot of the features that make our Cut Above workshops so great like printed papers, stickers and die-cuts that are labeled by layout number. Each of my layout uses the pieces that go with the cooresponding 8.5″ x 11″ layout. This means you can sort the pieces that come in the kit and follow my cutting directions to add additional pieces to each of your stacks. Once everything is cut, use the assembly guide to create each 12″ x 12″ layout.
Here’s a closer look at the completed pages:
The kit includes several Flap Flaps. If you have not used these before you will fall in love. The guide that comes in the kit includes directions for placing them on your finished pages. You can follow those steps even if you make the 12″ x 12″ pages. I did use a few of the pieces shown in the flip flaps when I redesigned the pages, but that just leaves more room for your photos — we always have more photos don’t we?
Speaking of more photos, even though these pages have more area thatn the originals, I did not add additional photos. I wanted to keep the directions simple, but there is certainly room on most of the pages for another photo or two. You will have extra cardstock left if you want to cut mats for those pictures.
*The Cut Above Workshop and Coordinating Cardstock are included in the Happiest Place Product bundle which is 20% off retail during July. So check it out because if you can use the additional items in the bundle (most likely you can), that is the better deal.
I’m so excited to add these layouts to my albums. We are definitely a Disney family and I have a couple trips that I have not finished scrapbooking. However, I didn’t want to delay getting these directions to you, so I will be adding my photos later. A great thing about this kit is that it includes white photo place holders so you can add your photos later. I like to trim my photos an extra 1/4″ smaller so that the place holder becomes a photo mat.
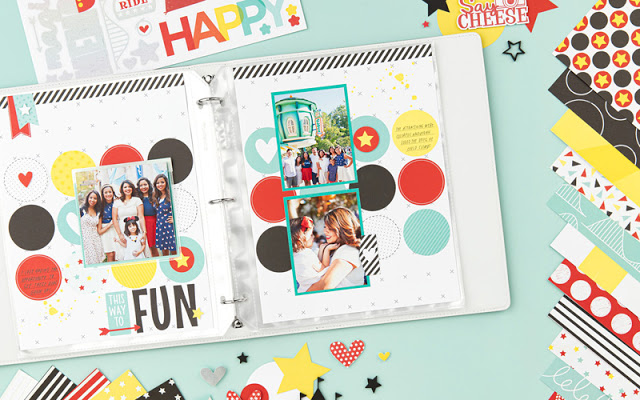
Photos of the projects for the Happiest Place virtual events have been released. I’m sure you’ll love them as much as I do!
If you are a Disney fan like me, I’m sure you LOVE our new Happiest Place Collection! Last week, I posted the schedule for August workshops that will take place on the Close To My Heart Facebook page. That schedule includes a three-day event using the magical Happiest Place collection on August 26 – 28.
We now know what the cardmaking and scrapbooking projects will look like!
Cut Above Album (8/26)
The project for this session has already been revealed, but I’ll include it here so you can see all the projects we’ll be making during the 3-day event. We will be making a 16 page 8.5″ x 11″ album. The kit comes together quickly thanks to printed base pages, die-cuts and stickers.
Cardmaking Workshop (8/27)
During the second session, we’ll make 16 individual magical cards. Yes, I said SIXTEEN!! And there is such a variety of styles, patterns and sentiments! These cards lend themselves perfectly for birthday wishes, but they can be used for all other happy occasions. You could even use them as announcements or invitations for a trip to the Happiest Place!
At the virtual event, we will walk through the steps to create these cards, from cutting the papers to stamping to embellishing. Along the way, you’ll learn lots of card making tips and tricks!
Scrapbooking Workshop (8/28)
I can’t wait to make these nine pages and adding pictures from our last trip to Disney World! During final session, we’ll make a single page and four 2-page layouts.
Details
These FUN & FREE virtual craft event will happen each day starting a 5 pm CST August 26 – 28 on the Close To My Heart Facebook page. Note that Close To My Heart will have prize drawings during the event. Be sure to click “GOING” on the Event Page for a chance to win.
The Happiest Place products used for all of these projects are conveniently included in the Happiest Place Bundle (CC7209 or CC7211) at 20% off retail price during JULY only.
In this HUGE bundle you get so much! Once you finishe the event projects you will have supplies left over for a few more projects. Plus of course you’ll have the stamp and thin cuts to use forever. The Bundle includes:
Happiest Place Cut Above Layout Kit
Happiest Place Paper Packet + Sticker Sheet
Happiest Place Coordinating Cardstock
Happiest Place Acrylic Shapes
Happiest Place Stamp + Thin Cuts
To make all the projects during the event, you’ll need the following supplies:
Stamp Pads: Archival Black, Candy Apple, Glacier and Lemonade
Preserve the happiest of memories and create truly magical artwork with the exclusive collection, Happiest Place!
The Happiest Place collection includes a whole suite of coordinating products, including an extra-large paper packet with 12 patterned paper sheets! Your projects will shine thanks to silver glitter foil accents on coordinating stickers and cardstock sheets. Add in stamps, acrylic shapes, SVG’s, and complete album workhop, and you have the recipe for hours of unforgettable crafting fun!
Be sure to check out the Happiest Place Product Bundle, which includes several of the items in this collection at a 20% discount in July!
Paper Packet
The Happiest Place paper packet includes 12 sheets of duo-sided pattered paper. Each sheet includes an additional 1/2″ zip strip that lists the coordinating colors on one side and has a decorative design on the other. Let’s take a closer look at the papers!
You can get the paper pack with our without the coordinating sticker sheet. Don’t you love the silver glitter foil accents on the stickers?
Coordinating Cardstock
The cardstock pack gives you 12 more sheets of paper to work with in coordinating colors of Candy Apple, Glacier, Lemonade, White Daisy and Black. Half of these papers have silver foil stars or stripes on one side. This really extra accent really adds some pizzazz to your projects!
Acrylix Shapes
The Happiest Place Acrylic Shapes pack includes assorted matte black acrylic pieces that go along with the theme. The back side is shiny which means for each image (except for the words), you can choose matte or shiny!
Stamp Set and Thin Cuts
The Happiest Place stamp set is the perfect way to add more words, images and icons to your projects. With stamps you can make your own accents with any color you’d like. This stamp set is available alone or you can get it bundled with coordinating Thin Cuts. The blue shading in the image below shows you what thin cuts are included.
Digital Art
We also have two brand new sets of Digital Art: Titles and Designs. These collections include SVG files that you can upload to Cricut or other design software to add even more creativity to your Happiest Place projects! After downloading the images, you can manipulate them in a program like Cricut Design Space™. Resize it, remove layers, and much more! Each different color in the image indicates different layers that can be edited and cut individually with your chosen software and personal cutting machine.
I love digital art because I can cut it any size and out of any material that I choose. Wouldn’t one of these titles be perfect to cut from Heat Transfer Vinyl for the front of the album?
Cut Above Album
The Happiest Place Cut Above workshop makes sixteen 8.5″ x 11″ pages. The only thing you need to complete this kit is your favorite adhesives. This is thanks to base pages that are pre-printed with designs, cut paper, die-cut pieces and stickers. You also get a full color instruction guide so you know exactly how to finish your pages.
As I mentioned at the beginning of this post, the best value is to order the Happiest Place Bundle. You will get the Paper Packet + Sticker Sheet, Coordinating Cardstock, Acrylic Shapes, Stamp + Thin Cuts plus the Cut Above Layout Kit! It really is a wonderful assortment of products to unlock your creativity! It’s 20% off only in July 2020.
WOW! That’s a lot of products to celebrate your Happiest Place isn’t it?
On August 26 – 28, Close To My Heart will be hosting virtual events using the products in the Happiest Place bundle. You can see samples of the projects, supply lists and more information on the events page. Be sure to order your bundle in July to get the 20% off dicount.
I’ve created a few other Happiest Place projects that I’ll share with you over the next few days. Stay tuned!
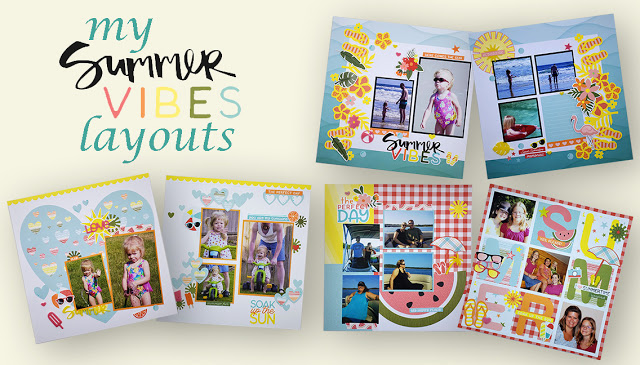
Last week, I went through my photos from 2002. We had just purchased our first digital camera, our daughter was two, I loved photos but was not really a scrapbooker yet. It was so fun to look back at these pictures and choose the ones to print. My first three layouts for 2002 are done!
The Summer Vibes Scrapbooking workshop was perfect for summer photos from our yard, the beach, camp and the lake! Before I show you the rest of my pages, let’s take a look at the kit.
The kit contents include:
Summer Vibes Paper Packet + Sticker Sheet (X7258S)
Additional cardstock sheets (1 Nectarine, 1 Black, 5 White Daisy)
Here’s a look at the sample pages that are shown in the directions for the kit.
I love these kits because they give me ready-to-assemble pages, but with the freedom to make them my own. By showing you my versions of these layouts, I hope that you see how easily they can be adapted for different themes, number of photos and more.
For this first layout, I chose some back yard summer photos and was able to complete the pages with very little changes. By the way, that sweet little girl is now a sophmore in college! She’s keeping busy this summer with a full time internship. Due to Covid, she has her workspace in the our basement so we get to see her occasionally!
For the second layout, I used photos from a trip to Florida that same year. It was our daughter’s first time to play in the ocean.
Once again I was able to finish these layouts with minimal changes to the pattern. The love how the clusters of flowers, leaves and flip flops frame the pages. The variety of materials (stickers, die cuts and acrylic shapes), creates a lot of interest. I also popped a few things up with 3D foam tape to add more dimension.
I split the last layout into two single pages. These were two events that I only had a few pictures for so that worked well. For the first page, I used the SUMMER grid for three pictures I took when I dropped my daughter off at camp a few years ago. All the fun icons capture the excitement of arriving on day one of what is expected to be a fun and busy week.
You may notice that I arranged the letters and pictures differently than the sample. I wish I could say there was an artistic reason for that, but it was totally an ACCIDENT!! This page has a die-cut grid overlay. I turned it upside down to attach the papers and photos from the back. I should have reverse the order and when I turned it over, I realized my mistake!
This final layout has pictures from a weekend trip to Table Rock Lake in Branson with our church small group. Within a year of taking this trip, the other three couples in the group moved out of the area. I’m so glad that we had this time together I wanted it in my album even though I didn’t take many pictures. The action shot of our tubing adventures are only captured in my mind. The title “The Perfect Day” is…well, perfect for that day!
For this layout, I exchanged the single 4×6 photo on the left for two 3x4s. The space on the left felt crowded, so I moved the umbrella and other icons to the right. I tend to do journaling on a bunch of pages at once, so as usual this, page is still needing some notes so years from now I’ll remember why these photos were important to me.
I hope that providing alteratives of the workshop layouts helps show that these kits really are versatile. For this workshop, I was able to make very minimal adjustments, but if you look back at my prior workshop examples, you see that sometimes I make more drastic changes. The key is to start with the base pages and the underlying design. Then I start arranging my photos and the various elements until I find something that feels right. The kits give me such a good starting point and keeps me from getting into a creative rut.
If you’d like more instruction on this kit, Close To My Heart is hosting a virtual workshop on August 18. The actual event will be held on the Close To My Heart Facebook page, but you need to mark yourself as “going” on the event page to be entered to win prizes!
Here’s a schedule of all of the CTMH virtual events planned for August.
There are so many things coming up to be excited about!
Close To My Heart continues to create free online workshops just for you!
Updated 7/27/2020 to include the Born To Shine Kids Crafts Workshop!
These virtual sessions will be held on the Close To My Heart Facebook page. Be sure to RSVP to these events by selecting “Going” for each of these events so that your name will be in the prize drawings! Attendance is free, but you can order the kits on my CTMH website if you’d like to create along with us!
Summer Vibes Workshops
The next two events will feature workshops from the Summer Vibes suite of products.
Cardmaking Workshop
Tuesday, August 11 at 3 pm CST
At this workshop, we’ll be making the 16 just for fun greeting cards, four each of the four designs below. You can order the kit on my CTMH Website. In addition to the paper, cards/envelopes, stamp set and embellishments included in the kit, you’ll basic paper crafting and stamping tools, plus the ink pads listed on the site. To finish them as shown, you’ll also need watercolor paints and a brush — I recomend our small waterbrush.
Scrapbooking Workshop
Tuesday, August 18 at 3 pm CST
At this workshop, we’ll be making the three 2-page 12″ x 12″ summer layouts below. You can order the kit on my CTMH Website. These layouts use custom die-cut pieces and stickers. There is very little prep work, but you will need a paper trimmer for a few cuts. The sample layouts include sparkly highlights created with Cool Mint stickles. If you’d like to recreate that affect, be sure to add a bottle to your order!
Happiest Place Workshops
At the end of August, we have three days of crafting lined up! Each afternoon from August 26 – 28, join us to make a project from the Happiest Place Collection. If we can’t travel to our happy place this year, we can at least celebrate it with some creative projects! So grab photos from past trips or get ready for your next one with these projects!
(Sample projects. Actual cardmaking & scrapbooking workshop projects will be posted soon.)
The basic materials for all three of these workshops are included in the Happiest Place Product Bundle. Each of the items inclued in the kit (stamp + Thin Cut set, Paper Packet with Sticker Sheet, Coordinating Cardstock, Cut ABove Workshop and Acrylic Shapes) are available individually, but you save 20% when you buy the bundle. You can also buy individual products separately.
Cut Above Layout Workshop
August 26, 5 pm CST
The Cut Above workshop kit makes a sixteen gorgeously decorative 8.5″ x 11″ scrapbook pages. This kit can be purchased separately or as part of the product bundle. The pages will come together quickly thanks to die cuts and stickers. You also get photo placeholders and printed instructions. Memory protectors and albums can be purchased separately. (Memory Protectors ARE included in the bundle.)
Although pictures and other details of the cardmaking and scrapbooking projects have not yet been posted, you can see the list of additional materials needed on the Event page.
All of these events will happen on the Close To My Heart Facebook page. You can watch them live or on replay at a later time that works for you. Over the last few weeks, CTMH has hosted workshops to make cards and layouts from the Aurora, Stitched Together and Brushed collections. You can still order some of these projects and watch the replays!
I am so glad that Clsoe To My Heart is offering these opportunities to get creative. For the upcoming Summer Vibes & Happiest Place workshops, don’t forget to RSVP to these events by selecting “Going” for each of these events so that your name will be in the prize drawings! I hope to see you there!


 (Sample projects. Actual cardmaking & scrapbooking workshop projects will be posted soon.)