Last week, I went through my photos from 2002. We had just purchased our first digital camera, our daughter was two, I loved photos but was not really a scrapbooker yet. It was so fun to look back at these pictures and choose the ones to print. My first three layouts for 2002 are done!

The Summer Vibes Scrapbooking workshop was perfect for summer photos from our yard, the beach, camp and the lake! Before I show you the rest of my pages, let’s take a look at the kit.

The kit contents include:
- Summer Vibes Paper Packet + Sticker Sheet (X7258S)
- Additional cardstock sheets (1 Nectarine, 1 Black, 5 White Daisy)
- 5 Exclusive die-cut sheets
- 1 Exclusive patterned paper sheets
- Summer Vibes Acrylic Shapes (X7258E)
- 4 Top-load 12″ × 12″ Memory Protectors™ (optional)
- Photo placeholders
- Printed instructions
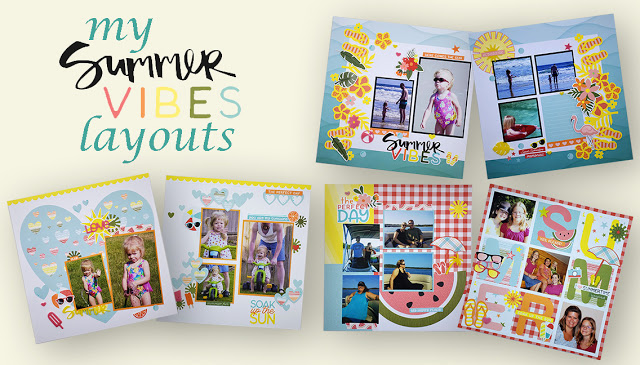
Here’s a look at the sample pages that are shown in the directions for the kit.

I love these kits because they give me ready-to-assemble pages, but with the freedom to make them my own. By showing you my versions of these layouts, I hope that you see how easily they can be adapted for different themes, number of photos and more.

For this first layout, I chose some back yard summer photos and was able to complete the pages with very little changes. By the way, that sweet little girl is now a sophmore in college! She’s keeping busy this summer with a full time internship. Due to Covid, she has her workspace in the our basement so we get to see her occasionally!


For the second layout, I used photos from a trip to Florida that same year. It was our daughter’s first time to play in the ocean.

Once again I was able to finish these layouts with minimal changes to the pattern. The love how the clusters of flowers, leaves and flip flops frame the pages. The variety of materials (stickers, die cuts and acrylic shapes), creates a lot of interest. I also popped a few things up with 3D foam tape to add more dimension.


I split the last layout into two single pages. These were two events that I only had a few pictures for so that worked well. For the first page, I used the SUMMER grid for three pictures I took when I dropped my daughter off at camp a few years ago. All the fun icons capture the excitement of arriving on day one of what is expected to be a fun and busy week.

You may notice that I arranged the letters and pictures differently than the sample. I wish I could say there was an artistic reason for that, but it was totally an ACCIDENT!! This page has a die-cut grid overlay. I turned it upside down to attach the papers and photos from the back. I should have reverse the order and when I turned it over, I realized my mistake!
This final layout has pictures from a weekend trip to Table Rock Lake in Branson with our church small group. Within a year of taking this trip, the other three couples in the group moved out of the area. I’m so glad that we had this time together I wanted it in my album even though I didn’t take many pictures. The action shot of our tubing adventures are only captured in my mind. The title “The Perfect Day” is…well, perfect for that day!

For this layout, I exchanged the single 4×6 photo on the left for two 3x4s. The space on the left felt crowded, so I moved the umbrella and other icons to the right. I tend to do journaling on a bunch of pages at once, so as usual this, page is still needing some notes so years from now I’ll remember why these photos were important to me.
I hope that providing alteratives of the workshop layouts helps show that these kits really are versatile. For this workshop, I was able to make very minimal adjustments, but if you look back at my prior workshop examples, you see that sometimes I make more drastic changes. The key is to start with the base pages and the underlying design. Then I start arranging my photos and the various elements until I find something that feels right. The kits give me such a good starting point and keeps me from getting into a creative rut.
If you’d like more instruction on this kit, Close To My Heart is hosting a virtual workshop on August 18. The actual event will be held on the Close To My Heart Facebook page, but you need to mark yourself as “going” on the event page to be entered to win prizes!
Here’s a schedule of all of the CTMH virtual events planned for August.

There are so many things coming up to be excited about!
Keep creating!
Rebecca