Posted on

Roxie Layout – Convention Project #1

The 2011 Close to my Heart Convention at Disneyland was excellent! I had so much fun seeing beautiful artwork, meeting new people, and enjoying fabulous entertainment. But my favorite times were the creative sessions where we got to create using new products. Over the next couple days, I’d like to share with your the projects we made. Let me know if you’d like instructions to make them for yourself!

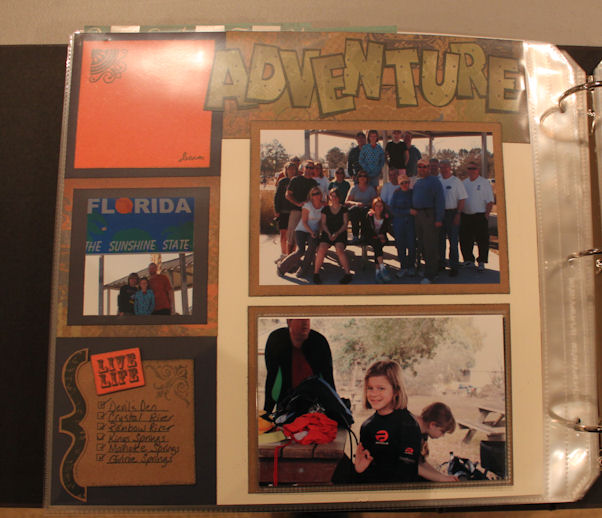
The first project is this two page layout using the new Roxie paper.

Recipe:

Roxie paper set

10 Things Stamp Set

10-Things Pocket

Rhinestone Bling Assortment

You will noticed the new 10 Things Pocket on the right page. This pocket comes with 10 numbered strips for journaling. Clever!

Close up of the decorated 10-Things Pocket

While the pocket comes blank, it coordinates perfectly with the 10 Things stamp set pictured below. I stamped mine to say “10 Things I Love About You”. As you can see in the picture below there are many other options including “I Miss About You”, “That make Today great”, “I wish for your birthday”, and more. There are endless possibilities for using this pocket for both scrapbooking and card making.

New 10 Things Stamp Set

This layout also shows off our new bling! The new Rhinestone embellishment pack comes with 6 large buttons, 6 small buttons, plus 6 pins to add sparkle.

Close up of new bling and ribbon

Here’s a great tip I learned for adding pins to projects: You may not be able to tell from the picture, but I attached the paper hearts with 3D foam tape. Not only does this add dimension, but also provides a convenient place to stick the pins. How fun is that?

Did you notice the pretty gathered ribbon that runs across the layout? This is from our new red ribbon pack. The Tulip ribbon I used is pre-gathered, so it’s super easy to add a professional look to your projects.

Keep watching my blog for pictures of the other convention projects. I hope my pictures will inspire you to try something new today. It was so much fun experimenting with the new stuff, but it also makes me think of new ways to use my current stash (and make room for the new!). Have fun creating!

Posted on

It’s National Scrapbooking Month!

Did you know that May is National Scrapbook Month? I just learned of it myself. Curious about it’s origins, I decided to do some research. Unfortunately, my internet search did not turn up much history on this observance, but I did learn that May is also National Barbeque Month, National Bike Month, Get Caught Reading Month, Clean Air Month and ton of other things. So I guess you can take you pick on which one to celebrate. I choose Scrapbooking!

To help you celebrate National Scrapbooking Month, Close to My Heart released an lovely scrapbooking kit, You & Me, and I’d like to show you what I made last weekend with it. (I’m so proud!)

Close To My Heart made a great preview video of this kit that you can view by clicking here.

SKIP TO THE BOTTOM OF THIS POST TO SEE HOW YOU CAN GET THIS KIT DISCOUNTED OR FREE!

I chose to design my own layouts rather than follow the instructions that came with the kit. Both of my projects are from about 4 years ago. My first layout documents the first few weeks that our dog Calla came to live with us. This cute little puppy is now about 50 pounds, but remains as sweet as she was then.

There is so much to love about this kit: the papers, stamp set, Irresistable chip board elements, ribbon and Opaques. I love the way clusters of embellishment look, but sometimes it is really hard to combine different elements. These coordinated perfect and it was really easy to put together. Here’s some close ups of the clusters in this layout.

The tickets in the prior picture use the included stamp set with Desert Sand and Smoothie ink. The fluer de lis on the next two pages are also stamped. The stitching around the edge of the page is also stamped.

Take a look at the brown (Desert Sand) chipboard shapes in the next two pictures. These are called Irresistables and were completely white when they arrived. The fun began when I started sponging them with ink. The “resist” pattern (see the stitching and flourish on the next picture) appeared in white! Isn’t that cool?

You may also notice that I lined the stems of the fluer de lis with seed-sized opaques. I love the detail this adds. Keep reading to see how I used the larger size opaques to simulate a rope.

My second project was a single page commemorating my daughter as “Principal for the Day” when she was 6 (going on 40!). Don’t you love her little blazer and hair bun. I left a little room on the right for her name badge (when I find it). I love how this page turned out and chuckle at the memories everytime I look at it.

Here are a couple more close ups of the details. So what is holding up the banner? Nothing! The opaques placed between the banner panels makes it appear to be hanging from a rope.

I can’t say enough how much I love this kit. The pictures really don’t do it justice. This kit is all about the details. Just take a look at everything you get!


I know you can’t wait to get one for yourselves, so let me tell you how. There are three ways:

1) Purchase at the retail price of $34.95,

2) Purchase for just $15 with additional $50 in purchases, or

3) Receive it for FREE if you sign up to be a Close To My Heart consultant in May.

Click here to begin shopping or here to learn more about becoming a consultant.

Thanks for letting me share my pages with you.

Posted on

May Stamp of the Month – Chairs to You

I can’t believe it is already May! As we are entering a new month, I’d like to introduce the new Stamp of the Month, Chairs to You, which includes all of the images below. This exclusive set is only available during the month of May. Click here to see how you can get this stamp set at a discounted price or FREE!  

Last weekend, I had a chance to play around with the set and made the following three cards.

TEST: Can you find the element of this scrapbook page that also uses the Chairs to You stamp set?

Have a wonderful May Day!

Posted on

Lucky Layout

I am really excited about the next papercrafting night that will be on May 13. We are finally doing the LUCKY kit! This paper and stamp set was a favorite of everyone I surveyed when the new catelog came out.  I’ve paired this kit with another favorite product — Memory Protector Flip Flaps. Everyone who comes will receive a free 4″x 6″ Flip Flap!

These fun pockets allow you to add extra pictures to your layouts. I used two flip flaps in the layout below to tell the story of my daughter’s first open water dive. This first picture shows how the layout appears when you open the album.

Flip up the first layer to the left to see a couple views of the dive site.

This final picture shows the view after flipping the second layer to the right. The underwater picture in the center is adhered to the underlying layout page.

We are also going to have fun playing with the new Kraft cardstock, wooden buttons and hemp. As always you will also get to choose a free 1″ stamp and there will be a door prize drawing.

For complete information including pictures of the Lucky kits available, see my Papercrafting Nights page.

Posted on

Lovin’ Level 1

During the month of April, you will get your choice from a selection of Level 1 kits FREE when you place an order of $100 or more online. You may be wondering just what a Level 1 kit includes and how to use it.

The kit comes with 4 sheets of preprinted cardstock which are perfect bases for your layouts. Two solid sheets of cardstock provide the other bases. You also get 2 sheets of B&T Duos paper and two sheets of coordinating Stickease. One page of the Stickease always includes an alphabet. The back of the Stickease sheets even have instructions for two layouts! How easy is that?

I made the three layouts below with just one Level 1 kit! The kit I chose is Perfect Day (which is one of the options for the Lovin’ Level 1 promotion). I added just a few items for dimension, including kraft borders, paper flowers ribbon, brads, 1 sheet of cardstock, and canvas badge buttons. Everything else I used was in the Level 1 kit.


The Level 1 kits are a great way to speed through your scrapbooking. Try one free this month by placing an order of $100 or more online.

Go to my website to start shopping. Be sure to check out the discounted items available exclusively online under the category of “While Supplies Last”.

Posted on

Badges and Flowers

Seems like an unlikely combination, but “Badges and Flowers” describes a the next papercrafting night which will be on April 8.

The “Badges” part of the title refers to the new Canvas Badge Buttons which will be given as a sample to everyone that comes. These self-adhesive embellishments can be used plain or inked up to match your layout.

I stamped the first badge below with the cherry stamp from the Mayberry stamp set using Smoothie and Olive ink. Then I sponged the edges with Cocoa. Isn’t that sweet?

I sponged the second larger button with Olive ink, then stamped the small flower with Cocoa ink. Those of you that are more creative will probably come up with lots of other ways to decorate these fun buttons.

The picture also shows what the badges look like without additional decoration. The smaller button is turned over to show the backing that is easily peeled to reveal adhesive.

The second part of the title refers to the FLOWERS pictured below.

Hopefully, you are not getting tired of making paper flowers because I just can’t seem to stop. This little arrangement was just too sweet to resist. It is simple to make using round and scalloped punches.

The night will also include:

  • An Easter Egg Hunt
  • Sample Rub-Ons
  • Creating a leather look from cardstock
  • Your choice of a 1×1 stamp
  • Door prize drawing

Additional information on this papercrafting night is here. Don’t miss out! Please email me if you are planning to come.

If you want to purchase a kit, I need to know by tomorrow (Thursday March 31). Follow this link to see pictures of the mini-kits available for $6. You can also purchase the full Mayberry Workshop On The Go for $29.95 (plus shipping and taxes).

Have a PEARFECT day!

Posted on

Pearfect Spring Day

This weekend, I squeezed in a few minutes (ok, a couple hours) to play around with the Mayberry Workshop On The Go kit. Because I am so ready for warmer weather, both projects I completed have a Spring feel.

The first thing I made is the All Occasion card below. You could send this card to wish a loved one well any special occasion like a birthday, interview or test day. You could also use it on an ordinary day to make it special day.

You can make four cards with this design by choosing the Card Making Mini Kit option for the April 8 Paper-crafting Night.

Recipe:

Mayberry B&T Duos paper

Mayberry My Acrylix Stamp Set

Friendship Small My Acrylix Stamp Set

Cocoa, Smoothie and Bamboo Cardstock and Ink

Next, I chose the layout below to celebrate the coming of spring. I listed ten things that I am looking forward to in the next couple months. It is now assembled and waiting for me to add some fun pictures from these upcoming events. For once I am a little ahead of schedule!

You can make a similar layout (choose your own Top Ten list) by choosing the Scrapbooking Mini Kit options for the April 8 Paper-crafting Night.

Recipe:

Mayberry B&T Duos Paper

Giggles Caps, Friendship Small and Sensational Seasons My Acrylix Stamp Sets

Cocoa, Olive and Colonial White Cardstock and Ink

“Give Me Ten” design from Originals by Jeanette Lynton

If you are interested in coming to the April Paper-crafting Night and make one of these kits, please drop me an emailto sign up.  Follow thislink for more details.

Posted on

Miracle Fun!!

There is still time to sign up for this month’s Show-Me-Scrapping craft night this coming Friday, March 4. I wanted to share with you some of the fun things that we will be doing. First, we will be making the fun pinwheels pictured below using the Miracle My Acrylix stamp set.

Did you know that you can use a fork to make perfectly symmetrical bows? Come on Friday to learn how!This technique is especially good if you want a double or triple bows. It is also good if you need several bows exactly the same size. No more guesswork!

Everyone who comes will also get to sample one of the new Kraft Color-Ready Borders. They can be colored, are self-adhesive and come in lots of fun designs. Pick your favorite to try on your current project.

If you missed last month’s craft night, you may also be interested in trying your hand at making some of the paper flowers pictured below.

All of this, plus door prizes and up to 5 hours of crafting time (6:30 – 11:30 pm) for $4. Please email me if you have any questions or to sign up.

Currently, I also have a couple extra each of the Miracle scrapbooking and card mini-kits (pictured below). You can choose from the 2-page (12″x12″) scrapbook layout or set of four cards. These are $6 each and include everything listed above for the craft night. You can also order both for $8.

Please email me right away if you would like one of these kits as quantities are limited.

Posted on

Magnificant Magnifique!

The purpose of this post is to show the versatility of a single My Reflections paper packet from Close To My Heart. I’ve chosen the Magnifique Level 2 Paper Packet. The cards in this picture demonstrate the variety of papers included in the pack and how the papers can take on completely different looks by matching with different card stock and embellishments. We will be making the last two cards at an upcoming workshop, Cards by the Dozen (details to come).

This nontraditional baby page was also made with Magnifique papers. Don’t I have the cutest nephews and niece?

I created the last 2-page layout for the Friday, January 14 crop night at my house. You are invited to come and make one for yourself. The cost is $6 which includes all materials, plus use of my stamps and other tools required to complete the layout. You will also learn to use generational stamping to make the layered embellishments on the layout.

The class is FREE if you preorder the Magnifique Workshop On the Go kit shown below. The kit includes a Level 2 paper pack (22 sheets), stamp set, mini-medley collection and guide. All of this plus the workshop is a great value at $29.95, plus tax and shipping. Preorder deadline is January 5.

Workshop starts at 6:30 pm. You can come for the workshop and stay to crop until 11:30 for 5 hours of uninterrupted scrapbooking! Bring your own cutting tools and adhesives of choice.

Please email me to RSVP for this fun evening by Friday, January 7.

Recipes (combined):

Magnifique Level 2 Paper Packet

Heart to Heart Stamp Set

Mini-Medley Shades of Chocolate

A Sip Stamp Set

A Little Thanks Stamp Set

Unity Stamp Set

Giggle Caps Stamp Set